AIモデルを使ったリアルタイム処理
概要
AISVisionを活用してAIモデルを作成し、それをThe Imaging Source社のSDKと統合することで、リアルタイムの画像処理を実現することが可能です。The Imaging Source社のSDKを使用してAI検査を行うシステムを構築する場合、以下のような概要と手順で進めることができます。
AISVisionとは
AISVisionは、ASUS IoT社が提供するノーコードのAIモデル作成ツールキットで、直感的なUIを通じて誰でも簡単にAIモデルを作成・検証できます。AIモデルを生成した後は、SDKを利用して既存のアプリケーションに容易に組み込むことができます。
サンプルプログラム
| 利用した開発環境 | Visual Studio™ 2022 |
|---|---|
| SDK | IC Imaging Control 3.5(Python, C#, VB.NET), AISVision1.6 |
| デバイスドライバ | Cam33U_setup,gigecam_setup,usbcam,AFU420_setup,usb2pro_drv |
| デバイス | TISカメラ全般(MIPI CSI-2&FPD-Link IIIカメラを除く) |
| サンプル(C#) | ic35-aisvision_cs3.5.zip |
| サンプル(VB.NET) | ー |
| exeファイル アプリケーション |
ー |
| 別途ファイル | ー |
| 関連参照URL | ー |
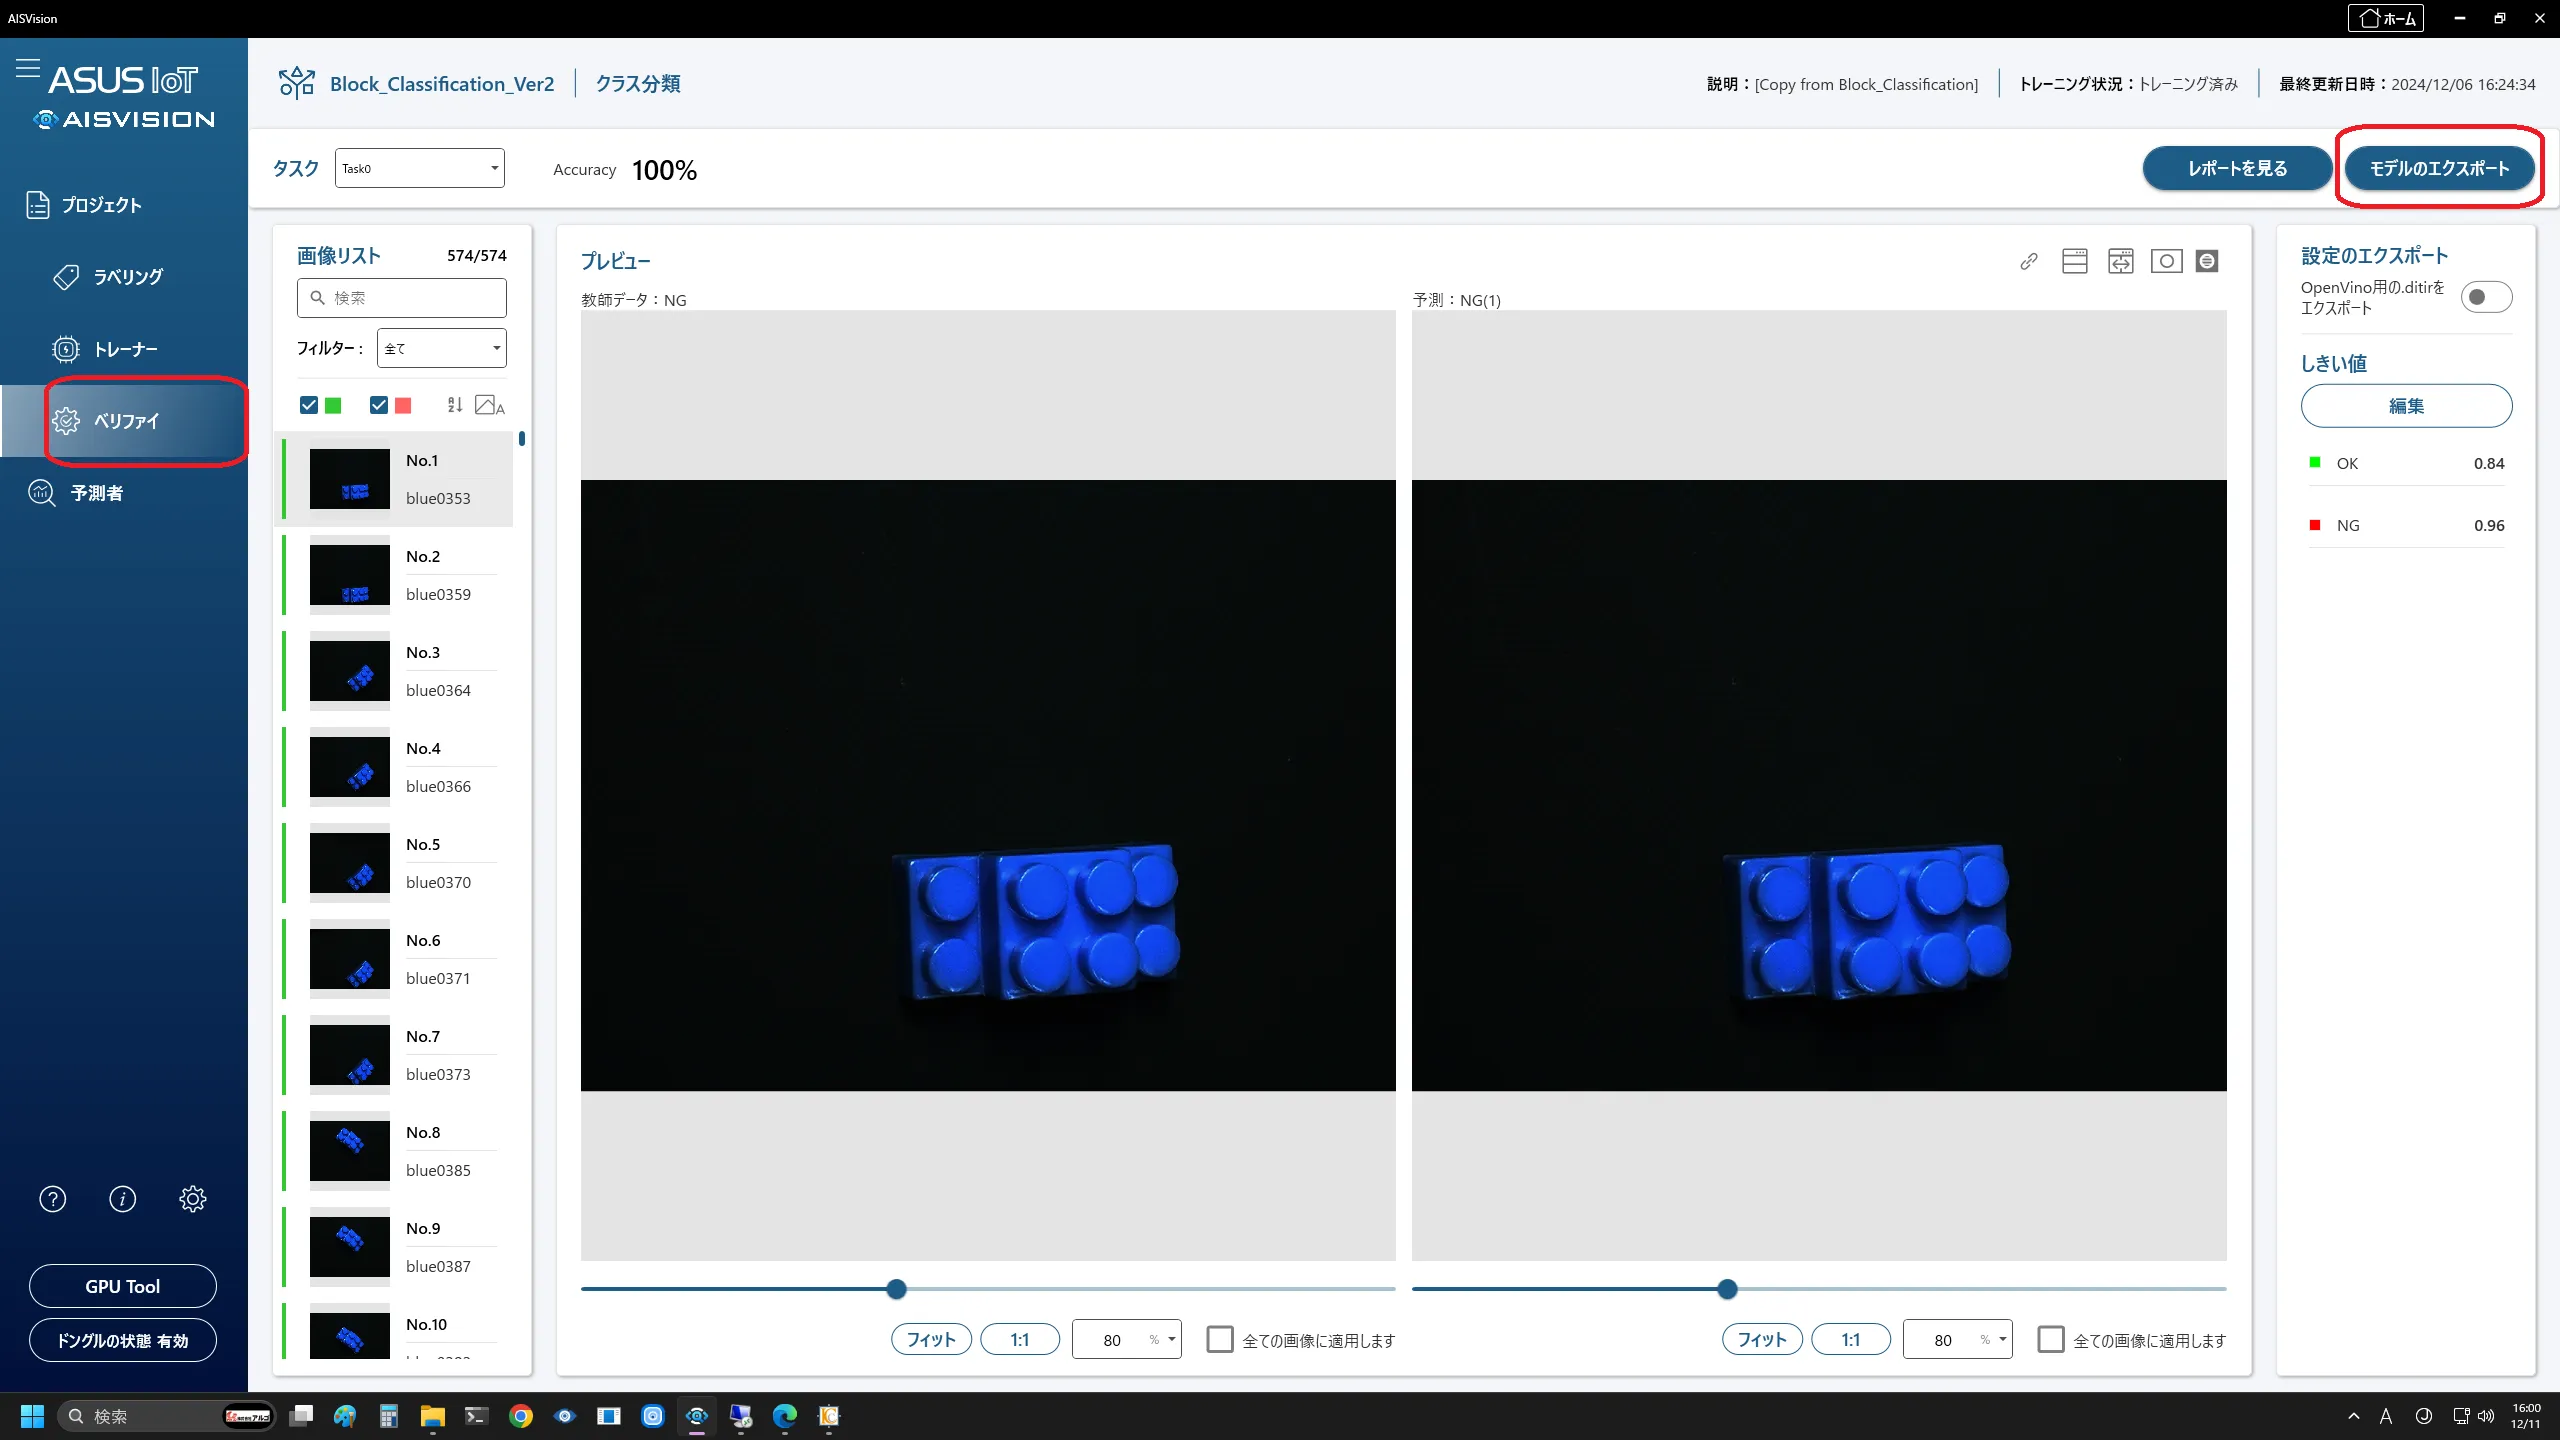
サンプルツールの外観
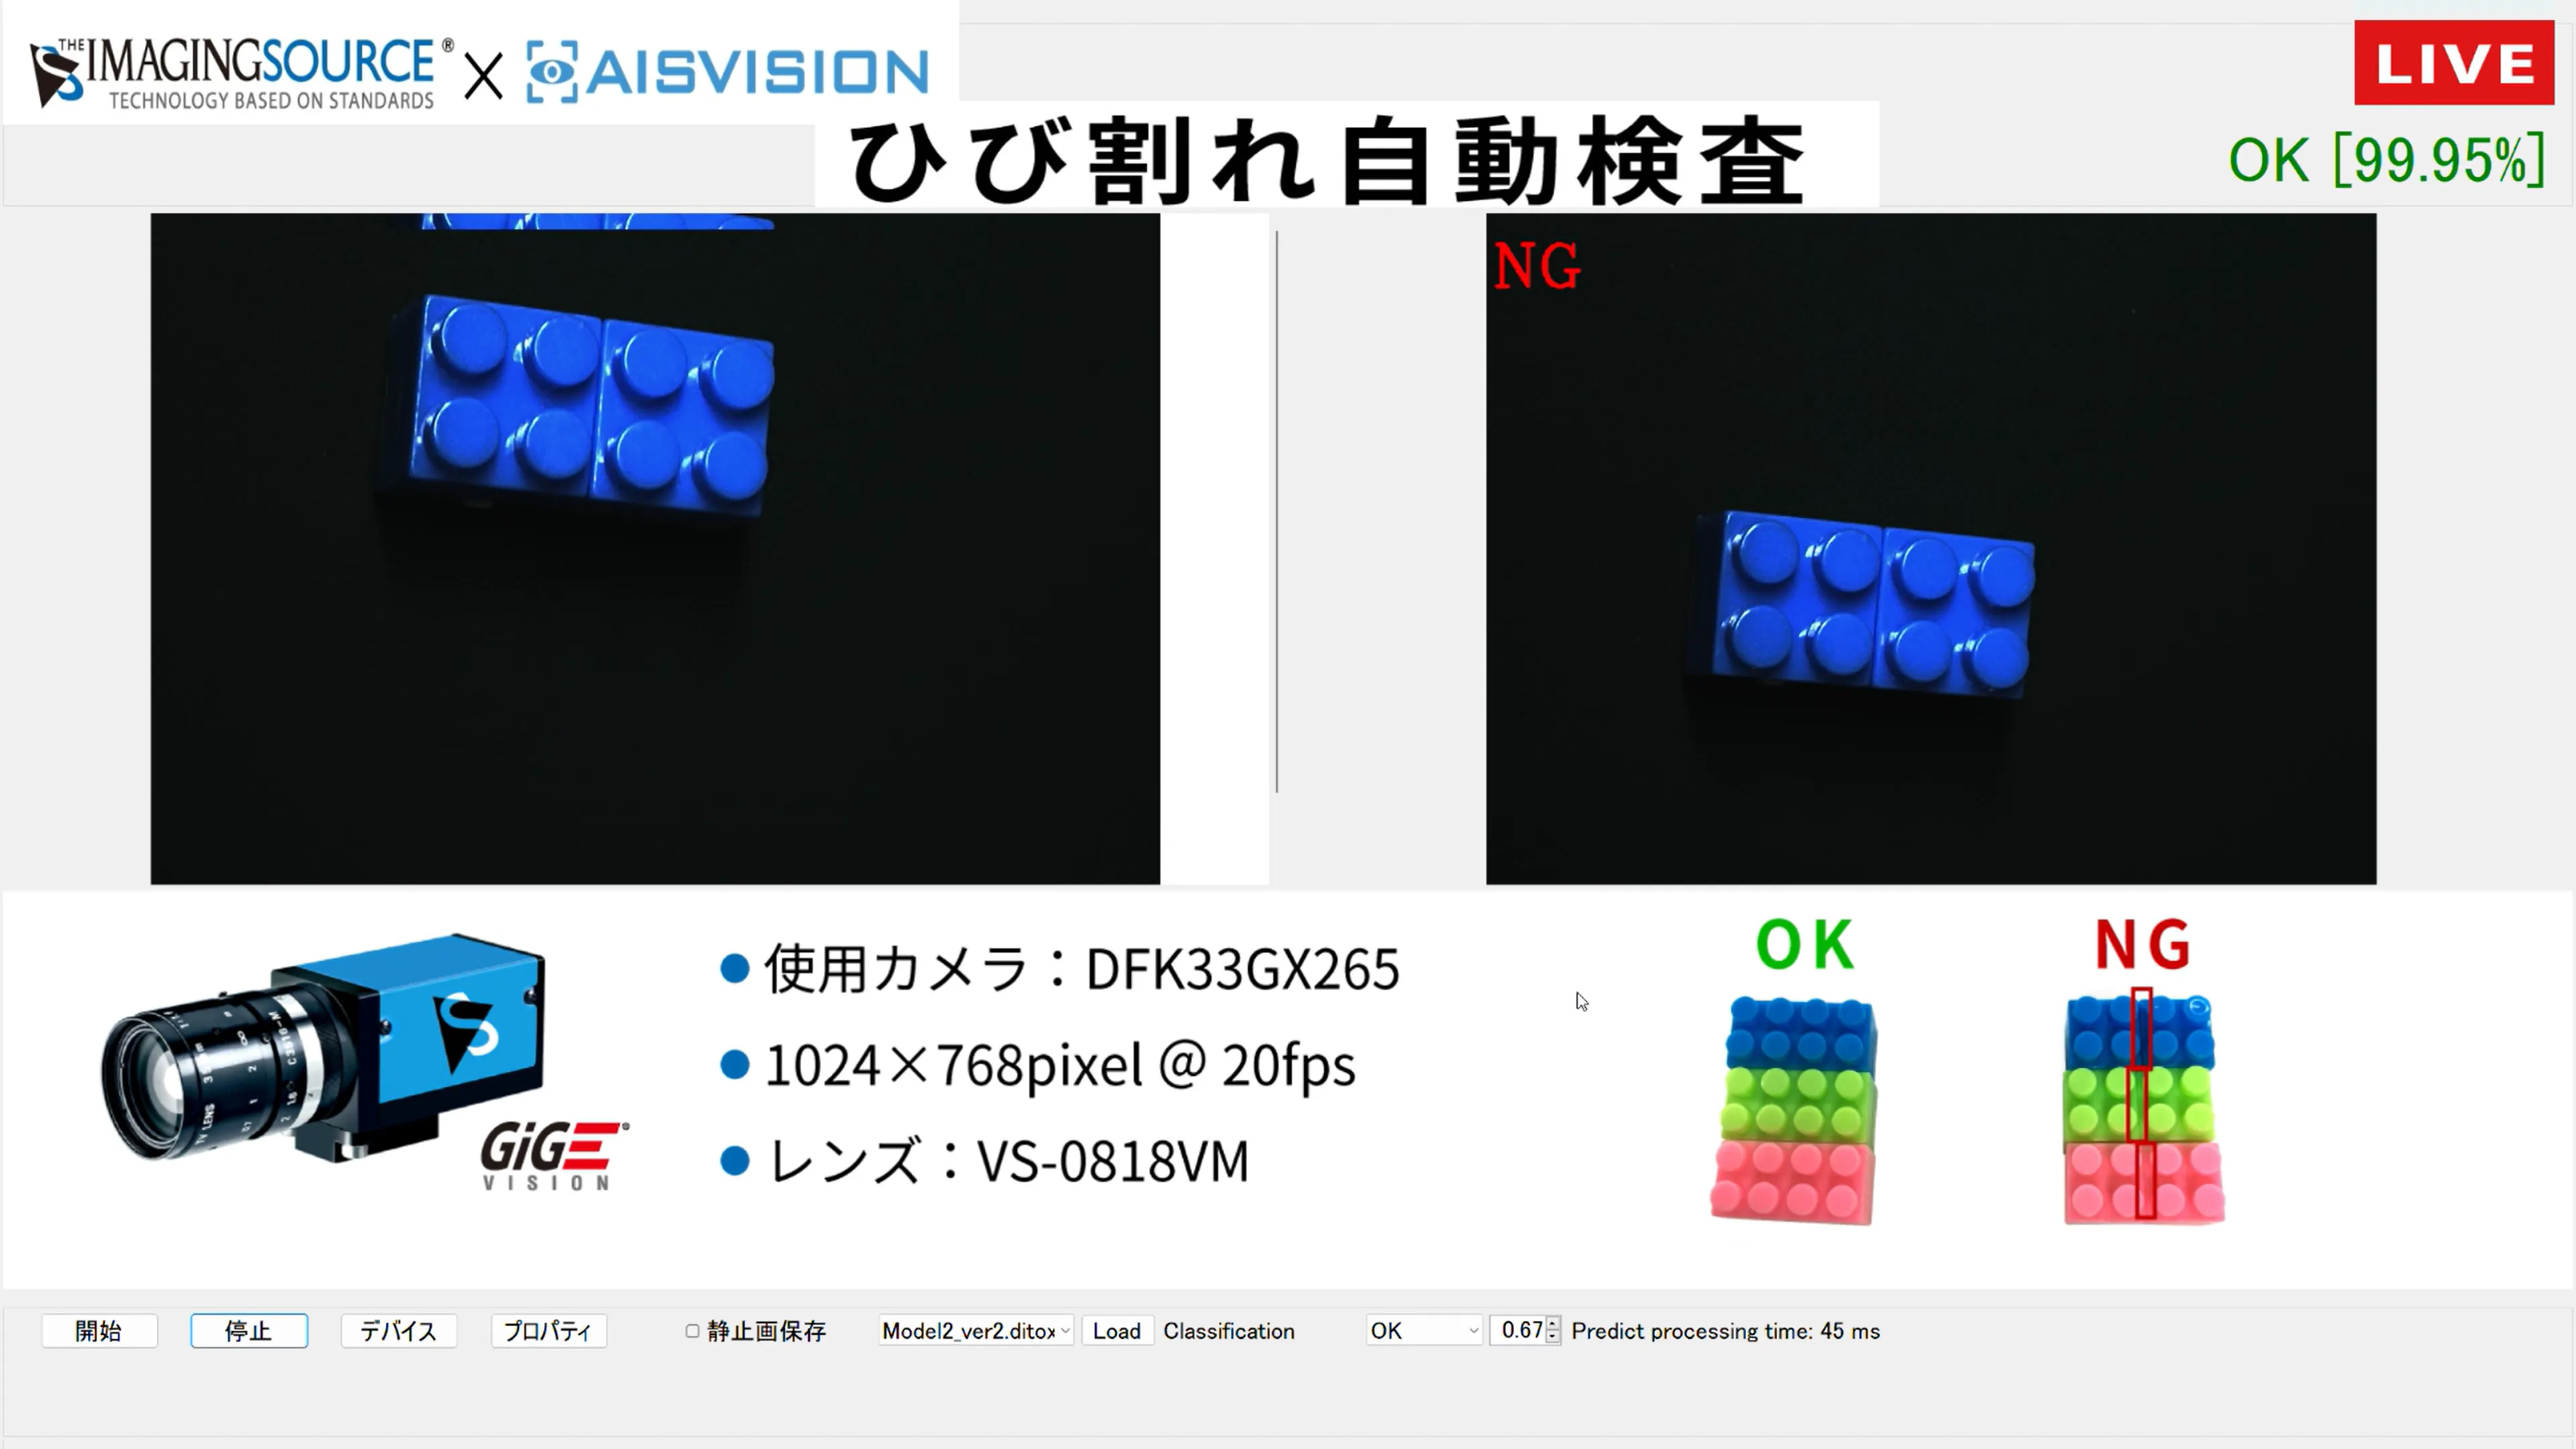
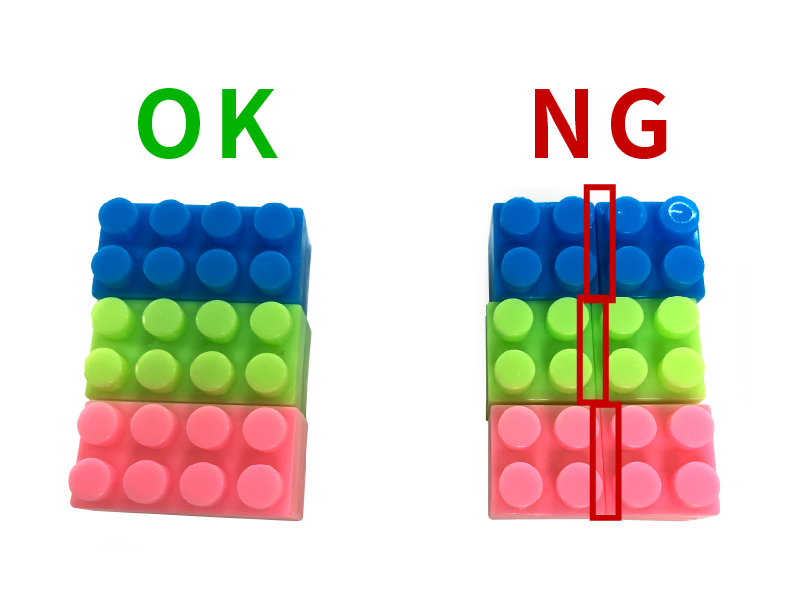
ブロックの真ん中に亀裂があったらNGとしています。
実際に展示した時の動画です。
ステップ1:OK画像とNG画像の収集
1-1.画像の収集
IC Captureを使用して、ひび割れ検査用のOK画像(正常)とNG画像(異常)を静止画保存していきます。
(※画像形式: JPEG、BMP、PNG)
IC Capture2.5上で、スペースキーを押下することで静止画を簡単に保存できます。
「OK」フォルダと「NG」フォルダに作成し、それぞれ1000枚以上のパターンの画像を保存します。
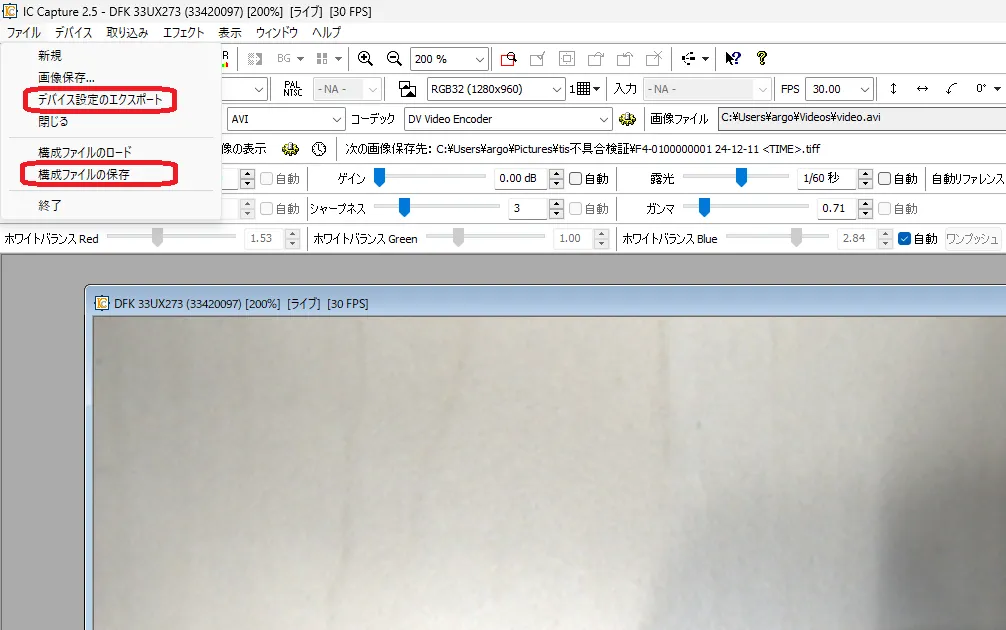
1-2.カメラ設定の保存
露光時間やゲインなど、設定したカメラのパラメータをエクスポートして保存します。
| デバイス設定のエクスポート | XML形式で保存します。後述の【ステップ4:プログラム作成】のカメラ設定を呼び出す際に使用します。 |
|---|---|
| 構成ファイルの保存 | IC Captureで同じパラメータを再利用する際に使用します。 |
ステップ2:AISVisionでAIモデルを作成
2-1.AISVisionのセットアップ
手順について下記のGPUドライバセットアップ、CUDAセットアップ、AISVisionセットアップまでセットアップしてください。
https://www.argocorp.com/software/DL/ASUS_IoT/index.html
なお、PCシステム要件は下記の通りです。
| OS | 64bit版 Windows 10, 11 |
|---|---|
| CPU | Intel® Core™ i7シリーズ(第12世代以降推奨) |
| メモリ | 16GB以上 |
| GPU | NVIDIA® GeForce™ RTX3060以上、6GB以上必須 |
2-3.AIモデルの作成
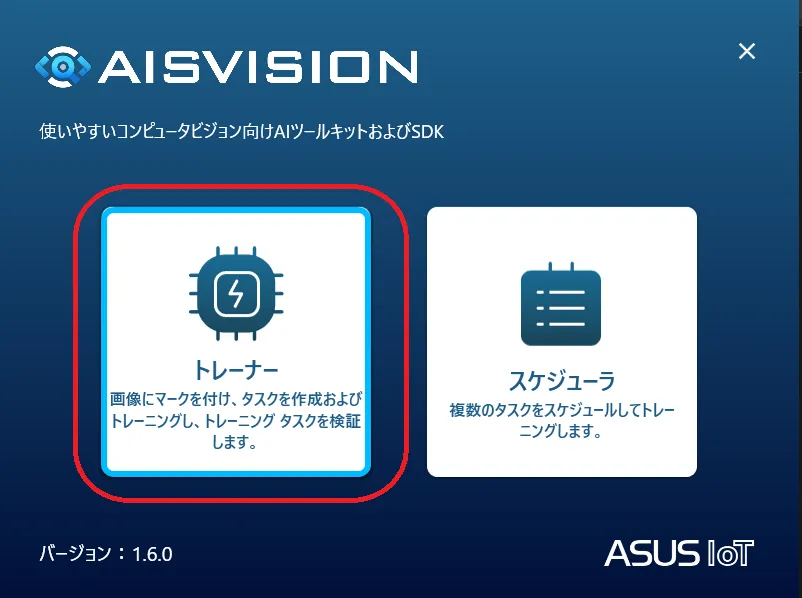
[トレーナー]を選択してくだい。
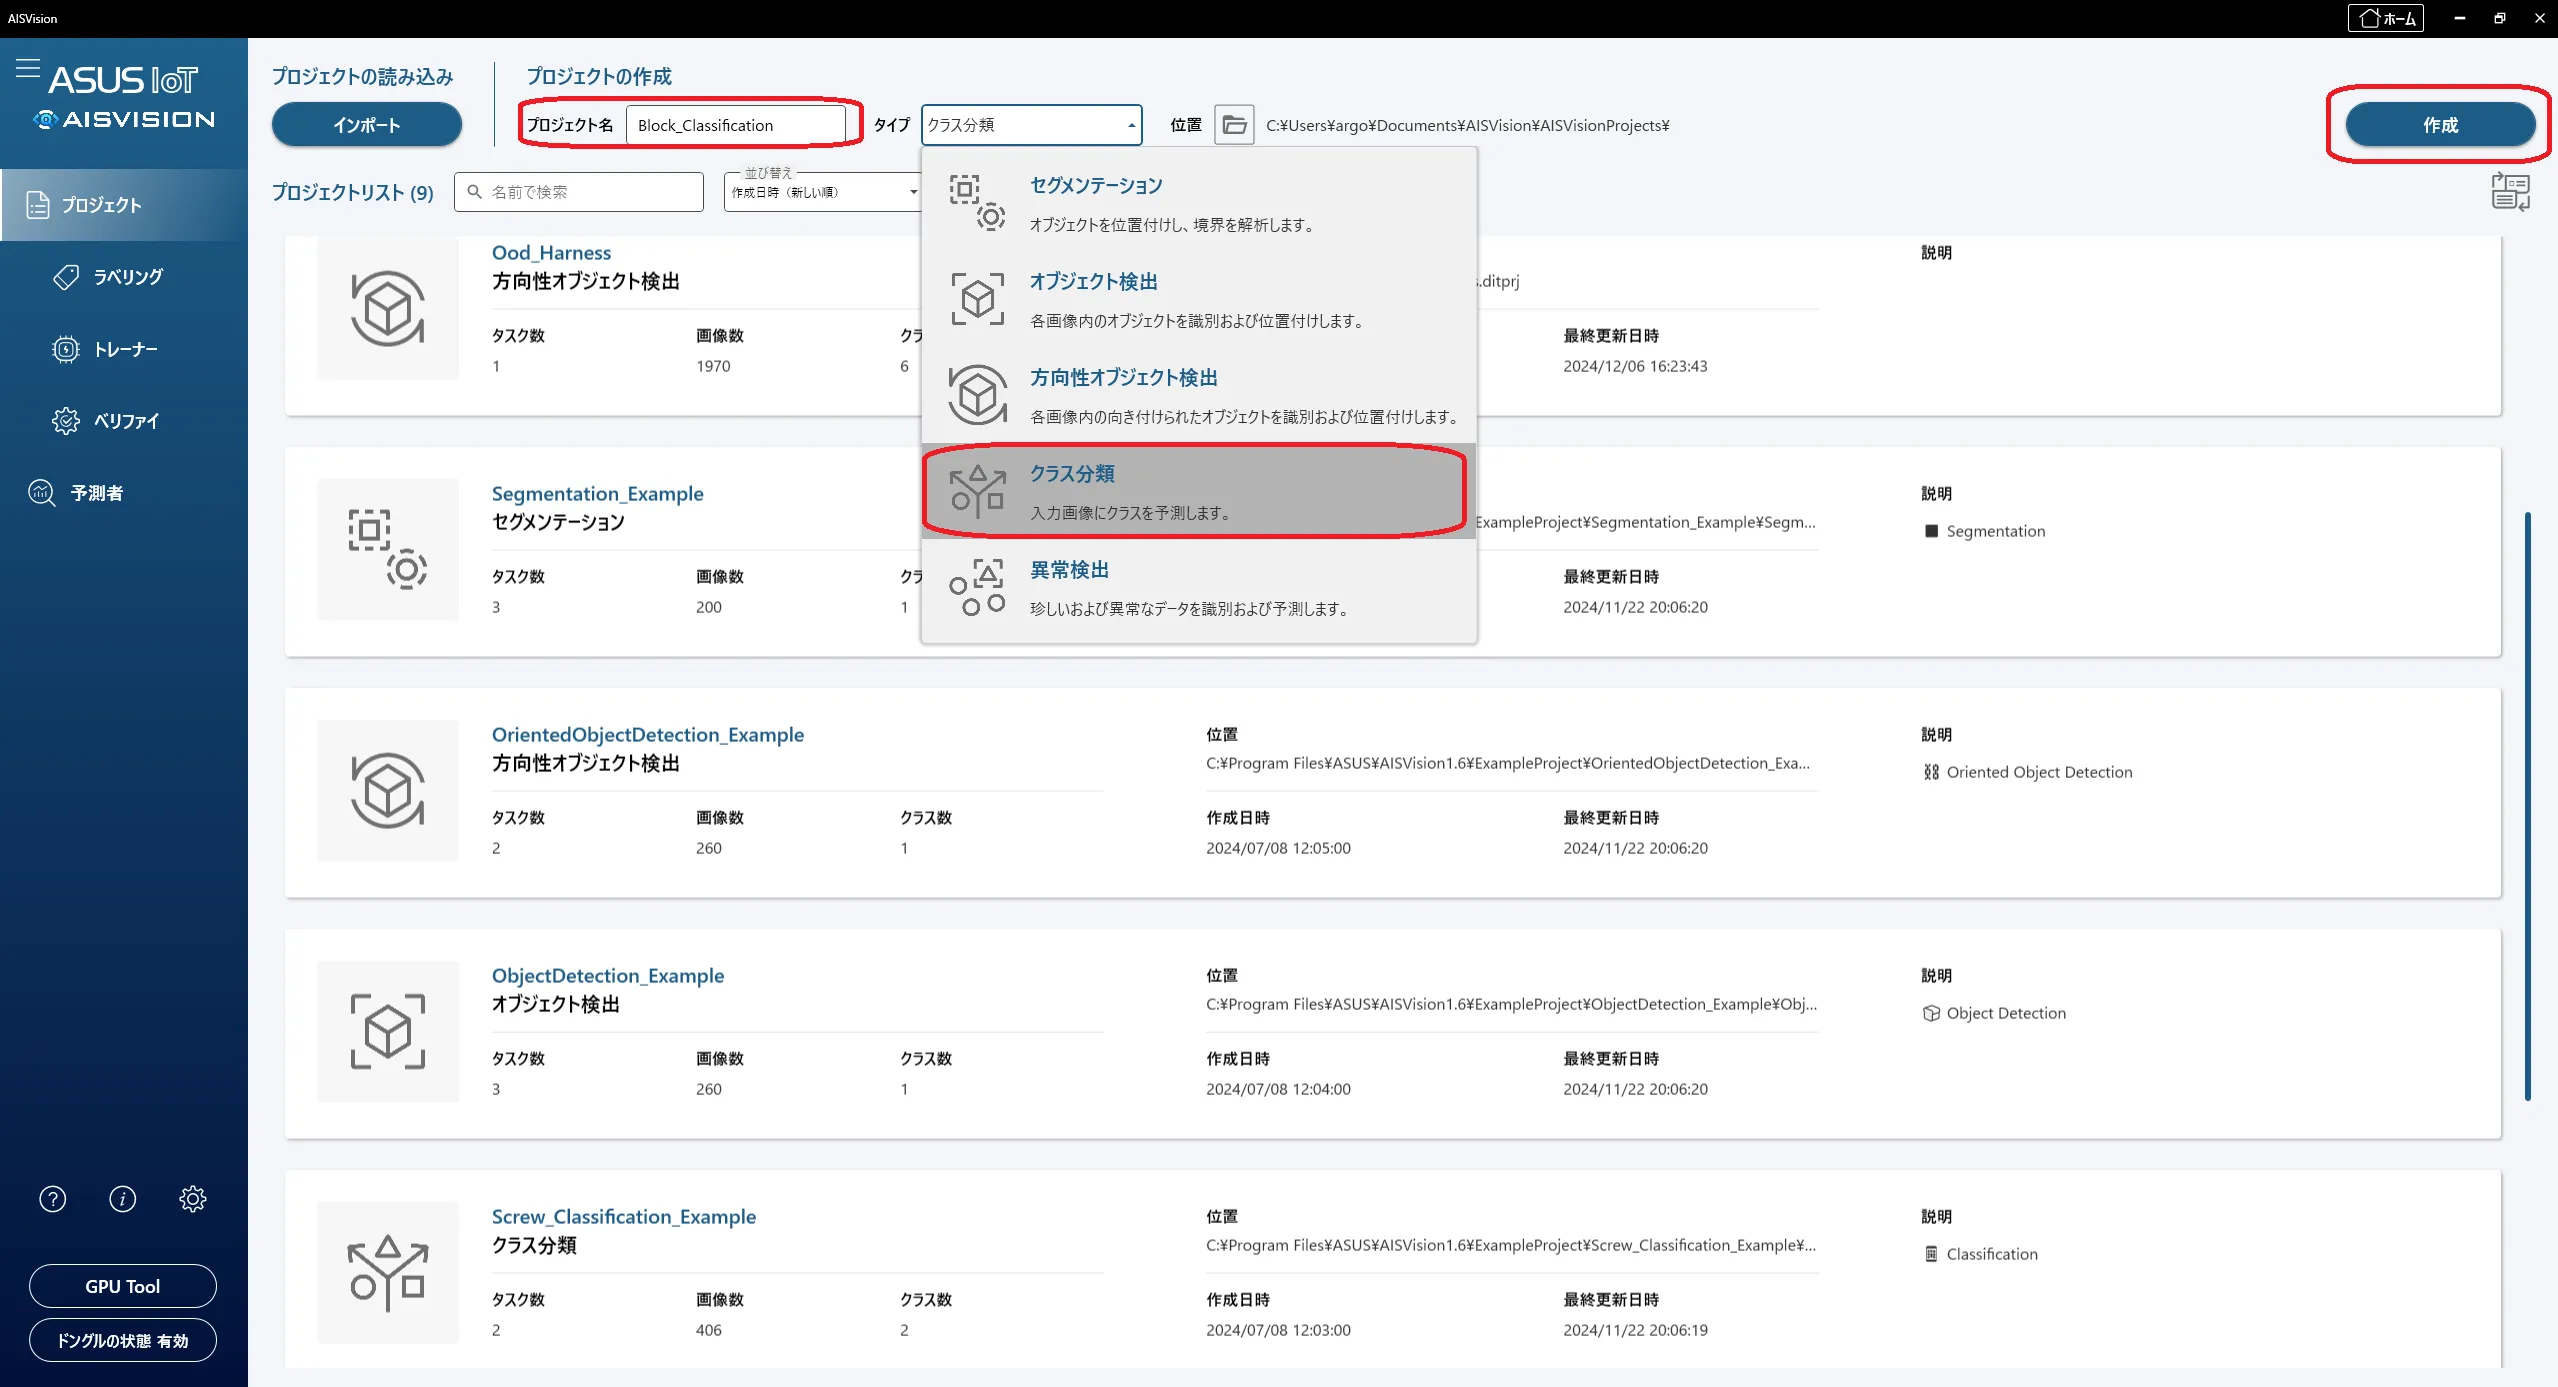
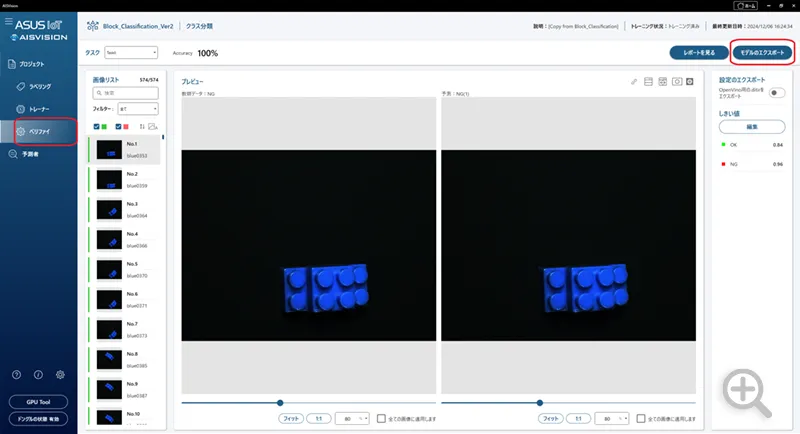
その後、プロジェクト画面で「ファイル名」と「タイプ」を選択後、[作成]ボタンをクリックしてください。ここではOK画像とNG画像をそれぞれ登録して区別するためにクラス分類を行っています。その他のモデルに関しては下記を参照してください。
https://www.argocorp.com/software/ASUS_IoT/AISVision.html

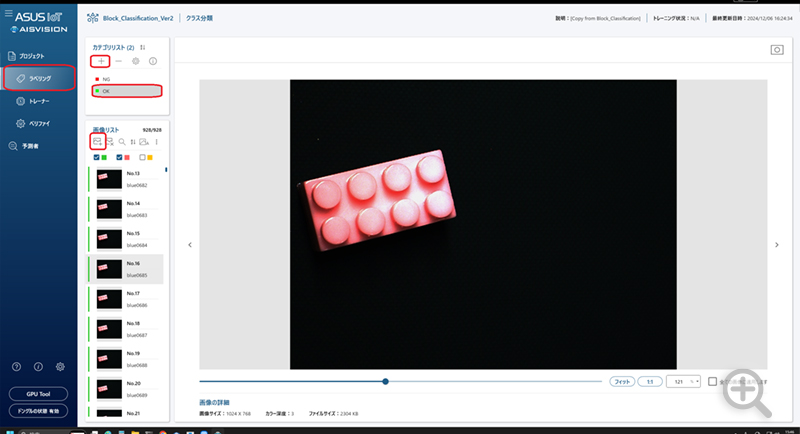
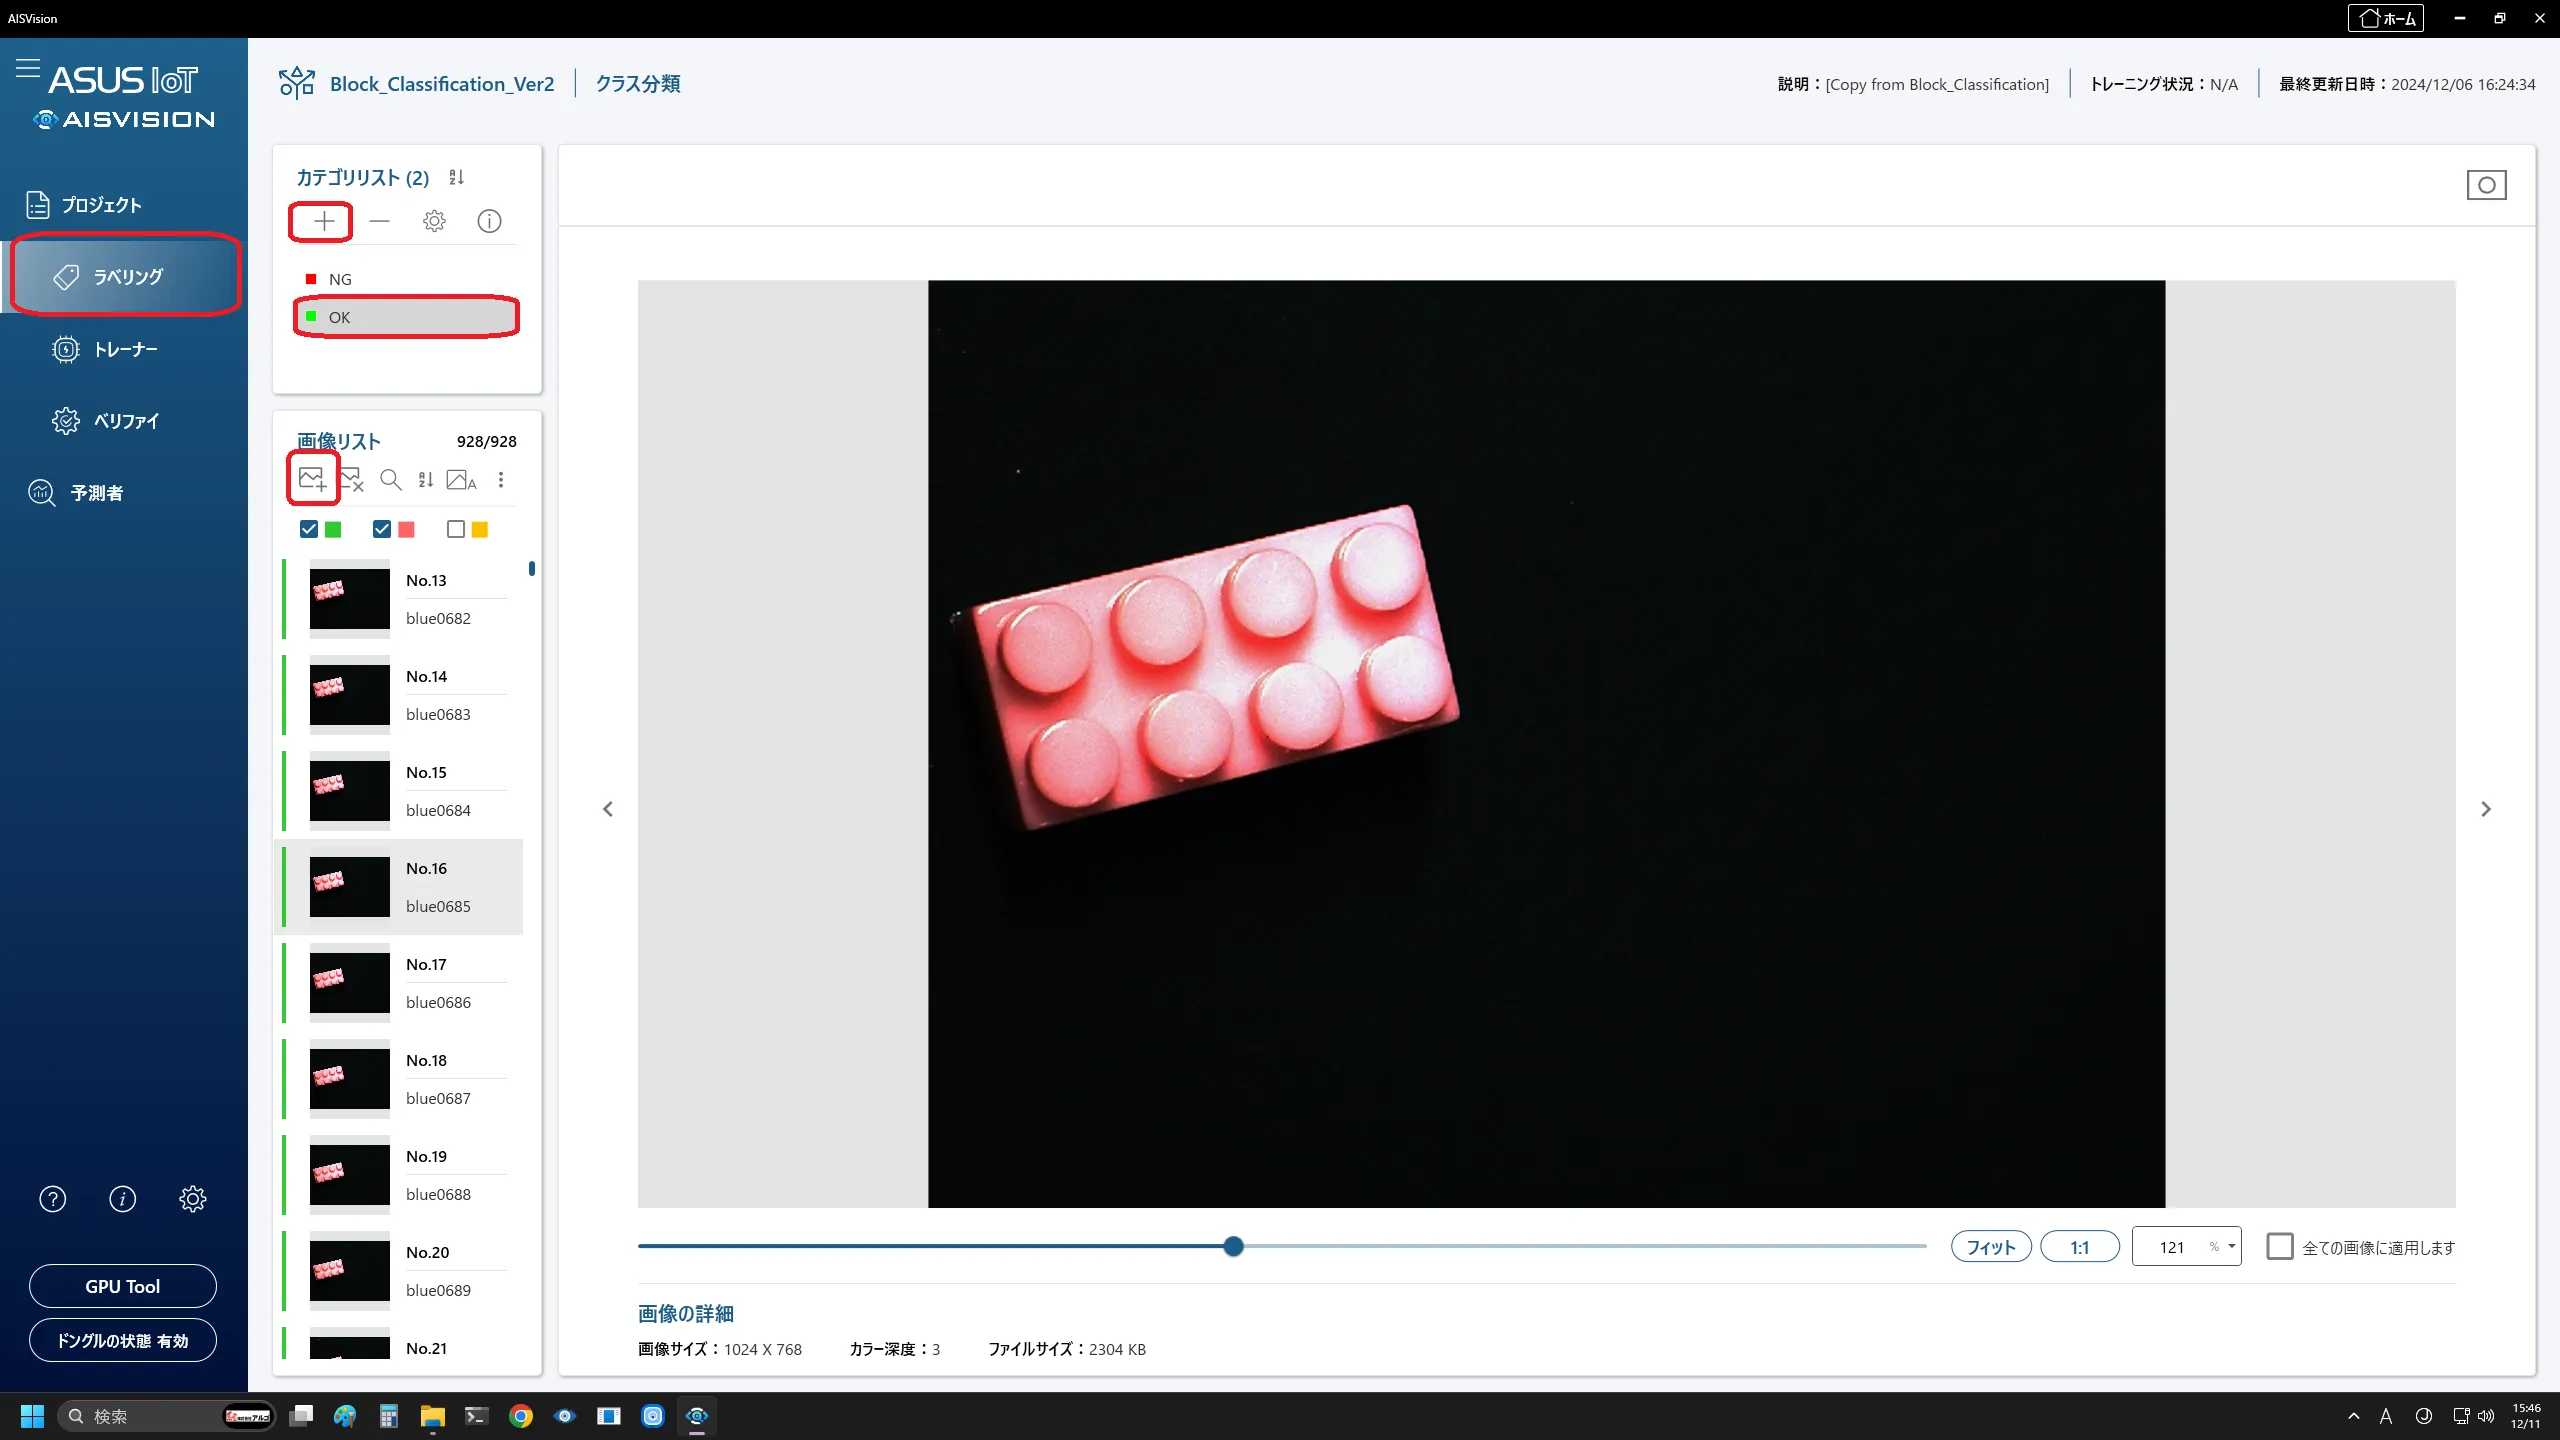
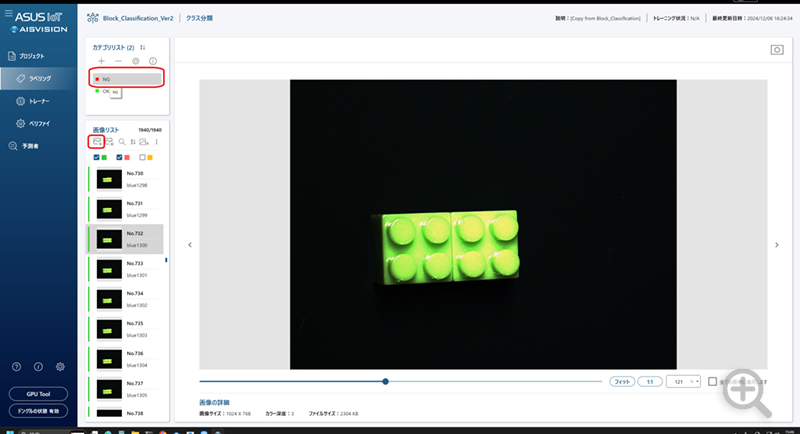
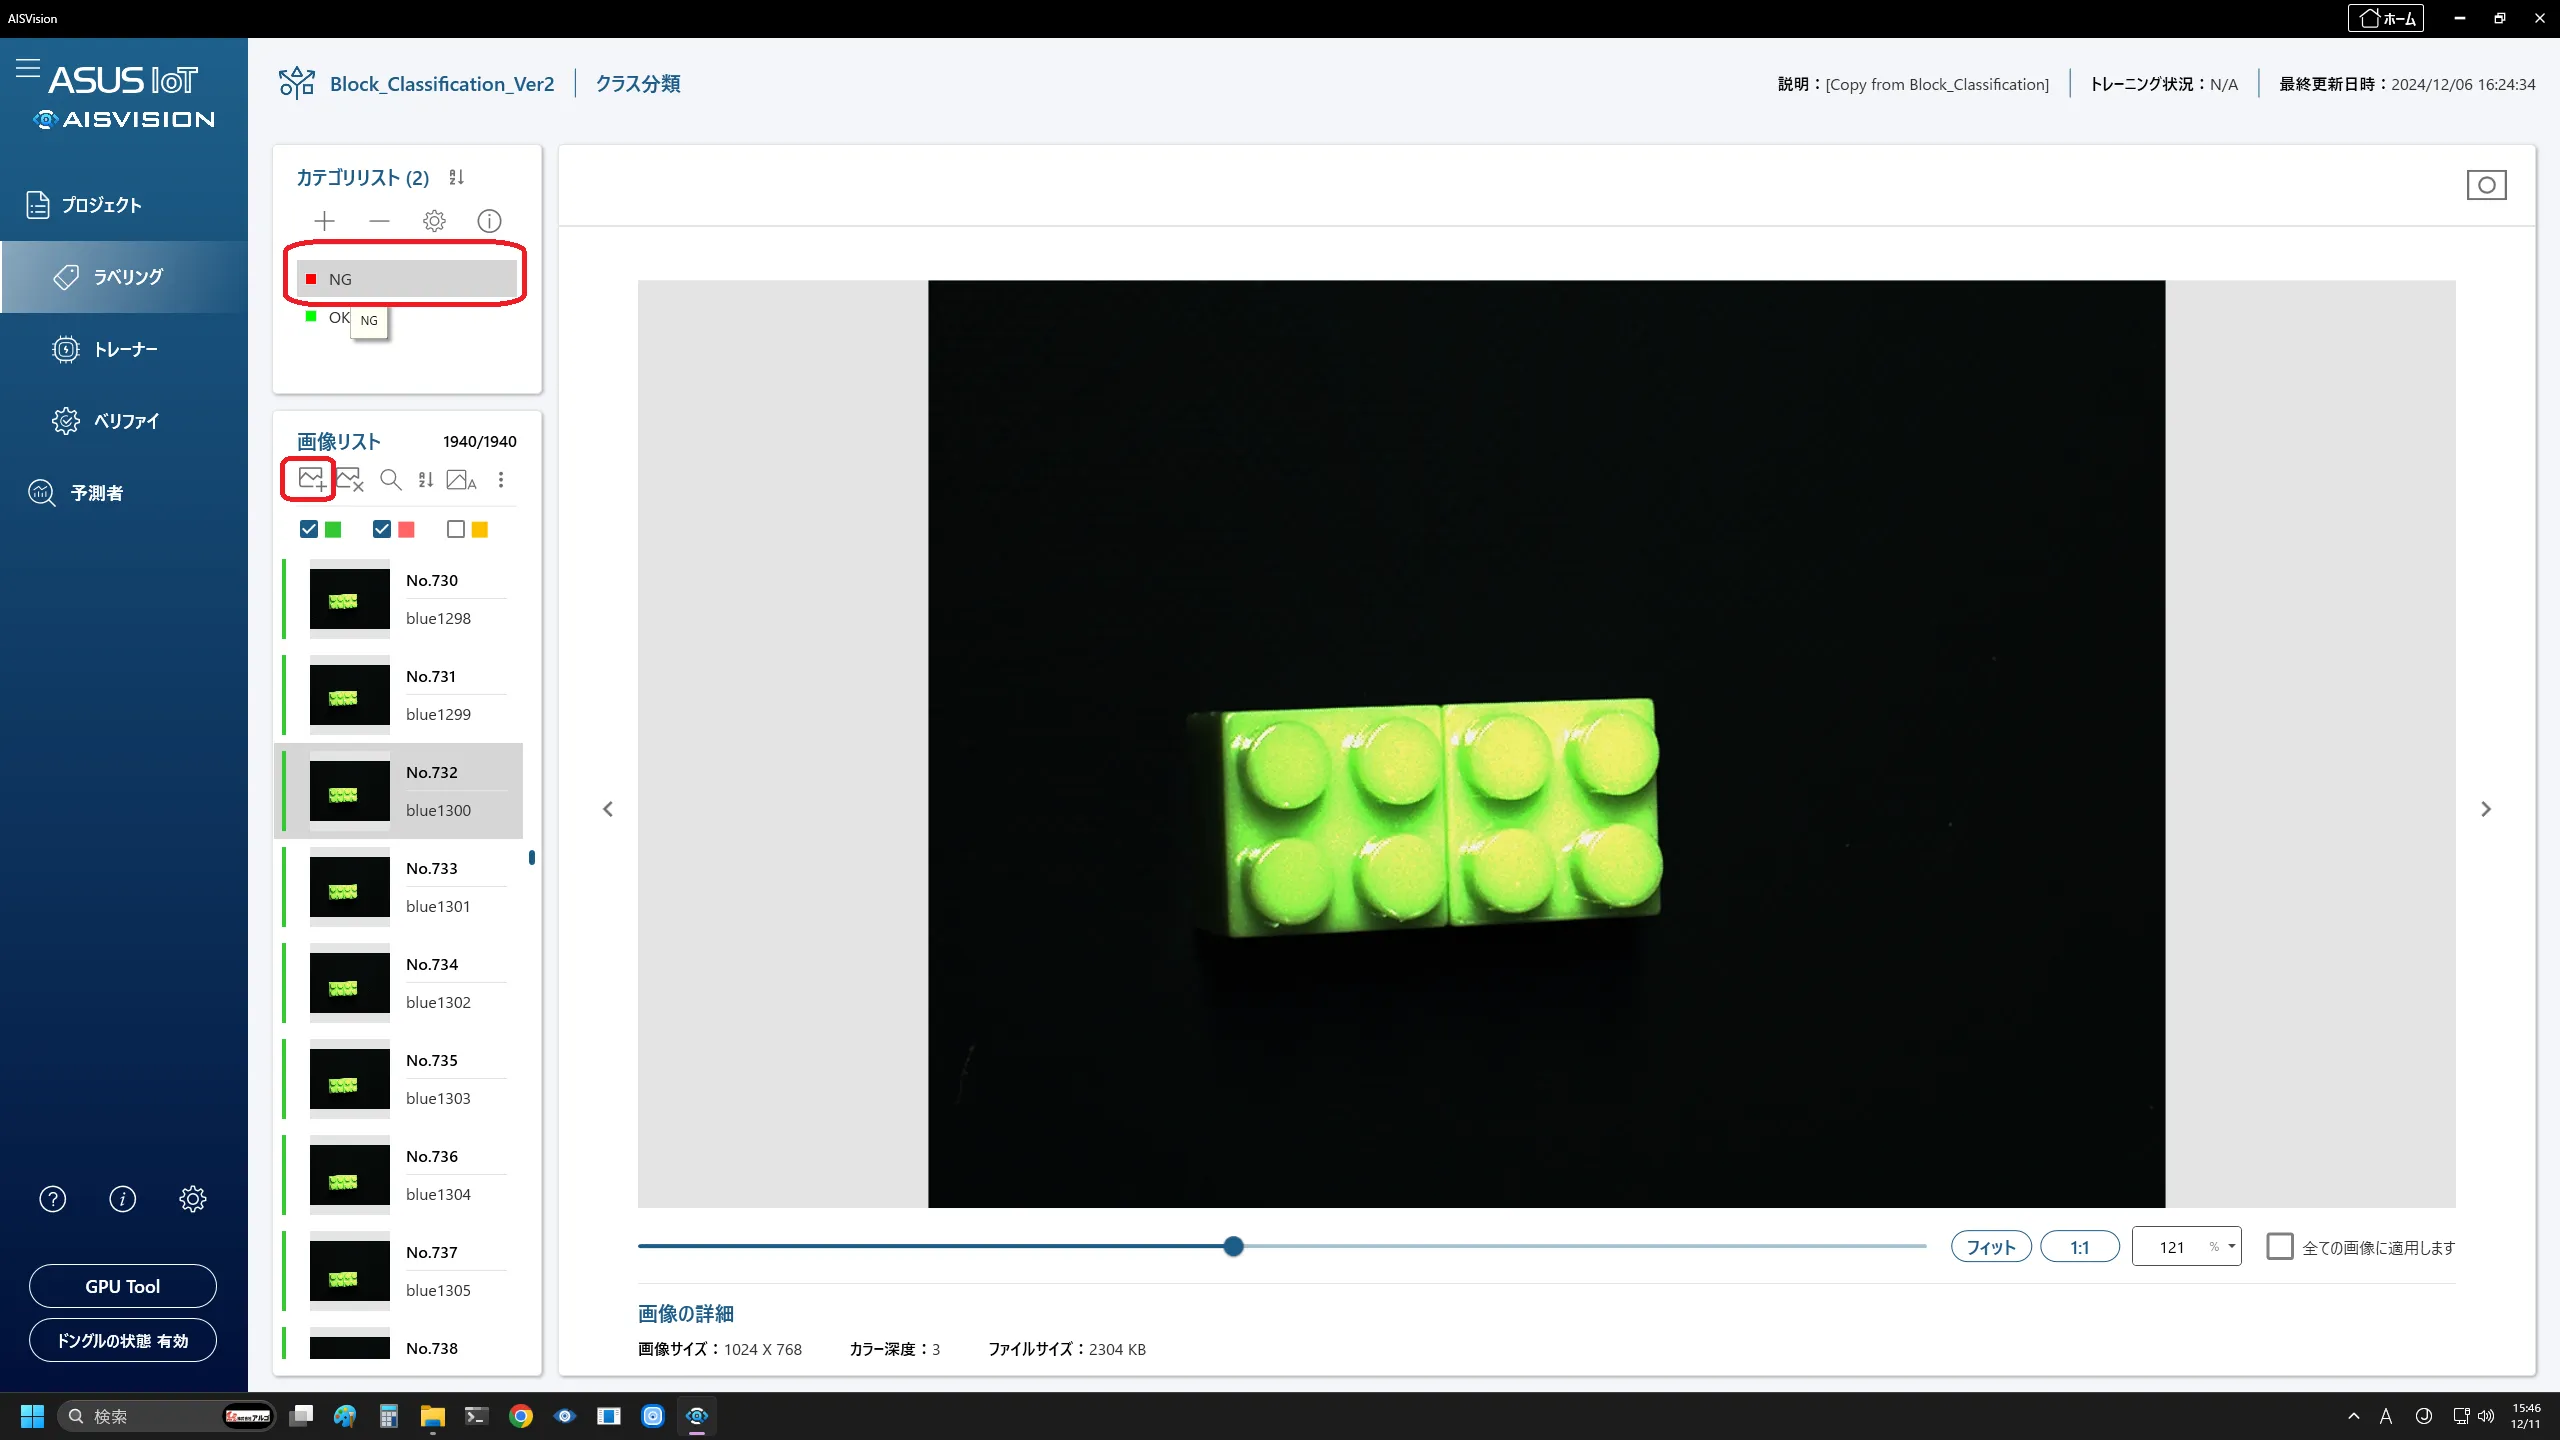
次にカメラをカテゴリリストの「+」マークでOKとNGを作成し、OK画像とNG画像のそれぞれに対して【1-1.画像の収集】で保存した画像ファイルを入れます。
ブロック割れなしの画像(OK画像)の登録
ブロック割れありの画像(NG画像)の登録
![[トレーナー]タブで選択した画像を学習](img/ic35-aisvision_2-4-01s.webp)
![[トレーナー]タブで選択した画像を学習](img/ic35-aisvision_2-4-01.webp)
![[トレーナー]タブで選択した画像を学習](img/ic35-aisvision_2-4-02s.webp)
![[トレーナー]タブで選択した画像を学習](img/ic35-aisvision_2-4-02.webp)
ステップ3:Visual Studioで使うための準備
3-1.AISVision Predict SDKのインストール
下記のURLに沿ってAISVision Predict SDKをダウンロードしてください。
https://www.argocorp.com/software/DL/ASUS_IoT/index.html#tab4
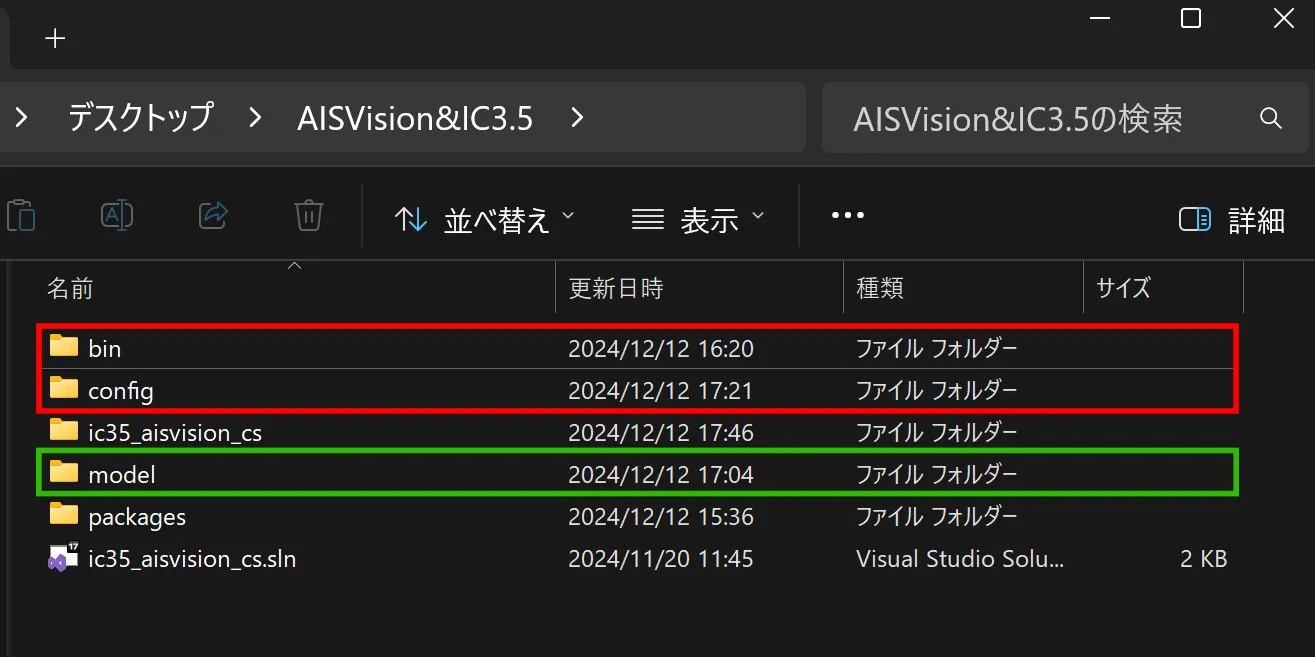
3-2.ライブラリなどの配置
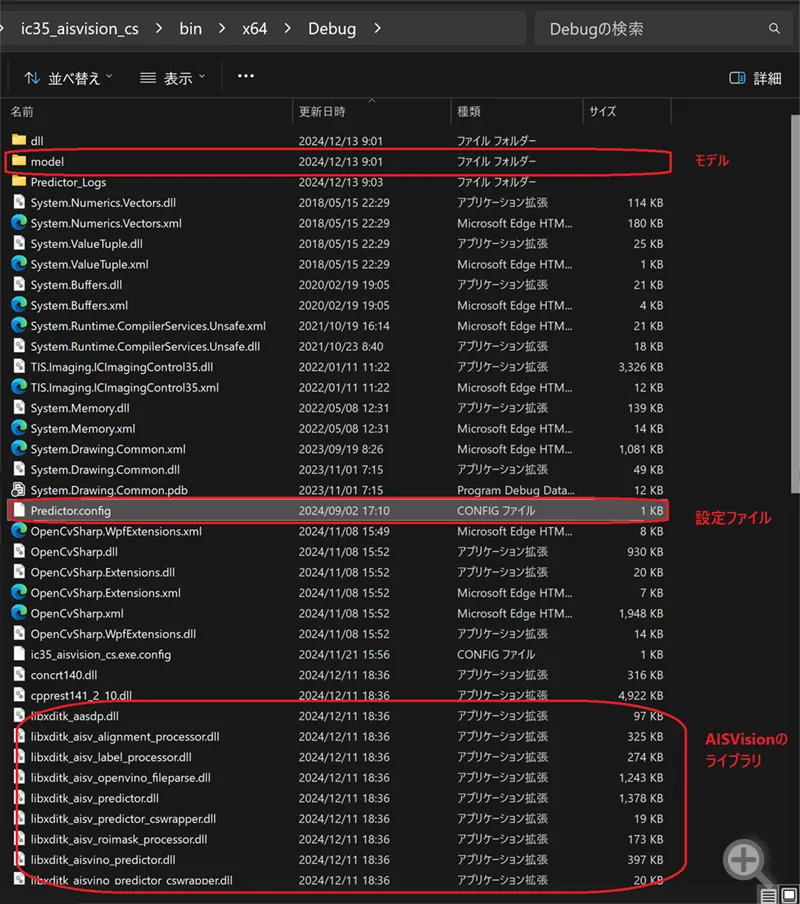
SDKにある「bin」と「config」をソリューションファイルと同じフォルダ内に配置してください。また、「model」フォルダを作成し、ステップ2で作成した「ditoxファイル」を入れてください。
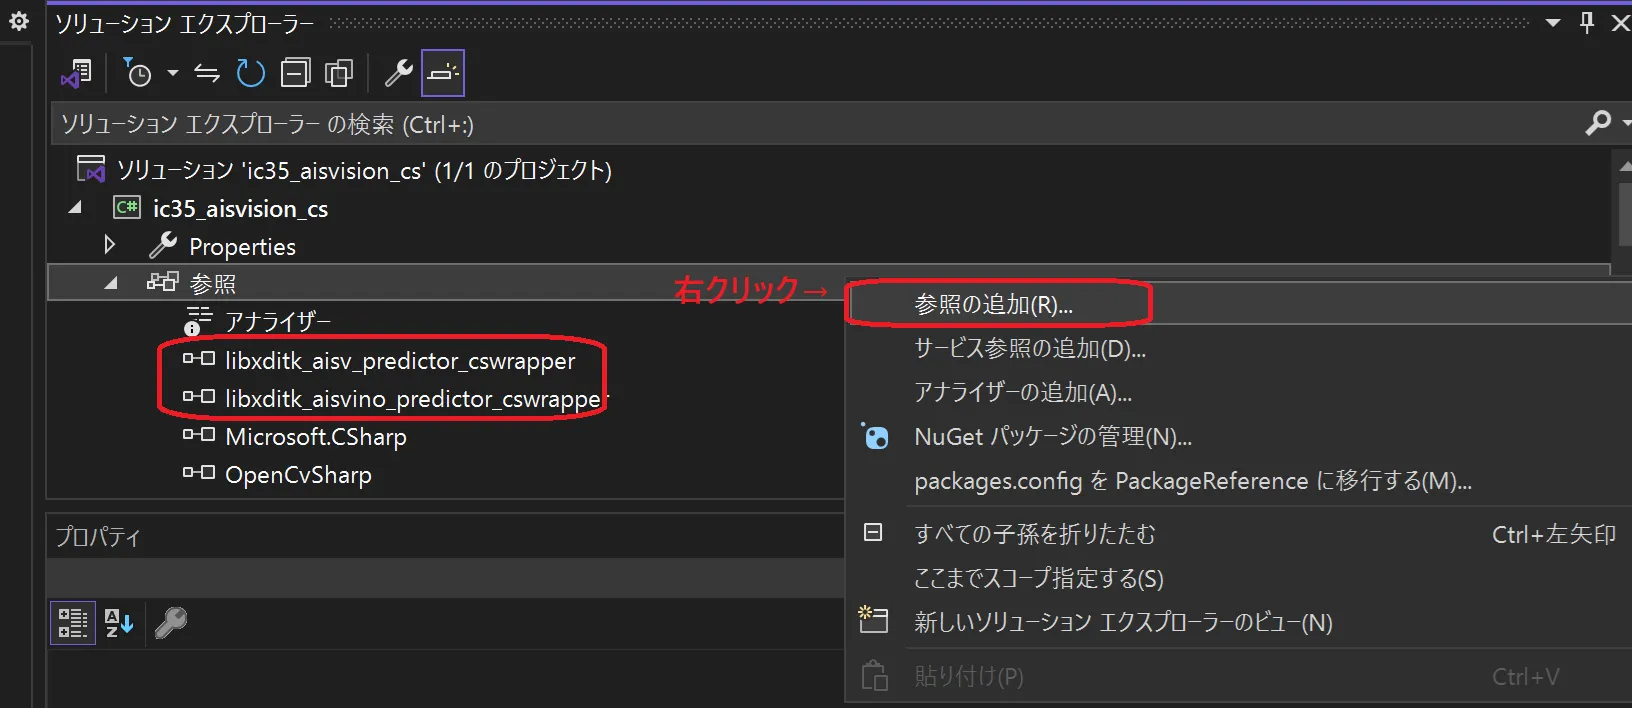
3-3.dllの参照設定
ソリューションエクスプローラ内の[参照]の上で右クリックをして、[参照の追加...]を選択し、「libxditk_aisvino_predictor_cswrapper」と「libxditk_aisv_predictor_cswrapper」を選択してください。
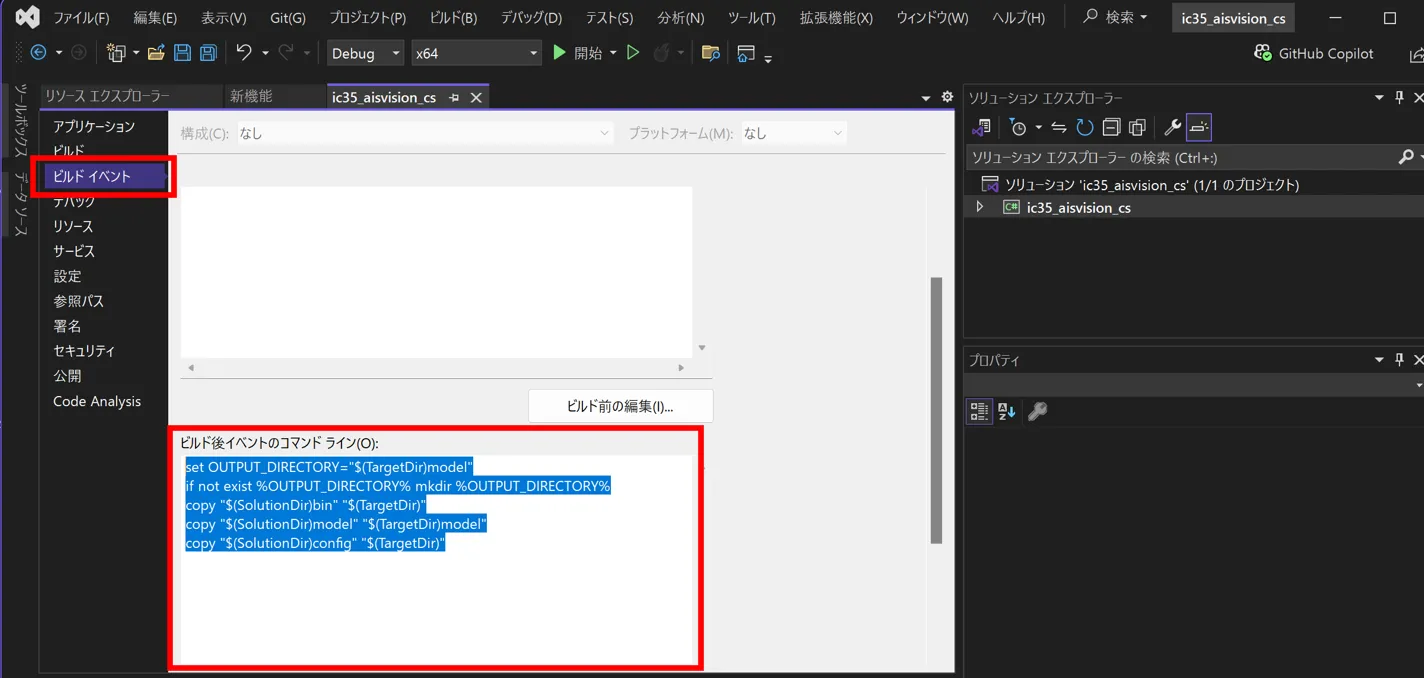
3-4.dllをexeと同じフォルダにコピー
exeファイルと同じ階層にAISVisionに関連するライブラリを配置するために、プロジェクトのプロパティにあるビルドイベント:ビルド後イベントのコマンドラインの箇所に下記のように記載してください。
set OUTPUT_DIRECTORY="$(TargetDir)model"
if not exist %OUTPUT_DIRECTORY% mkdir %OUTPUT_DIRECTORY%
copy "$(SolutionDir)bin" "$(TargetDir)"
copy "$(SolutionDir)model" "$(TargetDir)model"
copy "$(SolutionDir)config" "$(TargetDir)"
ビルド後に下記のように必要なファイル群がexeファイルと同じ階層に配置され、exeファイルが動作するようになります。
ステップ4:プログラム作成
Form Loadのイベント
private void Form1_Load(object sender, EventArgs e)
{
   //経過時間計測用のカウンタ周期情報取得
   QueryPerformanceFrequency(ref timefrequencyCounter);

   //Log用ListBox準備
   var log_header = new ColumnHeader();
   log_header.Width = 700;
   log_header.Text = "Log";
   //LogBox.Columns.Add(log_header);

   //Result用ListBox準備
   var result_header = new ColumnHeader();
   result_header.Width = 700;
   result_header.Text = "Result";

   flag_closing = false;

   try
   {
       //AISVision初期化
       string dirpath = AppDomain.CurrentDomain.BaseDirectory + "model";
       string[] extensions = { ".ditox", ".ditir" };

       filepaths = Directory.EnumerateFiles(dirpath, "*.*", SearchOption.AllDirectories)
                   .Where(file => extensions.Contains(Path.GetExtension(file)))
                   .ToList();
       var filenames = filepaths.Select(Path.GetFileName).ToList();
       if (filenames.Count == 0)
       {
           MessageBox.Show("No AImodel On PC", "Error", MessageBoxButtons.OK, MessageBoxIcon.Error);
           this.Close();
           return;
       }

       foreach (var name in filenames)
       {
           comboBox_modelpath.Items.Add(name);
       }

       if (comboBox_modelpath.Items.Count != 0)
       {
           comboBox_modelpath.SelectedIndex = 0;
           comboBox_modelpath.Enabled = true;
           button_modelload.Enabled = true;
       }

       //AIモデル読み込み
       readAIModel();

       //IC Imaging Control3.5でカメラオープン
       if (!icImagingControl1.DeviceValid)
       {
           icImagingControl1.LoadShowSaveDeviceState("lastDevice.xml");
       }
       else
       {
           MessageBox.Show("デバイスが見つかりませんでした。", "Error", MessageBoxButtons.OK, MessageBoxIcon.Error);
           this.Close();
           return;
       }

       icImagingControl1.LiveDisplayDefault = false;
       icImagingControl1.LiveCaptureLastImage = false;
       icImagingControl1.LiveDisplay = false; //ライブ画像を表示しない
       icImagingControl1.Sink = new FrameQueueSink(mDataStream_NewBufferEvent, TIS.Imaging.MediaSubtypes.RGB32, 5);

       if(icImagingControl1.DeviceValid) icImagingControl1.LiveStart();
       icImagingControl1.LiveDisplayZoomFactor = (float)0.98f;


       this.WindowState = FormWindowState.Maximized;


       // PictureBox のサイズを更新
       pictureBox_result.Size = new System.Drawing.Size(
           (int)(icImagingControl1.Width * (float)1.5f),
           (int)(icImagingControl1.Height * (float)1.5f)
       );

   }
   catch (ICException ex)
   {
       addlog("ErrorType:" + ex.GetType().ToString());
       addlog("ErrorException:" + ex.GetBaseException().ToString());
       addlog("Error:Form1_Load");
   }
}
プログラムが起動すると、Form1_Load メソッドが呼び出され、以下の処理が実行されます。
(1)AISVisionの初期化
AISVisionを初期化し、readAIModelメソッドを用いてAISVisionモデルを読み込みます。
(2)デバイス設定のロード
icImagingControl1.LoadShowSaveDeviceState("lastDevice.xml") を使用して、以前に保存されたデバイス設定(lastDevice.xml:【1-2】で作成したxmlファイル)をロードし、カメラの設定ダイアログ画面を立ち上げます。
(3)リアルタイム処理の設定
カメラをFrameQueueSinkに設定し、リアルタイム処理を可能にします。この設定により、カメラからのフレームデータが取得されるたびに、後述のmDataStream_NewBufferEventコールバック関数が呼び出されるようになります。
(4)ライブスタート
icImagingControl1.LiveStart()を呼び出して、カメラの撮影を開始します。
AIモデルの読み込み
private void readAIModel()
{

    //読み込み済みなら一度閉じる
    if (predict.CheckSession())
    {
        predict.Dispose();
        predict = new Predictor();
    }

    var path = filepaths.ElementAt(comboBox_modelpath.SelectedIndex);
    if (Path.GetFileName(path).Contains("ditox") == true)
    {
        //AIモデルファイル読み込み
        predict.LoadModel(path, true, 0);
        //読み込み成否チェック
        if (predict.CheckSession())
        {
            //モデル情報取得
            predict.GetModelInfo(out modelInfo);
            label_modelinfo.Text = modelInfo.ModelType.ToString();
            addlog("");
            addlog("AISVision Predicter Opened");
            addlog("Model Type: " + modelInfo.ModelType.ToString());
            addlog("Model Status: " + modelInfo.ModelStatus.ToString());
            addlog("Project Name: " + modelInfo.ProjectName.ToString());
            addlog("Task Name: " + modelInfo.TaskName.ToString());

            comboBox_classthreshold.Items.Clear();
            classlist.Clear();
            if (modelInfo.ModelType == Predictor.ModelType.Classification || modelInfo.ModelType == Predictor.ModelType.ObjectDetection || modelInfo.ModelType == Predictor.ModelType.OrientedObjectDetection)
            {
                numericUpDown_classthresholdvalue.Enabled = true;
                comboBox_classthreshold.Enabled = true;
                //カテゴリ情報取得
                Predictor.AisvCategoryInfo cat_temp = new Predictor.AisvCategoryInfo();
                predict.GetCategoryInfo(out cat_temp);
                for (int i = 0; i < cat_temp.Size; ++i)
                {
                    classlist.Add(cat_temp.CategoryList[i].Name, cat_temp.CategoryList[i].Threshold);
                    categorylist.Add(i, cat_temp.CategoryList[i].Name);
                    categoryfontlist.Add(i, cat_temp.CategoryList[i].Color);
                    comboBox_classthreshold.Items.Add(cat_temp.CategoryList[i].Name);
                }
                comboBox_classthreshold.SelectedIndex = 0;
                numericUpDown_classthresholdvalue.Value = (decimal)classlist[cat_temp.CategoryList[0].Name];
                target = comboBox_classthreshold.Text;
            }
            else
            {
                numericUpDown_classthresholdvalue.Enabled = false;
                comboBox_classthreshold.Enabled = false;
            }
        }
        else
        {
            predict.Dispose();
            addlog("Error: Faild AISVision Predicter Loading");
        }
    }
    else
    {
        addlog("Please select *.ditox file");
    }

}
モデルフォルダ内に存在する.ditoxファイルを確認し、predict.LoadModel(path, true, 0)を使用してモデルをロードします。その後、CheckSessionを再度呼び出して、モデルが正しくロードされたかを確認します。さらに、GetModelInfoを利用してモデルの詳細情報(モデルタイプ、状態、プロジェクト名、タスク名など)を取得し、ログやUIに反映します。
ロードされたモデルのタイプが「分類」「物体検出」「方向付き物体検出」のいずれかである場合、しきい値やカテゴリ情報を取得し、スライダーやドロップダウンを有効化します。それ以外の場合、これらのUI要素は無効化されます。
ロードが失敗した場合、エラーログを出力し、predict.Dispose() を呼び出してリソースを解放します。
※Windowsのリモートデスクトップ接続でアプリを起動したときにはモデルの読み込みが行えませんのでご注意ください。
コールバック関数
private FrameQueuedResult mDataStream_NewBufferEvent(IFrameQueueBuffer buffer)
{

    // フレームが閉じている場合は再キューイングを行う
    if (flag_closing) return FrameQueuedResult.ReQueue;

    if (buffer == null)
    {
        // データが格納されていない場合のエラーログ
        addlog("Error: Buffer Timeout ");
    }
    else
    {
        // 非同期タスクで画像処理を実行
        Task.Run(() =>
        {
            IFrameQueueBuffer controlbuffer = buffer;
            icImagingControl1.DisplayImageBuffer(buffer);
            resultsimage = Enumerable.Repeat<Bitmap>(new Bitmap(cam_width, cam_height, PixelFormat.Format8bppIndexed), num_resultview).ToArray();

            // バッファからBitmapを作成し、Matに変換
            Mat matImage = OpenCvSharp.Extensions.BitmapConverter.ToMat(buffer.CreateBitmapWrap());
            if (matImage != null)
            {
                // 青チャンネル(Bチャンネル)のみを抽出
                Mat blueChannel = new Mat();
                Cv2.ExtractChannel(matImage, blueChannel, 0); // Bチャンネルはインデックス0

                // 全体の明るさを補正する(ガンマ補正で暗い青を明るくする)
                Mat adjustedBlueChannel = new Mat();
                blueChannel.ConvertTo(adjustedBlueChannel, MatType.CV_8U, alpha: 1.5, beta: 20);
                // alpha: コントラスト調整係数、beta: 明るさ補正値

                // 画像の中心座標を計算
                int centerX = adjustedBlueChannel.Cols / 2; // 画像幅の中心
                int centerY = adjustedBlueChannel.Rows / 2; // 画像高さの中心

                // 真ん中の5x5領域を抽出
                int rectSize = 5; // 矩形サイズ
                int startX = Math.Max(0, centerX - rectSize / 2); // X方向の開始座標
                int startY = Math.Max(0, centerY - rectSize / 2); // Y方向の開始座標
                int width = Math.Min(rectSize, adjustedBlueChannel.Cols - startX); // 幅
                int height = Math.Min(rectSize, adjustedBlueChannel.Rows - startY); // 高さ

                // 抽出領域(Region of Interest)を設定
                Rect roi = new Rect(startX, startY, width, height);
                Mat roiMat = new Mat(adjustedBlueChannel, roi); // 抽出領域を切り出す

                // 5x5領域の輝度平均を計算
                Scalar meanBrightness = Cv2.Mean(roiMat);

                // 輝度平均をログに出力
                addlog("5x5領域の輝度平均: " + meanBrightness.Val0.ToString());
                double meanValue = meanBrightness.Val0;

                // 輝度平均が75を超える場合、バッファをコピー
                if (meanValue > 75)
                {
      //AI画像処理処理へ
                    copybuf(controlbuffer);
                }
            }
        });
    }
    return FrameQueuedResult.ReQueue;

}
mDataStream_NewBufferEventは、カメラからフレームデータが送られてくるたびに発火するコールバックイベントです。このイベントでは、全フレームを受け取った後に、処理がフリーズしないよう非同期タスク (Task.Run)を使用してフレームごとに画像処理を行います。
各フレームに対して以下の処理が実行されます:
(1)バッファのチェック
- バッファが空 (null) の場合はエラーログを出力。
- バッファが有効であれば、次の処理へ進みます。
(2)画像処理
- フレームデータをBitmapに変換し、さらに OpenCV のMat形式に変換します。
- 画像の青チャンネル(Bチャンネル)を抽出し、ガンマ補正を行って全体の明るさを調整します。
- 画像の中心座標を基準に5×5ピクセルの領域(ROI: Region of Interest)を抽出し、その輝度の平均値を計算します(下図赤い資格の所のピクセル平均値)。
(3)3. 輝度値の条件チェック
- 平均輝度値が 75 を超える場合、copybufメソッドを呼び出してAI画像処理を実行します。
リアルタイムでフレームデータを処理しつつ、非同期処理を利用することでメインスレッドのフリーズを防ぎ、スムーズな操作を可能にしています。
表示用Bitmapへのコピーと表示処理
private void copybuf(IFrameQueueBuffer buffer)
{

   if (flag_closing) return;
   if (imagelock) return;
   if (rwLock.TryEnterWriteLock(1))
   {
       try
       {

           currentimage = buffer.CreateBitmapWrap();
           imagelock = true;

            //AISVision推論用バッファ作成
            aisimage_source = predict.ConvertBitmapToImage(buffer.CreateBitmapWrap());

           //AISVision推論
           predictbuf();
       }
       finally
       {
           if (rwLock.IsWriteLockHeld)
           {
               rwLock.ExitWriteLock();
           }
       }

       //メインスレッドでUI更新
       this.BeginInvoke(new Action(() =>
       {
               pictureBox_result.Invalidate();
               flag_paintmain = false;
       }));

   }

}copybufメソッドは、IFrameQueueBufferのデータをコピーし、AI推論を実行するための準備を行います。このメソッドでは、以下のような排他制御やロック処理を実施しています。
(1)flag_closing
- アプリケーションが終了中であれば処理をスキップします。
(2)imagelock
- 他の処理が画像データを使用中の場合、処理をスキップして競合を回避します。
(3)rwLock
- 書き込みロックを取得し、排他制御を行います。これにより、同時アクセスによるデータ競合を防ぎます。
処理の流れは以下の通りです。
(1)フレームデータのコピー
- バッファから Bitmap を生成し、currentimage にコピーします。
- 同時に、AI推論用に aisimage_source を作成します。
(2)AI推論の実行
- predictbuf メソッドを呼び出し、aisimage_source を使用してAI推論を実行します。
(3)ロックの解放
- 処理が完了したら、rwLock のロックを解放します。
(4)UIの更新
- BeginInvoke を用いて非同期でUIスレッドを更新し、pictureBox_result の再描画します。
リアルタイムなAI推論と画像表示をスムーズに行い、アプリケーション全体の安定性とパフォーマンスを確保しています。
AI推論
private void predictbuf()
{
    // フォームが閉じられている場合は処理を終了
    if (flag_closing) return;

    // 書き込みロックを取得
    if (predictLock.TryEnterWriteLock(1))
    {
        ulong checkstart = 0;
        ulong checkend = 0;

        try
        {
            // 処理時間計測:開始ポイント
            QueryPerformanceCounter(ref checkstart);

            // 推論実行
            predictInfo = predict.Predict(aisimage_source);

            // 処理時間計測:終了ポイント
            QueryPerformanceCounter(ref checkend);

            // 結果画像生成
            aisimage_result = predict.VisualizeResult(aisimage_source, predictInfo, true);
            predictimage = predict.ConvertImageToBitmap(aisimage_result);
        }
        catch (OperationCanceledException)
        {
            // タスクがキャンセルされた場合の処理
            return;
        }
        finally
        {
            // 書き込みロックを解放
            if (predictLock.IsWriteLockHeld)
            {
                predictLock.ExitWriteLock();
            }
        }

        // 処理時間計算
        var processingtime = ((checkend - checkstart) * 1000 / timefrequencyCounter);

        // メインスレッドでUI更新
        this.BeginInvoke(new Action(() =>
        {
            label_predicttime.Text = "Predict processing time: " + (processingtime).ToString() + " ms";
        }));

        // 推論結果表示
        if (resultLock.TryEnterWriteLock(1))
        {
            try
            {
                // モデルタイプに応じた結果処理
                //モデルタイプ:アノマリー
                if (modelInfo.ModelType == Predictor.ModelType.AnomalyDetection)
                {
                    addresult("[Anomaly] Result:" + predictInfo.anomalydetectionInfo.Name + " [" + Math.Round(predictInfo.anomalydetectionInfo.Score, 2, MidpointRounding.AwayFromZero).ToString() + "%]");
                    if (predictInfo.anomalydetectionInfo.Name == target)
                    {
                        if (!flag_detect)
                        {
                            for (int i = 0; i < resultsimage.Length; ++i)
                            {
                                if (i != num_resultview - 1)
                                {
                                    resultsimage[i] = resultsimage[i + 1];
                                }
                                else
                                {
                                    resultsimage[i] = predictimage;
                                }
                            }
                            flag_detect = true;
                        }
                    }
                    else
                    {
                        flag_detect = false;
                    }
                }
                //モデルタイプ:クラス分類
                else if (modelInfo.ModelType == Predictor.ModelType.Classification)
                {
                    addresult("[Classification] Result:" + predictInfo.classificationInfo.Name + " [" + Math.Round(predictInfo.classificationInfo.Prob, 2, MidpointRounding.AwayFromZero).ToString() + "%]");

                    this.BeginInvoke(new Action(() =>
                    {
                        if (predictimage != null)
                        {
                            pictureBox_result.Image = (System.Drawing.Image)predictimage.Clone();
                        }
                    }));

                    string_Judgement = predictInfo.classificationInfo.Name + " [" + Math.Round(predictInfo.classificationInfo.Prob, 2, MidpointRounding.AwayFromZero).ToString() + "%]";

                    if (check_saveimage.Checked && imagelock) SaveImageBasedOnJudgement((Bitmap)currentimage.Clone(), predictInfo.classificationInfo.Name, Math.Round(predictInfo.classificationInfo.Prob, 2, MidpointRounding.AwayFromZero).ToString());
                    imagelock = false;

                    if (predictInfo.classificationInfo.Name == target)
                    {
                        if (!flag_detect)
                        {
                            flag_detect = true;
                        }
                    }
                    else
                    {
                        flag_detect = false;
                    }
                }
                //モデルタイプ:物体検出
                else if (modelInfo.ModelType == Predictor.ModelType.ObjectDetection)
                {
                    addresult("[ObjectDetection] Detected items:" + predictInfo.objectdetectionInfo.Size.ToString());
                    foreach (var items in predictInfo.objectdetectionInfo.ResultList)
                    {
                        addresult("[" + items.Name + "] [Prob=" + Math.Round(items.Prob, 2, MidpointRounding.AwayFromZero).ToString() + "] [X=" + Math.Round(items.TopLeftX) + ",Y=" + Math.Round(items.TopLeftY) + "] [Width=" + Math.Round(items.Width) + ",Height=" + Math.Round(items.Height) + "]");
                    }
                    if (predictInfo.objectdetectionInfo.ResultList.Any(res => res.Name == target))
                    {
                        if (!flag_detect)
                        {
                            for (int i = 0; i < resultsimage.Length; ++i)
                            {
                                if (i != num_resultview - 1)
                                {
                                    resultsimage[i] = resultsimage[i + 1];
                                }
                                else
                                {
                                    resultsimage[i] = predictimage;
                                }
                            }
                            flag_detect = true;
                        }
                    }
                    else
                    {
                        flag_detect = false;
                    }
                }
                //物体検出(回転あり)
                else if (modelInfo.ModelType == Predictor.ModelType.OrientedObjectDetection)
                {
                    addresult("[OrientedObjectDetection] Detected items:" + predictInfo.orientedobjectdetectionInfo.Size.ToString());
                    foreach (var items in predictInfo.orientedobjectdetectionInfo.ResultList)
                    {
                        addresult("[" + items.Name + "] [Prob=" + Math.Round(items.Prob, 2, MidpointRounding.AwayFromZero).ToString() + "] [CenterX=" + Math.Round(items.CenterX) + ",CenterY=" + Math.Round(items.CenterY) + "] [Width=" + Math.Round(items.Width) + ",Height=" + Math.Round(items.Height) + "] [Angle=" + items.Angle + "]");
                    }
                    if (predictInfo.orientedobjectdetectionInfo.ResultList.Any(res => res.Name == target))
                    {
                        if (!flag_detect)
                        {
                            for (int i = 0; i < resultsimage.Length; ++i)
                            {
                                if (i != num_resultview - 1)
                                {
                                    resultsimage[i] = resultsimage[i + 1];
                                }
                                else
                                {
                                    resultsimage[i] = predictimage;
                                }
                            }
                            flag_detect = true;
                        }
                    }
                    else
                    {
                        flag_detect = false;
                    }
                }
                //モデルタイプ:セグメンテーション
                else if (modelInfo.ModelType == Predictor.ModelType.Segmentation)
                {
                    addresult("[Segmentation] Detected items:" + predictInfo.segmentationInfo.CategorySize.ToString());
                    foreach (var items in predictInfo.segmentationInfo.CategoryList)
                    {
                        addresult("[" + items.Name + "] [Threshold=" + items.Threshold + "]");
                    }
                    if (predictInfo.segmentationInfo.CategoryList.Any(res => res.Name == target))
                    {
                        if (!flag_detect)
                        {
                            for (int i = 0; i < resultsimage.Length; ++i)
                            {
                                if (i != num_resultview - 1)
                                {
                                    resultsimage[i] = resultsimage[i + 1];
                                }
                                else
                                {
                                    resultsimage[i] = predictimage;
                                }
                            }
                            flag_detect = true;
                        }
                    }
                    else
                    {
                        flag_detect = false;
                    }
                }
            }
            finally
            {
                // 書き込みロックを解放
                if (resultLock.IsWriteLockHeld)
                {
                    resultLock.ExitWriteLock();
                }
            }
        }
    }
}
このコードでは、AIモデルによる推論処理を行い、その結果を処理・表示する流れが実装されています。
推論処理
カメラから送られてきたフレーム(aisimage_source)を基に以下の推論処理が実行されます:
(1)Predict
- 推論結果は predictInfo オブジェクトに格納されます。
(2)VisualizeResult
- 推論結果を基に、結果を可視化した画像を生成します。
(3)ConvertImageToBitmap
- 可視化された結果画像を Bitmapに変換し、UIで表示可能な形式にします。
推論結果の処理
AIモデルの種類に応じて適切な処理が行われます:
(1)異常検出(Anomaly Detection)
- 異常が検出された場合、該当する領域をログに記録し、フラグを更新します。
- 判定が目標(target)と一致した場合、結果画像を更新します。
(2)クラス分類(Classification)
- 推論結果をUIに表示します。
- 推論結果のクラス名と確率を string_Judgement に格納します。
- チェックボックスにマークが付いている場合、判定結果に応じてSaveImageBasedOnJudgementメソッドで画像を保存します。
(3)物体検出(Object Detection)
- 検出されたオブジェクトの名前、確率、位置、サイズをログに記録します。
- 目標クラス(target)が検出された場合、結果画像を更新します。
(4)物体検出(回転あり Oriented Object Detection)
- 回転情報を含む検出結果を処理します。
- 検出対象の中心座標やサイズ、角度をログに記録します。
(5)セグメンテーション(Segmentation)
- 検出されたカテゴリ情報をログに記録します。
- 指定したカテゴリが存在する場合、結果画像を更新します。
画像保存処理
private void SaveImageBasedOnJudgement(Bitmap saveImage, string judgement, string probability)
{
    // 保存先のベースディレクトリを指定
    string baseDirectory = @"D:\ImageResults"; // 必要に応じて変更
    string subDirectory;

    // Judgementに応じてフォルダを決定
    switch (judgement.ToLower())
    {
        case "ok":
            subDirectory = "OK";
            break;
        case "ng":
            subDirectory = "NG";
            break;

        default:
            subDirectory = "unknown";
            break;
    }

    // フォルダパスを組み立てる
    string targetDirectory = Path.Combine(baseDirectory, subDirectory);

    // フォルダが存在しない場合は作成
    if (!Directory.Exists(targetDirectory))
    {
        Directory.CreateDirectory(targetDirectory);
    }
    counter_save++;
    // ファイル名をユニークにするためにタイムスタンプを使用
    string fileName = $"Image_{subDirectory}_{probability}_{counter_save}_{DateTime.Now:yyyyMMdd_HHmmssfff}.bmp";
    string filePath = Path.Combine(targetDirectory, fileName);

    // Bitmap を指定したパスに保存
    saveImage.Save(filePath, System.Drawing.Imaging.ImageFormat.Bmp);

    addlog($"Image saved to: {filePath}");
}
クラス分類の場合、チェックボックスが有効な際には画像を保存することが可能です。
この処理はSaveImageBasedOnJudgementメソッドで行われます。
SaveImageBasedOnJudgementの主な処理
(1)保存先のベースディレクトリ
- 画像はD:\ImageResults配下に保存されます。必要に応じて変更してください。
(2)判定結果に応じたサブフォルダの選択
- OK:判定が「OK」の場合
- NG:判定が「NG」の場合
- unknown:判定が不明な場合
(3)フォルダの生成
- サブフォルダが存在しない場合、新しく作成します。
(4)ユニークなファイル名の生成
- タイムスタンプと保存カウンタ(counter_save)を用いてファイル名を生成し、重複を回避します。
(5)画像の保存
- 生成したファイルパスに画像を Bitmap 形式で保存します。
- 保存後、保存先のパスをログに記録します。

