GigE Visionデバイスのプロパティ一覧
使用できるSDK・ドライバ・デバイス
| SDK | IC Imaging Control 4 SDK |
|---|---|
| ドライバ | GenTL Producer for GigE Vision Cameras |
| デバイス | 33Gシリーズ、38Gシリーズ、43Gシリーズ、47Gシリーズ、DFKZシリーズ |
| SFNC feature | Namespace | IC4 設定項目 |
主な機能 | 説明 | 詳細 |
|---|
-
IC4詳細・解説
Image Format Controlは、カメラから出力される映像の「見え方」や「使うピクセルの範囲」を決めるカテゴリです。ここでは解像度の設定、ROI(Region of Interest:関心領域)の指定、ビニングやスキッピングによる画素処理、画像の上下・左右反転といった調整を行うことができます。ROIを使えば撮影範囲の一部だけを切り出して効率的に処理でき、ビニングやスキッピングは画素を間引くことでフレームレート向上や感度改善を実現します。また、反転機能を用いると光学系の取り付け方向やミラー反射の影響を補正できます。
# 横:センサー1画素の物理サイズ(単位:µm)
# SensorPixelWidth  (Type=Float, ReadOnly=True)
try:
    v_SensorPixelWidth = prop_map.get_value_float('SensorPixelWidth')
    print('SensorPixelWidth =', v_SensorPixelWidth)
except Exception as e:
    v_SensorPixelWidth = None
    print('  SensorPixelWidth: get failed:', e)


# 縦:センサー1画素の物理サイズ(単位:µm)
# SensorPixelHeight  (Type=Float, ReadOnly=True)
try:
    v_SensorPixelHeight = prop_map.get_value_float('SensorPixelHeight')
    print('SensorPixelHeight =', v_SensorPixelHeight)
except Exception as e:
    v_SensorPixelHeight = None
    print('  SensorPixelHeight: get failed:', e)


# 横:センサー全体の物理サイズ(単位:mm)
try:
    v_SensorWidth = prop_map.get_value_int('SensorWidth')
    print('SensorWidth =', v_SensorWidth)
except Exception as e:
    v_SensorWidth = None
    print('  SensorWidth: get failed:', e)

# 縦:センサー全体の物理サイズ(単位:mm)
try:
    v_SensorHeight = prop_map.get_value_int('SensorHeight')
    print('SensorHeight =', v_SensorHeight)
except Exception as e:
    v_SensorHeight = None
    print('  SensorHeight: get failed:', e)


# 画像の横幅(解像度)を設定・取得
try:
    v_WidthMax = prop_map.get_value_int('WidthMax')
    print('WidthMax =', v_WidthMax)
except Exception as e:
    v_WidthMax = None
    print('  WidthMax: get failed:', e)


# 画像の高さ幅(解像度)を設定・取得
try:
    v_HeightMax = prop_map.get_value_int('HeightMax')
    print('HeightMax =', v_HeightMax)
except Exception as e:
    v_HeightMax = None
    print('  HeightMax: get failed:', e)


# 画像の横幅(解像度)を設定・取得
try:
    v_Width = prop_map.get_value_int('Width')
    print('Width =', v_Width)
except Exception as e:
    v_Width = None
    print('  Width: get failed:', e)
try:
    prop_map.set_value('Width', v_Width)
except Exception as e:
    print('  Width: set failed:', e)

# 画像の高さ(解像度)を設定・取得
try:
    v_Height = prop_map.get_value_int('Height')
    print('Height =', v_Height)
except Exception as e:
    v_Height = None
    print('  Height: get failed:', e)
try:
    prop_map.set_value('Height', v_Height)
except Exception as e:
    print('  Height: set failed:', e)

# X:画像の切り出し開始位置(左上からのオフセット)を設定・取得
try:
    v_OffsetX = prop_map.get_value_int('OffsetX')
    print('OffsetX =', v_OffsetX)
except Exception as e:
    v_OffsetX = None
    print('  OffsetX: get failed:', e)
try:
    prop_map.set_value('OffsetX', v_OffsetX)
except Exception as e:
    print('  OffsetX: set failed:', e)

# Y:画像の切り出し開始位置(左上からのオフセット)を設定・取得
try:
    v_OffsetY = prop_map.get_value_int('OffsetY')
    print('OffsetY =', v_OffsetY)
except Exception as e:
    v_OffsetY = None
    print('  OffsetY: get failed:', e)
try:
    prop_map.set_value('OffsetY', v_OffsetY)
except Exception as e:
    print('  OffsetY: set failed:', e)

# 切り出しの基準位置を中央にするかどうか("Off" = 左上基準)
try:
    v_OffsetAutoCenter = prop_map.get_value_str('OffsetAutoCenter')
    print('OffsetAutoCenter =', v_OffsetAutoCenter)
except Exception as e:
    v_OffsetAutoCenter = None
    print('  OffsetAutoCenter: get failed:', e)
try:
    prop_map.set_value('OffsetAutoCenter', v_OffsetAutoCenter)
except Exception as e:
    print('  OffsetAutoCenter: set failed:', e)

# カラーフォーマットの設定(例:"Mono8" はモノクロ8bit)
# 利用可能なフォーマットはカメラにより異なるため、IC Capture等で事前確認が必要
try:
    v_PixelFormat = prop_map.get_value_str('PixelFormat')
    print('PixelFormat =', v_PixelFormat)
except Exception as e:
    v_PixelFormat = None
    print('  PixelFormat: get failed:', e)
try:
    prop_map.set_value('PixelFormat', v_PixelFormat)
except Exception as e:
    print('  PixelFormat: set failed:', e)


# 水平方向のビニング(ここでは無効=1倍)
try:
    v_BinningHorizontal = prop_map.get_value_int('BinningHorizontal')
    print('BinningHorizontal =', v_BinningHorizontal)
except Exception as e:
    v_BinningHorizontal = None
    print('  BinningHorizontal: get failed:', e)
try:
    prop_map.set_value('BinningHorizontal', v_BinningHorizontal)
except Exception as e:
    print('  BinningHorizontal: set failed:', e)

# 垂直方向のビニング(ここでは無効=1倍)
try:
    v_BinningVertical = prop_map.get_value_int('BinningVertical')
    print('BinningVertical =', v_BinningVertical)
except Exception as e:
    v_BinningVertical = None
    print('  BinningVertical: get failed:', e)
try:
    prop_map.set_value('BinningVertical', v_BinningVertical)
except Exception as e:
    print('  BinningVertical: set failed:', e)

# 水平方向のデシメーション(画素間引き処理)(ここでは無効=1倍)
try:
    v_DecimationHorizontal = prop_map.get_value_int('DecimationHorizontal')
    print('DecimationHorizontal =', v_DecimationHorizontal)
except Exception as e:
    v_DecimationHorizontal = None
    print('  DecimationHorizontal: get failed:', e)
try:
    prop_map.set_value('DecimationHorizontal', v_DecimationHorizontal)
except Exception as e:
    print('  DecimationHorizontal: set failed:', e)

# 垂直方向のデシメーション(ここでは無効=1倍)
try:
    v_DecimationVertical = prop_map.get_value_int('DecimationVertical')
    print('DecimationVertical =', v_DecimationVertical)
except Exception as e:
    v_DecimationVertical = None
    print('  DecimationVertical: get failed:', e)
try:
    prop_map.set_value('DecimationVertical', v_DecimationVertical)
except Exception as e:
    print('  DecimationVertical: set failed:', e)

# 水平方向の画像反転設定(false = 反転なし)
try:
    v_ReverseX = prop_map.get_value_bool('ReverseX')
    print('ReverseX =', v_ReverseX)
except Exception as e:
    v_ReverseX = None
    print('  ReverseX: get failed:', e)
try:
    prop_map.set_value('ReverseX', v_ReverseX)
except Exception as e:
    print('  ReverseX: set failed:', e)

# 垂直方向の画像反転設定(true = 上下反転あり)
try:
    v_ReverseY = prop_map.get_value_bool('ReverseY')
    print('ReverseY =', v_ReverseY)
except Exception as e:
    v_ReverseY = None
    print('  ReverseY: get failed:', e)
try:
    prop_map.set_value('ReverseY', v_ReverseY)
except Exception as e:
    print('  ReverseY: set failed:', e)
[Image Format Control]の詳細を閉じる▲ -
IC4詳細・解説
Acquisition Control はカメラの撮像動作を直接制御するためのカテゴリであり、撮影開始や停止、モード切替、露光やフレームレートの設定、さらにはトリガー制御まで幅広く扱います。例えば、AcquisitionStartやAcquisitionStopを使うことで画像ストリーミングを開始・停止でき、AcquisitionFrameRateによってフレームレートを、ExposureTimeによって露光時間をマイクロ秒単位で設定することが可能です。自動露光を利用する場合には ExposureAutoをContinuousに設定し、基準輝度や露光時間の上下限を細かく調整できます。さらに、外部信号やソフトウェアによるトリガー撮影にも対応しており、TriggerSourceをLine1(ハードウェアトリガー)やSoftware(ソフトウェアトリガー) に設定し、TriggerActivation でRisingEdge(立ち上がり時の撮影)や FallingEdge(立ち下がり時の撮影) を指定することで柔軟な制御が可能です。さらにTriggerDelayや TriggerDebouncerを利用すれば遅延やノイズ対策を行うことができ、AcquisitionBurstFrameCountやAcquisitionBurstIntervalを設定すればバースト撮影も設定可能です。
# - AcquisitionStart : Acquisition Start
#  撮像開始
try:
    print('AcquisitionStart (Command)')
    prop_map.execute_command('AcquisitionStart')
except Exception as e:
    print('  AcquisitionStart: command failed:', e)

# - AcquisitionStop : Acquisition Stop
#  撮像停止
try:
    print('AcquisitionStop (Command)')
    prop_map.execute_command('AcquisitionStop')
except Exception as e:
    print('  AcquisitionStop: command failed:', e)

# - AcquisitionMode : Acquisition Mode
#   撮像モード(例:Continuous, SingleFrame, MultiFrame)
try:
    v_AcquisitionMode = prop_map.get_value_str('AcquisitionMode')
    print('AcquisitionMode =', v_AcquisitionMode)
except Exception as e:
    v_AcquisitionMode = None
    print('  AcquisitionMode: get failed:', e)
try:
    prop_map.set_value('AcquisitionMode', v_AcquisitionMode)
except Exception as e:
    print('  AcquisitionMode: set failed:', e)

# - AcquisitionFrameRate : Acquisition Frame Rate
#   撮像フレームレートの設定
try:
    v_AcquisitionFrameRate = prop_map.get_value_float('AcquisitionFrameRate')
    print('AcquisitionFrameRate =', v_AcquisitionFrameRate)
except Exception as e:
    v_AcquisitionFrameRate = None
    print('  AcquisitionFrameRate: get failed:', e)
try:
    prop_map.set_value('AcquisitionFrameRate', v_AcquisitionFrameRate)
except Exception as e:
    print('  AcquisitionFrameRate: set failed:', e)

# - ExposureTime : Exposure Time
#   露光時間(単位:マイクロ秒)
try:
    v_ExposureTime = prop_map.get_value_float('ExposureTime')
    print('ExposureTime =', v_ExposureTime)
except Exception as e:
    v_ExposureTime = None
    print('  ExposureTime: get failed:', e)
try:
    prop_map.set_value('ExposureTime', v_ExposureTime)
except Exception as e:
    print('  ExposureTime: set failed:', e)

# - ExposureAuto : Exposure Auto
#   自動露光のON/OFF("Off", "Once", "Continuous")
try:
    v_ExposureAuto = prop_map.get_value_str('ExposureAuto')
    print('ExposureAuto =', v_ExposureAuto)
except Exception as e:
    v_ExposureAuto = None
    print('  ExposureAuto: get failed:', e)
try:
    prop_map.set_value('ExposureAuto', v_ExposureAuto)
except Exception as e:
    print('  ExposureAuto: set failed:', e)

# - ExposureAutoReference : Exposure Auto Reference
#   自動露光の基準輝度(通常128)
try:
    v_ExposureAutoReference = prop_map.get_value_int('ExposureAutoReference')
    print('ExposureAutoReference =', v_ExposureAutoReference)
except Exception as e:
    v_ExposureAutoReference = None
    print('  ExposureAutoReference: get failed:', e)
try:
    prop_map.set_value('ExposureAutoReference', v_ExposureAutoReference)
except Exception as e:
    print('  ExposureAutoReference: set failed:', e)

# - ExposureAutoLowerLimit : Exposure Auto Lower Limit
#   自動露光の下限(μs)
try:
    v_ExposureAutoLowerLimit = prop_map.get_value_float('ExposureAutoLowerLimit')
    print('ExposureAutoLowerLimit =', v_ExposureAutoLowerLimit)
except Exception as e:
    v_ExposureAutoLowerLimit = None
    print('  ExposureAutoLowerLimit: get failed:', e)
try:
    prop_map.set_value('ExposureAutoLowerLimit', v_ExposureAutoLowerLimit)
except Exception as e:
    print('  ExposureAutoLowerLimit: set failed:', e)

# - ExposureAutoUpperLimit : Exposure Auto Upper Limit
#   自動露光の上限(μs)
try:
    v_ExposureAutoUpperLimit = prop_map.get_value_float('ExposureAutoUpperLimit')
    print('ExposureAutoUpperLimit =', v_ExposureAutoUpperLimit)
except Exception as e:
    v_ExposureAutoUpperLimit = None
    print('  ExposureAutoUpperLimit: get failed:', e)
try:
    prop_map.set_value('ExposureAutoUpperLimit', v_ExposureAutoUpperLimit)
except Exception as e:
    print('  ExposureAutoUpperLimit: set failed:', e)

# - ExposureAutoUpperLimitAuto : Exposure Auto Upper Limit Auto
#   自動露光の上限を自動で決定(ON/OFF)
try:
    v_ExposureAutoUpperLimitAuto = prop_map.get_value_bool('ExposureAutoUpperLimitAuto')
    print('ExposureAutoUpperLimitAuto =', v_ExposureAutoUpperLimitAuto)
except Exception as e:
    v_ExposureAutoUpperLimitAuto = None
    print('  ExposureAutoUpperLimitAuto: get failed:', e)
try:
    prop_map.set_value('ExposureAutoUpperLimitAuto', v_ExposureAutoUpperLimitAuto)
except Exception as e:
    print('  ExposureAutoUpperLimitAuto: set failed:', e)

# - ExposureAutoHighlightReduction : Exposure Auto Highlight Reduction
#   ハイライト低減の有効化(白とび軽減)
try:
    v_ExposureAutoHighlightReduction = prop_map.get_value_bool('ExposureAutoHighlightReduction')
    print('ExposureAutoHighlightReduction =', v_ExposureAutoHighlightReduction)
except Exception as e:
    v_ExposureAutoHighlightReduction = None
    print('  ExposureAutoHighlightReduction: get failed:', e)
try:
    prop_map.set_value('ExposureAutoHighlightReduction', v_ExposureAutoHighlightReduction)
except Exception as e:
    print('  ExposureAutoHighlightReduction: set failed:', e)


# - TriggerSelector : Trigger Selector
#   トリガーセレクター(基本的に"FrameStart"のみ)
try:
    v_TriggerSelector = prop_map.get_value_str('TriggerSelector')
    print('TriggerSelector =', v_TriggerSelector)
except Exception as e:
    v_TriggerSelector = None
    print('  TriggerSelector: get failed:', e)
try:
    prop_map.set_value('TriggerSelector', v_TriggerSelector)
except Exception as e:
    print('  TriggerSelector: set failed:', e)

# - TriggerMode : Trigger Mode
#   トリガーモード("On"/"Off")
try:
    v_TriggerMode = prop_map.get_value_str('TriggerMode')
    print('TriggerMode =', v_TriggerMode)
except Exception as e:
    v_TriggerMode = None
    print('  TriggerMode: get failed:', e)
try:
    prop_map.set_value('TriggerMode', v_TriggerMode)
except Exception as e:
    print('  TriggerMode: set failed:', e)

# - TriggerSource : Trigger Source
#   トリガーソース(Line1, Software, Action0, Any)
try:
    v_TriggerSource = prop_map.get_value_str('TriggerSource')
    print('TriggerSource =', v_TriggerSource)
except Exception as e:
    v_TriggerSource = None
    print('  TriggerSource: get failed:', e)
try:
    prop_map.set_value('TriggerSource', v_TriggerSource)
except Exception as e:
    print('  TriggerSource: set failed:', e)

# - TriggerActivation : Trigger Activation
#   トリガー条件("RisingEdge", "FallingEdge" など)
try:
    v_TriggerActivation = prop_map.get_value_str('TriggerActivation')
    print('TriggerActivation =', v_TriggerActivation)
except Exception as e:
    v_TriggerActivation = None
    print('  TriggerActivation: get failed:', e)
try:
    prop_map.set_value('TriggerActivation', v_TriggerActivation)
except Exception as e:
    print('  TriggerActivation: set failed:', e)

# - TriggerSoftware : Trigger Software
#   ソフトウェアトリガーを発行
try:
    print('TriggerSoftware (Command)')
    prop_map.execute_command('TriggerSoftware')
except Exception as e:
    print('  TriggerSoftware: command failed:', e)

# - TriggerDelay : Trigger Delay
#   トリガー遅延(単位:μs)
try:
    v_TriggerDelay = prop_map.get_value_float('TriggerDelay')
    print('TriggerDelay =', v_TriggerDelay)
except Exception as e:
    v_TriggerDelay = None
    print('  TriggerDelay: get failed:', e)
try:
    prop_map.set_value('TriggerDelay', v_TriggerDelay)
except Exception as e:
    print('  TriggerDelay: set failed:', e)

# - TriggerDebouncer : Trigger Debounce Time
#   デバウンス時間(ノイズ除去用のフィルタ)
try:
    v_TriggerDebouncer = prop_map.get_value_float('TriggerDebouncer')
    print('TriggerDebouncer =', v_TriggerDebouncer)
except Exception as e:
    v_TriggerDebouncer = None
    print('  TriggerDebouncer: get failed:', e)
try:
    prop_map.set_value('TriggerDebouncer', v_TriggerDebouncer)
except Exception as e:
    print('  TriggerDebouncer: set failed:', e)

# - TriggerMask : Trigger Mask Time
#   トリガーマスク
try:
    v_TriggerMask = prop_map.get_value_float('TriggerMask')
    print('TriggerMask =', v_TriggerMask)
except Exception as e:
    v_TriggerMask = None
    print('  TriggerMask: get failed:', e)
try:
    prop_map.set_value('TriggerMask', v_TriggerMask)
except Exception as e:
    print('  TriggerMask: set failed:', e)

# - TriggerDenoise : Trigger Noise Suppression Time
#   トリガーデノイズ設定
try:
    v_TriggerDenoise = prop_map.get_value_float('TriggerDenoise')
    print('TriggerDenoise =', v_TriggerDenoise)
except Exception as e:
    v_TriggerDenoise = None
    print('  TriggerDenoise: get failed:', e)
try:
    prop_map.set_value('TriggerDenoise', v_TriggerDenoise)
except Exception as e:
    print('  TriggerDenoise: set failed:', e)

# - TriggerOverlap : Trigger Overlap
#   トリガーオーバーラップ設定("ReadOut"など)
try:
    v_TriggerOverlap = prop_map.get_value_str('TriggerOverlap')
    print('TriggerOverlap =', v_TriggerOverlap)
except Exception as e:
    v_TriggerOverlap = None
    print('  TriggerOverlap: get failed:', e)

# - AcquisitionBurstFrameCount : Acquisition Burst Frame Count
#   連写枚数の設定(MultiFrameやBurst用)
try:
    v_AcquisitionBurstFrameCount = prop_map.get_value_int('AcquisitionBurstFrameCount')
    print('AcquisitionBurstFrameCount =', v_AcquisitionBurstFrameCount)
except Exception as e:
    v_AcquisitionBurstFrameCount = None
    print('  AcquisitionBurstFrameCount: get failed:', e)
try:
    prop_map.set_value('AcquisitionBurstFrameCount', v_AcquisitionBurstFrameCount)
except Exception as e:
    print('  AcquisitionBurstFrameCount: set failed:', e)

# - AcquisitionBurstInterval : Acquisition Burst Interval
#   連写の間隔(Burst撮像時、μs単位)
try:
    v_AcquisitionBurstInterval = prop_map.get_value_int('AcquisitionBurstInterval')
    print('AcquisitionBurstInterval =', v_AcquisitionBurstInterval)
except Exception as e:
    v_AcquisitionBurstInterval = None
    print('  AcquisitionBurstInterval: get failed:', e)
try:
    prop_map.set_value('AcquisitionBurstInterval', v_AcquisitionBurstInterval)
except Exception as e:
    print('  AcquisitionBurstInterval: set failed:', e)
[Acquisition Control]の詳細を閉じる▲ -
IC4詳細・解説
カメラが出力する1フレームあたりのデータサイズ(バイト数)を示すのが PayloadSizeです。この値は画像の幅・高さ・カラーフォーマット(モノクロ8bit、RGB、Bayer など)によって決まり、必要な通信帯域や PC側の処理負荷を見積もる際の基準となります。例えば解像度が 1920×1200 で、各ピクセルを 3Byte(BGR8 フォーマット)のカメラの場合、理論値は 1920×1200×3 = 6,912,000 Byte となります。実際の PayloadSize にはヘッダ情報などが加算されるため、実測値として 6,912,024 Byte となります。
# - PayloadSize : Payload Size
#   PayloadSize(ペイロードサイズ)を取得する
try:
    v_PayloadSize = prop_map.get_value_int('PayloadSize')
    print('PayloadSize =', v_PayloadSize)
except Exception as e:
    v_PayloadSize = None
    print('  PayloadSize: get failed:', e)
[Transport Layer Control]の詳細を閉じる▲ -
IC4詳細・解説
PTP(Precision Time Protocol)は、ネットワーク上の複数機器の時刻を正確に合わせるための機能です。カメラで PtpEnable を有効にすると、各フレームに付与されるタイムスタンプが共通の基準で管理され、複数台のカメラから取得した画像の時刻が同期された状態になります。PtpClockAccuracy は、そのカメラが基準クロック(グランドマスター)になったときにどの程度の精度で時刻を維持できるかを示し、例えば「Within100us」であれば100マイクロ秒以内の誤差に収まることを表します。さらに PtpStatusでは、現在のPTP動作状態を確認でき、Masterの場合はそのカメラが基準クロックを提供しており、Slaveの場合は他の機器に同期して動作しています。
#  PtpEnable:PTP(Precision Time Protocol)を有効化(IEEE 1588)
try:
    v = prop_map.get_value_bool("PtpEnable")
    print("PtpEnable =", v)
except Exception as e:
    print("PtpEnable get failed:", e)
try:
    # 例:PTPを有効化
    prop_map.set_value("PtpEnable", True)
except Exception as e:
    print("PtpEnable set failed:", e)

#  PtpClockAccuracy:クロック精度を示す(ReadOnly)
try:
    v = prop_map.get_value_str("PtpClockAccuracy")  # Enumeration想定
    print("PtpClockAccuracy =", v)
except Exception as e:
    print("PtpClockAccuracy get failed:", e)

#  PtpStatus:PTP同期状態を示す文字列(ReadOnly)
try:
    v = prop_map.get_value_str("PtpStatus")   # Enumeration想定
    print("PtpStatus =", v)
except Exception as e:
    print("PtpStatus get failed:", e)
[PtpControl]の詳細を閉じる▲ -
IC4詳細・解説
Device Control は、カメラを使用する際に欠かせない基本カテゴリの一つであり、デバイス全体の管理や制御を担います。このカテゴリでは、カメラの接続や認識状態を確認し、必要に応じて初期化やリセットを行うことが可能です。撮影を始める前に、ホスト PC とのリンク状態や通信の安定性を確認するのもこの機能の役割です。さらに、接続されたカメラのハードウェア情報やネットワーク設定、ストリームチャネルの構成といったシステムに関わる情報を取得できます。加えて、タイムスタンプの監視や内部温度の把握など、運用中の監視機能も含まれています。USB カメラの場合は、デバイスリセットを直接行えるため、異常時に素早く復旧できる利点があります。
# - DeviceType : Device Type
#   デバイスの種類(例:"Camera" など)
try:
    v_DeviceType = prop_map.get_value_str('DeviceType')
    print('DeviceType =', v_DeviceType)
except Exception as e:
    v_DeviceType = None
    print('  DeviceType: get failed:', e)

# - DeviceScanType : Device Scan Type
#   スキャン方式("AreaScan" または "LineScan" など)
try:
    v_DeviceScanType = prop_map.get_value_str('DeviceScanType')
    print('DeviceScanType =', v_DeviceScanType)
except Exception as e:
    v_DeviceScanType = None
    print('  DeviceScanType: get failed:', e)

# - DeviceVendorName : Device Vendor Name
#   ベンダー名(製造会社名)
try:
    v_DeviceVendorName = prop_map.get_value_str('DeviceVendorName')
    print('DeviceVendorName =', v_DeviceVendorName)
except Exception as e:
    v_DeviceVendorName = None
    print('  DeviceVendorName: get failed:', e)

# - DeviceModelName : Device Model Name
#   モデル名(使用しているカメラの機種名)
try:
    v_DeviceModelName = prop_map.get_value_str('DeviceModelName')
    print('DeviceModelName =', v_DeviceModelName)
except Exception as e:
    v_DeviceModelName = None
    print('  DeviceModelName: get failed:', e)

# - DeviceFirmwareVersion : Device Firmware Version
#   デバイスのファームウェアバージョン
try:
    v_DeviceFirmwareVersion = prop_map.get_value_str('DeviceFirmwareVersion')
    print('DeviceFirmwareVersion =', v_DeviceFirmwareVersion)
except Exception as e:
    v_DeviceFirmwareVersion = None
    print('  DeviceFirmwareVersion: get failed:', e)

# - DeviceSerialNumber : Device Serial Number
#   シリアル番号(個体識別用)
try:
    v_DeviceSerialNumber = prop_map.get_value_str('DeviceSerialNumber')
    print('DeviceSerialNumber =', v_DeviceSerialNumber)
except Exception as e:
    v_DeviceSerialNumber = None
    print('  DeviceSerialNumber: get failed:', e)

# - DeviceUserID : Device User ID
#   ユーザー定義のカメラ名(後から設定可能)
try:
    v_DeviceUserID = prop_map.get_value_str('DeviceUserID')
    print('DeviceUserID =', v_DeviceUserID)
except Exception as e:
    v_DeviceUserID = None
    print('  DeviceUserID: get failed:', e)

# - DeviceSFNCVersionMajor : Device SFNC Version Major
#   GenICam準拠のバージョン情報(カメラ機能仕様のバージョン)
try:
    v_DeviceSFNCVersionMajor = prop_map.get_value_int('DeviceSFNCVersionMajor')
    print('DeviceSFNCVersionMajor =', v_DeviceSFNCVersionMajor)
except Exception as e:
    v_DeviceSFNCVersionMajor = None
    print('  DeviceSFNCVersionMajor: get failed:', e)

# - DeviceSFNCVersionMinor : Device SFNC Version Minor
#   GenICam準拠のバージョン情報(カメラ機能仕様のバージョン)
try:
    v_DeviceSFNCVersionMinor = prop_map.get_value_int('DeviceSFNCVersionMinor')
    print('DeviceSFNCVersionMinor =', v_DeviceSFNCVersionMinor)
except Exception as e:
    v_DeviceSFNCVersionMinor = None
    print('  DeviceSFNCVersionMinor: get failed:', e)

# - DeviceSFNCVersionSubMinor : Device SFNC Version Sub Minor
#   GenICam準拠のバージョン情報(カメラ機能仕様のバージョン)
try:
    v_DeviceSFNCVersionSubMinor = prop_map.get_value_int('DeviceSFNCVersionSubMinor')
    print('DeviceSFNCVersionSubMinor =', v_DeviceSFNCVersionSubMinor)
except Exception as e:
    v_DeviceSFNCVersionSubMinor = None
    print('  DeviceSFNCVersionSubMinor: get failed:', e)

# - DeviceTLType : Device TL Type
#   使用中の通信方式(DeviceTLType)
try:
    v_DeviceTLType = prop_map.get_value_str('DeviceTLType')
    print('DeviceTLType =', v_DeviceTLType)
except Exception as e:
    v_DeviceTLType = None
    print('  DeviceTLType: get failed:', e)

# - DeviceTLVersionMajor : Device TL Version Major
#   使用中の通信方式(DeviceTLVersionMajor)
try:
    v_DeviceTLVersionMajor = prop_map.get_value_int('DeviceTLVersionMajor')
    print('DeviceTLVersionMajor =', v_DeviceTLVersionMajor)
except Exception as e:
    v_DeviceTLVersionMajor = None
    print('  DeviceTLVersionMajor: get failed:', e)

# - DeviceTLVersionMinor : Device TL Version Minor
#   使用中の通信方式(DeviceTLVersionMinor)
try:
    v_DeviceTLVersionMinor = prop_map.get_value_int('DeviceTLVersionMinor')
    print('DeviceTLVersionMinor =', v_DeviceTLVersionMinor)
except Exception as e:
    v_DeviceTLVersionMinor = None
    print('  DeviceTLVersionMinor: get failed:', e)


# - DeviceTLVersionSubMinor : Device TL Version Sub Minor
#   使用中の通信方式(DeviceTLVersionSubMinor)
try:
    v_DeviceTLVersionSubMinor = prop_map.get_value_int('DeviceTLVersionSubMinor')
    print('DeviceTLVersionSubMinor =', v_DeviceTLVersionSubMinor)
except Exception as e:
    v_DeviceTLVersionSubMinor = None
    print('  DeviceTLVersionSubMinor: get failed:', e)

# - DeviceLinkThroughputLimitMode : Device Link Throughput Limit Mode
#   帯域幅の制限を有効にする(true:制限する、false:無制限)
try:
    v_DeviceLinkThroughputLimitMode = prop_map.get_value_bool('DeviceLinkThroughputLimitMode')
    print('DeviceLinkThroughputLimitMode =', v_DeviceLinkThroughputLimitMode)
except Exception as e:
    v_DeviceTLVersionSubMinor = None
    print('  DeviceLinkThroughputLimitMode: get failed:', e)
try:
    prop_map.set_value('DeviceLinkThroughputLimitMode', v_DeviceLinkThroughputLimitMode)
except Exception as e:
    print('  TimestampLatchValue: set failed:', e)

# - DeviceLinkThroughputLimit : Device Link Throughput Limit
#   最大スループット(単位:bps、例:125MB/s = 125000000)
try:
    v_DeviceLinkThroughputLimit = prop_map.get_value_float('DeviceLinkThroughputLimit')
    print('DeviceLinkThroughputLimit =', v_DeviceLinkThroughputLimit)
except Exception as e:
    v_DeviceTLVersionSubMinor = None
    print('  DeviceLinkThroughputLimit: get failed:', e)
try:
    prop_map.set_value('DeviceLinkThroughputLimit', v_DeviceLinkThroughputLimit)
except Exception as e:
    print('  TimestampLatchValue: set failed:', e)

# - DeviceLinkSelector : Device Link Selector
#   どのリンクを操作するかの選択(通常は 0)
try:
    v_DeviceLinkSelector = prop_map.get_value_int('DeviceLinkSelector')
    print('DeviceLinkSelector =', v_DeviceLinkSelector)
except Exception as e:
    v_DeviceTLVersionSubMinor = None
    print('  DeviceLinkSelector: get failed:', e)

# - DeviceLinkHeartbeatTimeout : Device Link Heartbeat Timeout
#   ハートビートタイムアウト(通信が切れたと判断するまでの時間、単位:ms)
try:
    v_DeviceLinkHeartbeatTimeout = prop_map.get_value_float('DeviceLinkHeartbeatTimeout')
    print('DeviceLinkHeartbeatTimeout =', v_DeviceLinkHeartbeatTimeout)
except Exception as e:
    v_DeviceLinkHeartbeatTimeout = None
    print('  DeviceLinkHeartbeatTimeout: get failed:', e)
try:
    prop_map.set_value('DeviceLinkHeartbeatTimeout', v_DeviceLinkHeartbeatTimeout)
except Exception as e:
    print('  DeviceLinkHeartbeatTimeout: set failed:', e)


# - DeviceStreamChannelCount : Device Stream Channel Count
try:
    v_DeviceStreamChannelCount = prop_map.get_value_int('DeviceStreamChannelCount')
    print('DeviceStreamChannelCount =', v_DeviceStreamChannelCount)
except Exception as e:
    v_DeviceStreamChannelCount = None
    print('  DeviceStreamChannelCount: get failed:', e)

# - DeviceStreamChannelSelector : Device Stream Channel Selector
try:
    v_DeviceStreamChannelSelector = prop_map.get_value_int('DeviceStreamChannelSelector')
    print('DeviceStreamChannelSelector =', v_DeviceStreamChannelSelector)
except Exception as e:
    v_DeviceStreamChannelSelector = None
    print('  DeviceStreamChannelSelector: get failed:', e)

# - DeviceStreamChannelType : Device Stream Channel Type
try:
    v_DeviceStreamChannelType = prop_map.get_value_str('DeviceStreamChannelType')
    print('DeviceStreamChannelType =', v_DeviceStreamChannelType)
except Exception as e:
    v_DeviceStreamChannelType = None
    print('  DeviceStreamChannelType: get failed:', e)

# - DeviceStreamChannelLink : Device Stream Channel Link
try:
    v_DeviceStreamChannelLink = prop_map.get_value_int('DeviceStreamChannelLink')
    print('DeviceStreamChannelLink =', v_DeviceStreamChannelLink)
except Exception as e:
    v_DeviceStreamChannelLink = None
    print('  DeviceStreamChannelLink: get failed:', e)

# - DeviceStreamChannelEndianness : Device Stream Channel Endianness
try:
    v_DeviceStreamChannelEndianness = prop_map.get_value_str('DeviceStreamChannelEndianness')
    print('DeviceStreamChannelEndianness =', v_DeviceStreamChannelEndianness)
except Exception as e:
    v_DeviceStreamChannelEndianness = None
    print('  DeviceStreamChannelEndianness: get failed:', e)


# - DeviceStreamChannelPacketSize : DeviceStreamChannelPacketSize
#   ストリームのパケットサイズ(GigE Visionなどで通信サイズを調整)
try:
    v_DeviceStreamChannelPacketSize = prop_map.get_value_int('DeviceStreamChannelPacketSize')
    print('DeviceStreamChannelPacketSize =', v_DeviceStreamChannelPacketSize)
except Exception as e:
    v_DeviceStreamChannelPacketSize = None
    print('  DeviceStreamChannelPacketSize: get failed:', e)
try:
    prop_map.set_value('DeviceStreamChannelPacketSize', v_DeviceStreamChannelPacketSize)
except Exception as e:
    print('  DeviceStreamChannelPacketSize: set failed:', e)


# - DeviceEventChannelCount : DeviceEventChannelCount
#   イベントチャネルの数(イベント処理が可能なチャネル数)
try:
    v_DeviceLinkHeartbeatTimeout = prop_map.get_value_int('DeviceEventChannelCount')
    print('DeviceEventChannelCount =', v_DeviceLinkHeartbeatTimeout)
except Exception as e:
    v_DeviceLinkHeartbeatTimeout = None
    print('  DeviceEventChannelCount: get failed:', e)


# - TimestampReset : Timestamp Reset
#   タイムスタンプを初期化(値をリセット)
try:
    print('TimestampReset (Command)')
    prop_map.execute_command('TimestampReset')

except Exception as e:
    print('  TimestampReset: command failed:', e)

# - TimestampLatch : Timestamp Latch
#   現在のタイムスタンプ値を保存
try:
    print('TimestampLatch (Command)')
    prop_map.set_value('TimestampReset',True)
except Exception as e:
    print('  TimestampLatch: command failed:', e)

# - TimestampLatchValue : Timestamp Latch Value
#   保持されたタイムスタンプの数値形式
try:
    v_TimestampLatchValue = prop_map.get_value_int('TimestampLatchValue')
    print('TimestampLatchValue =', v_TimestampLatchValue)
except Exception as e:
    v_TimestampLatchValue = None
    print('  TimestampLatchValue: get failed:', e)

# - DeviceTemperatureSelector : Device Temperature Selector
#   温度モニタリング( Sensor, Mainboard など選択可能)
try:
    v_DeviceTemperatureSelector = prop_map.get_value_str('DeviceTemperatureSelector')
    print('DeviceTemperatureSelector =', v_DeviceTemperatureSelector)
except Exception as e:
    v_DeviceTemperatureSelector = None
    print('  DeviceTemperatureSelector: get failed:', e)


# - DeviceTemperature : Device Temperature
#   温度モニタリングで選択した部位の現在温度
try:
    v_DeviceTemperature = prop_map.get_value_float('DeviceTemperature')
    print('DeviceTemperature =', v_DeviceTemperature)
except Exception as e:
    v_DeviceTemperature = None
    print('  DeviceTemperature: get failed:', e)
[Device Control]の詳細を閉じる▲ -
IC4詳細・解説
Action Controlは、GigEカメラを複数台で同時に制御するための仕組みで、ネットワーク経由で一斉にコマンドを送れるのが特徴です。通常、外部トリガーやソフトウェアトリガーを使うとカメラごとに命令を与える必要がありますが、この機能を利用すれば、1つのアクションコマンドを発行するだけで複数のカメラが同時に反応し、露光開始のタイミングを同期することができます。これにより、外部トリガーのような配線の手間や外部制御装置への依存を減らし、ネットワークベースで柔軟に同期撮影を構築することが可能です。また、Actioin Controlにはカメラをグループごとに制御できる機能があるため「すべてのカメラを一斉に動作させる」だけでなく「特定のグループに属するカメラだけを反応させる」といった細やかな運用も実現できます。例えば、下図のように「ActionGroupKey」「ActionGroupMask」を「0x1」と指定しActionCommnadを実行することで「0x1」だけを撮影することができます。
# ActionDeviceKey : アクションコマンドの識別用キー(カメラごとに一意の値を指定可能) # try: # v = prop_map.get_value_int("ActionDeviceKey") # print("ActionDeviceKey =", v) # except Exception as e: # print("ActionDeviceKey get failed:", e) try: prop_map.set_value("ActionDeviceKey", 1) except Exception as e: print("ActionDeviceKey set failed:", e) # ActionSelector : 使用するアクションを選択(通常は "0") try: v = prop_map.get_value_str("ActionSelector") print("ActionSelector =", v) except Exception as e: print("ActionSelector get failed:", e) try: prop_map.set_value("ActionSelector", 0) except Exception as e: print("ActionSelector set failed:", e) # ActionGroupKey : アクションのグループキー(複数台のカメラに同時に信号を送るときの識別番号) try: v = prop_map.get_value_int("ActionGroupKey") print("ActionGroupKey =", v) except Exception as e: print("ActionGroupKey get failed:", e) try: prop_map.set_value("ActionGroupKey", v) except Exception as e: print("ActionGroupKey set failed:", e) # ActionGroupMask : アクショングループのマスク設定(特定のビットを使用してグループ分けを制御) try: v = prop_map.get_value_int("ActionGroupMask") print("ActionGroupMask =", v) except Exception as e: print("ActionGroupMask get failed:", e) try: prop_map.set_value("ActionGroupMask", v) except Exception as e: print("ActionGroupMask set failed:", e) # アクションコマンドを受け付けるキューの最大数(バッファサイズのようなもの) try: v = prop_map.get_value_int("ActionQueueSize") print("ActionQueueSize =", v) except Exception as e: print("ActionQueueSize get failed:", e)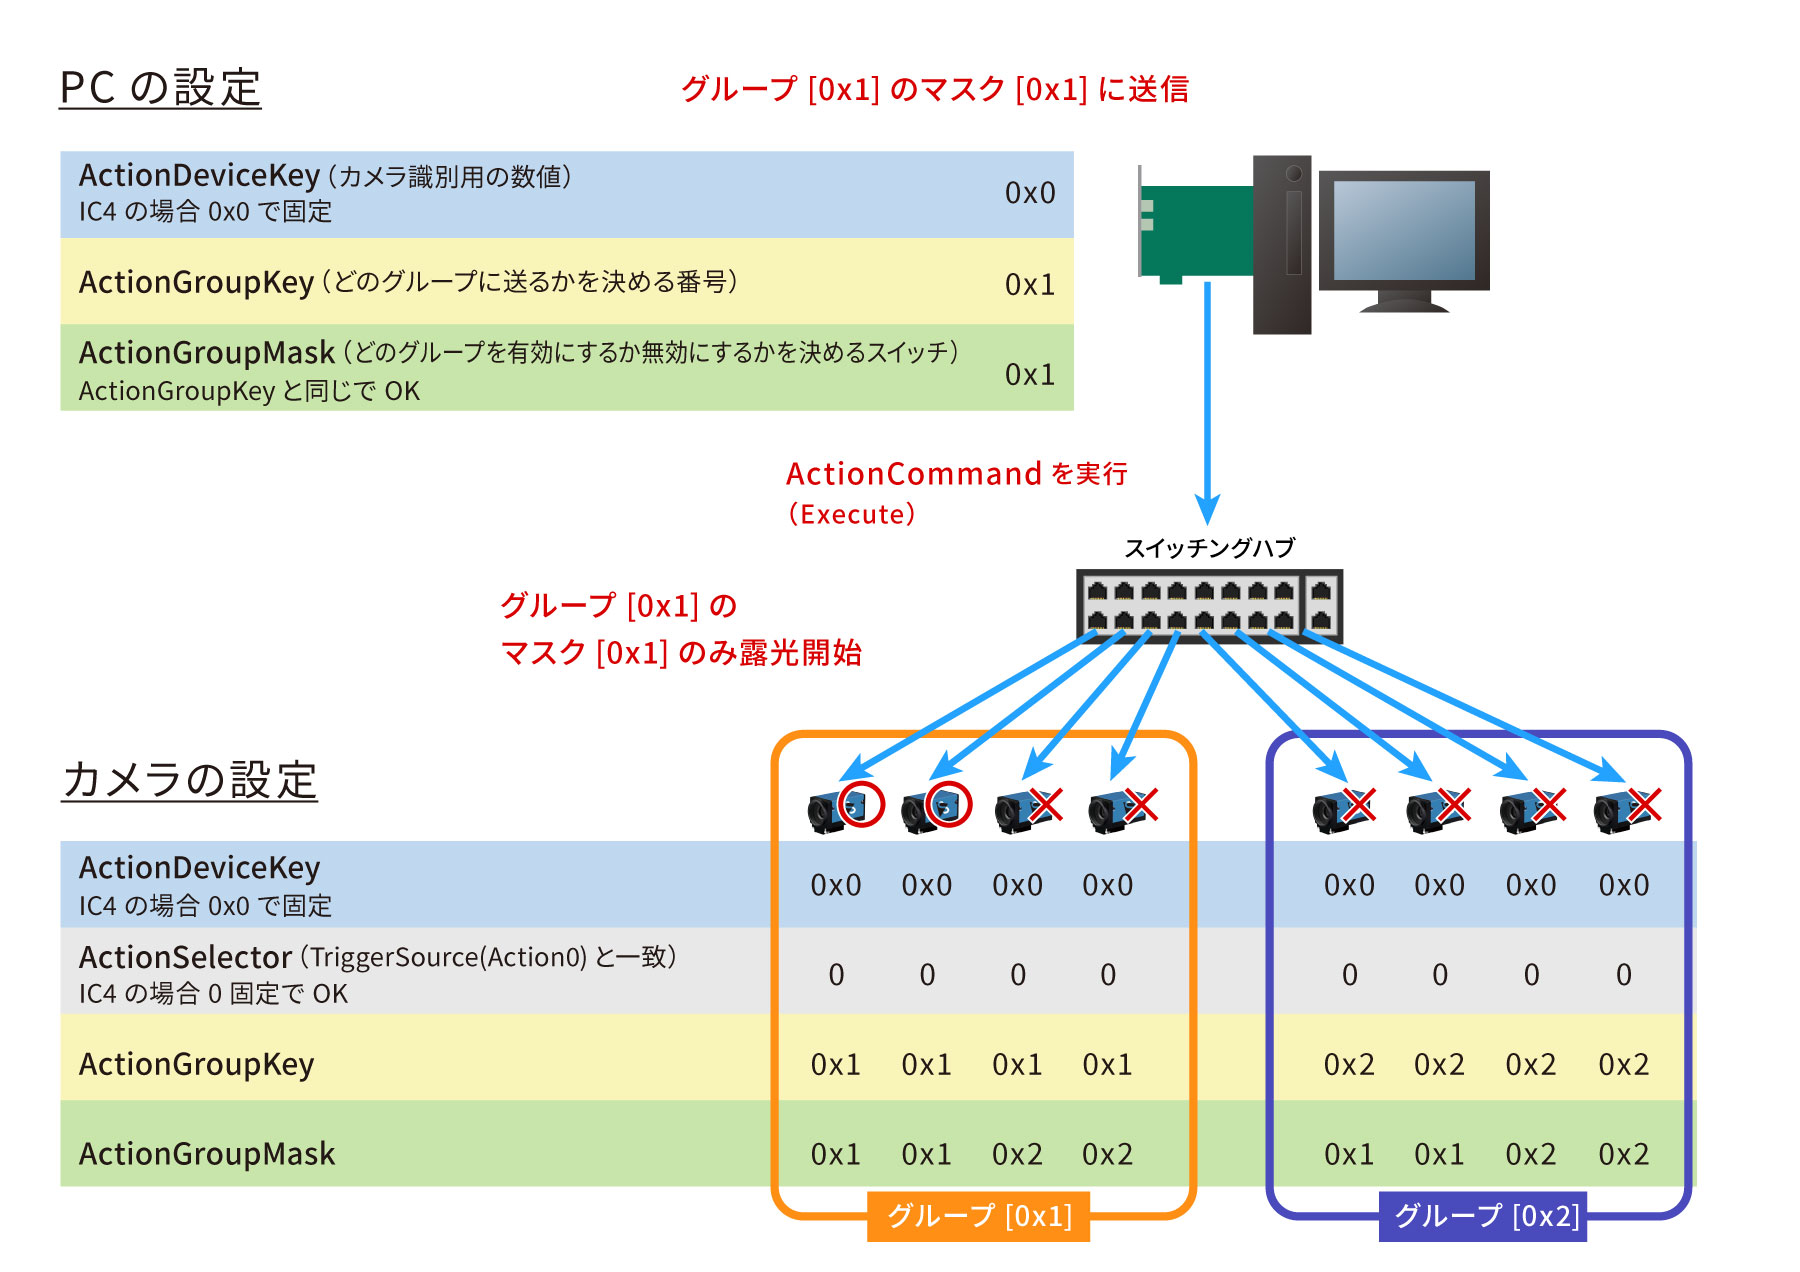 [Action Control]の詳細を閉じる▲
 -
IC4詳細・解説
ActionSchedulerは、カメラに対して「いつアクションを実行するか」をあらかじめ予約できる機能で、複数台のカメラを高精度に同期させたい場合や、定期的な撮影を自動化したい場合に有効です。通常のトリガーではコマンドや信号を送った瞬間に撮影が開始されますが、ActionSchedulerを使うとカメラ内部のクロックを基準に、将来の特定の時刻にアクションを発動するよう設定できます。例えば ActionSchedulerTimeに1,000,000,000nsを指定すれば「1秒後に実行」となり、ActionSchedulerInterval(μs)に値を設定すればその間隔で繰り返し実行されます。これにより、30fpsの周期撮影や複数カメラの完全なタイミング合わせが可能になります。また、設定を反映させるには ActionSchedulerCommitを実行し、不要になった場合は ActionSchedulerCancelによってActionSchedulerを解除できます。さらに ActionSchedulerStatusを確認すれば、現在のActionSchedulerの状態(Idle、Scheduled など)が取得でき、正しくスケジュールされているかを監視できます。
# ActionSchedulerTimeで指定された時間に実行されるアクションをスケジューリングします。
# オプションで、ActionSchedulerIntervalの間隔で繰り返されます。
try:
    prop_map.execute_command("ActionSchedulerCommit")
    print("ActionSchedulerCommit executed")
except Exception as e:
    print("ActionSchedulerCommit failed:", e)

# アクションスケジューラで予約実行する時刻を設定(単位:ナノ秒)
# ここでは 1 秒後(1,000,000,000ns)にアクションが実行されるように指定
try:
    v = prop_map.get_value_int("ActionSchedulerTime")
    print("ActionSchedulerTime =", v)
except Exception as e:
    print("ActionSchedulerTime get failed:", e)
try:
    prop_map.set_value("ActionSchedulerTime", 1000000000)
except Exception as e:
    print("ActionSchedulerTime set failed:", e)

# アクションスケジューラの繰り返し間隔を指定(0で単発実行)
# ここでは 1ns(最小値)としているが、周期撮影の場合は例えば33,333,333ns(30fps)
try:
    v = prop_map.get_value_int("ActionSchedulerInterval")
    print("ActionSchedulerInterval =", v)
except Exception as e:
    print("ActionSchedulerInterval get failed:", e)
try:
    prop_map.set_value("ActionSchedulerInterval", 1)
except Exception as e:
    print("ActionSchedulerInterval set failed:", e)


# スケジューラをキャンセルする(予約中のトリガーを無効化)
try:
    prop_map.execute_command("ActionSchedulerCancel")
    print("ActionSchedulerCancel executed")
except Exception as e:
    print("ActionSchedulerCancel failed:", e)


# 現在のスケジューラの状態を取得(ActionSchedulerStatus_Idle, ActionSchedulerStatus_Scheduledなどの文字列が返る)
try:
    v = prop_map.get_value_str("ActionSchedulerStatus")
    print("ActionSchedulerStatus =", v)
except Exception as e:
    print("ActionSchedulerStatus get failed:", e)
[ActionScheduler]の詳細を閉じる▲ -
IC4詳細・解説
FileAccessControlは、カメラ内部に格納できるユーザーファイルやカスタムデータを操作するための仕組みで、撮影パラメータだけでなくキャリブレーション情報や補正テーブルなどの独自データを自由に保存・読み込みできます。使用するにはまずFileSelectorで対象のファイル(例:UserFile0)を指定し、FileOperationSelectorで処理内容(Open、Read、Write、Deleteなど)を決め、FileOperationExecuteを実行します。読み出しや書き込みの結果はFileAccessBufferというプロパティを通じてやり取りされます。たとえばReadを実行するとカメラ内部のデータがFileAccessBufferに転送され、アプリケーション側でこのバッファを取得してPCのメモリやファイルに書き出すことで利用できるようになります。Writeの場合はアプリケーションがFileAccessBufferにデータを書き込み、それをカメラに送るという手順です。これによりカメラ本体に任意のデータを保持できます。
# - FileSelector : File Selector
#   FileSelector:操作対象のファイルを選択
#   例:UserFile0, UserFile1, UserFile2 など(カメラに依存)

try:
    v_FileSelector = prop_map.get_value_str('FileSelector')
    print('FileSelector =', v_FileSelector)
except Exception as e:
    v_FileSelector = None
    print('  FileSelector: get failed:', e)
try:
    prop_map.set_value('FileSelector', v_FileSelector)
except Exception as e:
    print('  FileSelector: set failed:', e)

# - FileOperationSelector : File Operation Selector
#   FileOperationSelector:操作内容を選択Open, Close, Read, Write, Delete
try:
    v_FileOperationSelector = prop_map.get_value_str('FileOperationSelector')
    print('FileOperationSelector =', v_FileOperationSelector)
except Exception as e:
    v_FileOperationSelector = None
    print('  FileOperationSelector: get failed:', e)
try:
    prop_map.set_value('FileOperationSelector', v_FileOperationSelector)
except Exception as e:
    print('  FileOperationSelector: set failed:', e)

# - FileOperationExecute : File Operation Execute
#   FileOperationSelector:操作内容を選択Open, Close, Read, Write, Delete
try:
    print('FileOperationExecute (Command)')
    prop_map.execute_command('FileOperationExecute')
except Exception as e:
    print('  FileOperationExecute: command failed:', e)

# - FileOpenMode : File Open Mode
#   FileOpenMode:ファイルを開く際のモード("Read", "Write", "ReadWrite")
try:
    v_FileOpenMode = prop_map.get_value_str('FileOpenMode')
    print('FileOpenMode =', v_FileOpenMode)
except Exception as e:
    v_FileOpenMode = None
    print('  FileOpenMode: get failed:', e)

# - FileAccessOffset : File Access Offset
#   FileAccessOffset:ファイル読み書きのバイトオフセット位置を指定
try:
    v_FileAccessOffset = prop_map.get_value_int('FileAccessOffset')
    print('FileAccessOffset =', v_FileAccessOffset)
except Exception as e:
    v_FileAccessOffset = None
    print('  FileAccessOffset: get failed:', e)

# - FileAccessLength : File Access Length
#   FileAccessLength:読み書きするデータ長(バイト数)を指定
try:
    v_FileAccessLength = prop_map.get_value_int('FileAccessLength')
    print('FileAccessLength =', v_FileAccessLength)
except Exception as e:
    v_FileAccessLength = None
    print('  FileAccessLength: get failed:', e)
try:
    prop_map.set_value('FileAccessLength', v_FileAccessLength)
except Exception as e:
    print('  FileAccessLength: set failed:', e)

# - FileOperationStatus : File Operation Status
#   FileOperationStatus:現在のファイル操作状態 Success, Failure
try:
    v_FileOperationStatus = prop_map.get_value_str('FileOperationStatus')
    print('FileOperationStatus =', v_FileOperationStatus)
except Exception as e:
    v_FileOperationStatus = None
    print('  FileOperationStatus: get failed:', e)

# - FileOperationResult : File Operation Result
#   FileOperationResult:最後のファイル操作の結果
try:
    v_FileOperationResult = prop_map.get_value_int('FileOperationResult')
    print('FileOperationResult =', v_FileOperationResult)
except Exception as e:
    v_FileOperationResult = None
    print('  FileOperationResult: get failed:', e)

# - FileSize : File Size
#   FileSize:選択されたファイルの全体サイズ(バイト単位)
try:
    v_FileSize = prop_map.get_value_int('FileSize')
    print('FileSize =', v_FileSize)
except Exception as e:
    v_FileSize = None
    print('  FileSize: get failed:', e)
[File Access Control]の詳細を閉じる▲ -
IC4詳細・解説
Analog Controlは、カメラの映像信号に関わる画質パラメータを調整するためのカテゴリで、色合いや明るさなどの画像を調整します。このカテゴリに含まれる代表的な機能として、ゲイン(Gain)があり、これはセンサー出力を増幅して全体的な明るさを引き上げます。暗い環境で有効ですが、ノイズも大きくなるため、必要に応じて適切な範囲で設定する必要があります。また、ブラックレベル(BlackLevel)があり、これは画像全体の黒基準を変えることで暗部の階調を調整することができます。ホワイトバランス(WhiteBalance)は、赤・緑・青の各色ゲインを補正して、光源の色温度に左右されない色再現を実現します。またBrightness や Contrast の調整によって、全体的な明るさバランスや階調の強調具合を変更できます。
# - BalanceRatioSelector : Balance Ratio Selector
#   BalanceRatioSelector:補正対象の色チャンネルを選択("Red", "Green", "Blue")
try:
    v_BalanceRatioSelector = prop_map.get_value_str('BalanceRatioSelector')
    print('BalanceRatioSelector =', v_BalanceRatioSelector)
except Exception as e:
    v_BalanceRatioSelector = None
    print('  BalanceRatioSelector: get failed:', e)
try:
    prop_map.set_value('BalanceRatioSelector', v_BalanceRatioSelector)
except Exception as e:
    print('  BalanceRatioSelector: set failed:', e)

# - BalanceRatio : Balance Ratio
#   BalanceRatio:選択中の色チャンネルのホワイトバランス比率
try:
    v_BalanceRatio = prop_map.get_value_float('BalanceRatio')
    print('BalanceRatio =', v_BalanceRatio)
except Exception as e:
    v_BalanceRatio = None
    print('  BalanceRatio: get failed:', e)
try:
    prop_map.set_value('BalanceRatio', v_BalanceRatio)
except Exception as e:
    print('  BalanceRatio: set failed:', e)

# - BalanceWhiteAuto : Auto White Balance
#   BalanceRatioSelector:補正対象の色チャンネルを選択("Red", "Green", "Blue")
try:
    v_BalanceWhiteAuto = prop_map.get_value_str('BalanceWhiteAuto')
    print('BalanceWhiteAuto =', v_BalanceWhiteAuto)
except Exception as e:
    v_BalanceWhiteAuto = None
    print('  BalanceWhiteAuto: get failed:', e)
try:
    prop_map.set_value('BalanceWhiteAuto', v_BalanceWhiteAuto)
except Exception as e:
    print('  BalanceWhiteAuto: set failed:', e)

# - BalanceWhiteMode : White Balance Mode
#   BalanceWhiteMode:ホワイトバランス方式  WhiteBalanceMode_GrayWorld, WhiteBalanceMode_Temperature
try:
    v_BalanceWhiteMode = prop_map.get_value_str('BalanceWhiteMode')
    print('BalanceWhiteMode =', v_BalanceWhiteMode)
except Exception as e:
    v_BalanceWhiteMode = None
    print('  BalanceWhiteMode: get failed:', e)
try:
    prop_map.set_value('BalanceWhiteMode', v_BalanceWhiteMode)
except Exception as e:
    print('  BalanceWhiteMode: set failed:', e)

# - BalanceWhiteAutoPreset : White Balance Auto Preset
#   BalanceWhiteAutoPreset:AWBのプリセット(例:BalanceWhiteAutoPreset_Any, BalanceWhiteAutoPreset_WarmWhite, BalanceWhiteAutoPreset_CoolWhite, BalanceWhiteAutoPreset_DayLight, BalanceWhiteAutoPreset_DeepShade
try:
    v_BalanceWhiteAutoPreset = prop_map.get_value_str('BalanceWhiteAutoPreset')
    print('BalanceWhiteAutoPreset =', v_BalanceWhiteAutoPreset)
except Exception as e:
    v_BalanceWhiteAutoPreset = None
    print('  BalanceWhiteAutoPreset: get failed:', e)
try:
    prop_map.set_value('BalanceWhiteAutoPreset', v_BalanceWhiteAutoPreset)
except Exception as e:
    print('  BalanceWhiteAutoPreset: set failed:', e)

# - BalanceWhiteTemperaturePreset : White Balance Temperature Preset
#   BalanceWhiteTemperaturePreset:色温度のプリセット(BalanceWhiteTemperaturePreset_SodiumVaporLamp, BalanceWhiteTemperaturePreset_WarmLight, BalanceWhiteTemperaturePreset_HalogenLight, BalanceWhiteTemperaturePreset_NeutralWhite, BalanceWhiteTemperaturePreset_CoolWhiteFluorescentLight, BalanceWhiteTemperaturePreset_CoolWhiteDaylight, BalanceWhiteTemperaturePreset_Daylight, BalanceWhiteTemperaturePreset_CoolWhiteLED, BalanceWhiteTemperaturePreset_BlueSky)
try:
    v_BalanceWhiteTemperaturePreset = prop_map.get_value_str('BalanceWhiteTemperaturePreset')
    print('BalanceWhiteTemperaturePreset =', v_BalanceWhiteTemperaturePreset)
except Exception as e:
    v_BalanceWhiteTemperaturePreset = None
    print('  BalanceWhiteTemperaturePreset: get failed:', e)
try:
    prop_map.set_value('BalanceWhiteTemperaturePreset', v_BalanceWhiteTemperaturePreset)
except Exception as e:
    print('  BalanceWhiteTemperaturePreset: set failed:', e)

# - BalanceWhiteTemperature : White Balance Temperature
#   BalanceWhiteTemperature:色温度(単位:ケルビン)
try:
    v_BalanceWhiteTemperature = prop_map.get_value_int('BalanceWhiteTemperature')
    print('BalanceWhiteTemperature =', v_BalanceWhiteTemperature)
except Exception as e:
    v_BalanceWhiteTemperature = None
    print('  BalanceWhiteTemperature: get failed:', e)
try:
    prop_map.set_value('BalanceWhiteTemperature', v_BalanceWhiteTemperature)
except Exception as e:
    print('  BalanceWhiteTemperature: set failed:', e)


# - BlackLevel : Black Level
#   BlackLevel:黒レベル補正値(通常 0~数十)
try:
    v_BlackLevel = prop_map.get_value_float('BlackLevel')
    print('BlackLevel =', v_BlackLevel)
except Exception as e:
    v_BlackLevel = None
    print('  BlackLevel: get failed:', e)
try:
    prop_map.set_value('BlackLevel', v_BlackLevel)
except Exception as e:
    print('  BlackLevel: set failed:', e)

# - Gain : Gain
#   Gain:ゲイン値
try:
    v_Gain = prop_map.get_value_float('Gain')
    print('Gain =', v_Gain)
except Exception as e:
    v_Gain = None
    print('  Gain: get failed:', e)
try:
    prop_map.set_value('Gain', v_Gain)
except Exception as e:
    print('  Gain: set failed:', e)

# - GainAuto : Gain Auto
#   GainAuto:ゲイン自動調整("Off", "Once", "Continuous")
try:
    v_GainAuto = prop_map.get_value_str('GainAuto')
    print('GainAuto =', v_GainAuto)
except Exception as e:
    v_GainAuto = None
    print('  GainAuto: get failed:', e)
try:
    prop_map.set_value('GainAuto', v_GainAuto)
except Exception as e:
    print('  GainAuto: set failed:', e)

# - GainAutoLowerLimit : Gain Auto Lower Limit
#   GainAutoLowerLimit:自動ゲインの最小制限値
try:
    v_GainAutoLowerLimit = prop_map.get_value_float('GainAutoLowerLimit')
    print('GainAutoLowerLimit =', v_GainAutoLowerLimit)
except Exception as e:
    v_GainAutoLowerLimit = None
    print('  GainAutoLowerLimit: get failed:', e)
try:
    prop_map.set_value('GainAutoLowerLimit', v_GainAutoLowerLimit)
except Exception as e:
    print('  GainAutoLowerLimit: set failed:', e)

# - GainAutoUpperLimit : Gain Auto Upper Limit
#   GainAutoUpperLimit:自動ゲインの最大制限値
try:
    v_GainAutoUpperLimit = prop_map.get_value_float('GainAutoUpperLimit')
    print('GainAutoUpperLimit =', v_GainAutoUpperLimit)
except Exception as e:
    v_GainAutoUpperLimit = None
    print('  GainAutoUpperLimit: get failed:', e)
try:
    prop_map.set_value('GainAutoUpperLimit', v_GainAutoUpperLimit)
except Exception as e:
    print('  GainAutoUpperLimit: set failed:', e)

# - Gamma : Gamma
#   Gamma:出力画像の階調補正(通常 0.5~2.5、1.0 = リニア)
try:
    v_Gamma = prop_map.get_value_float('Gamma')
    print('Gamma =', v_Gamma)
except Exception as e:
    v_Gamma = None
    print('  Gamma: get failed:', e)
try:
    prop_map.set_value('Gamma', v_Gamma)
except Exception as e:
    print('  Gamma: set failed:', e)
[Analog Control]の詳細を閉じる▲ -
IC4詳細・解説
Color Transformation Controlは、カメラから出力されるカラー画像の色合いを調整する機能です。RGBそれぞれの値を変換行列に通すことで、赤・緑・青のバランスを変え、照明環境に応じた補正を行います。たとえば、蛍光灯の下で赤みが強くなったり、屋外で青みが強くなる場合に、行列の係数を変えることで色を中和し、実際の見た目に近づけることができます。基本的にはRGB to RGB変換を用い、ColorTransformationEnableでこの機能をオンにすると有効になります。その状態では、ColorTransformationValueSelectorで行列のどの係数を操作するかを選び、ColorTransformationValueで数値を設定します。これにより、特定の色成分を強めたり弱めたりする微調整が可能です。また、Saturation EnableやSaturationを使うと、全体の彩度を高めて鮮やかさを出すこともできます。これらの設定によって、撮影環境や用途に合わせて柔軟に色の見え方をコントロールでき、最適な映像品質を得ることが可能になります。
# - ColorTransformationSelector : Color Transformation Selector
#   ColorTransformationSelector:色変換モードの選択(例:"RGBtoRGB")
try:
    v_ColorTransformationSelector = prop_map.get_value_str('ColorTransformationSelector')
    print('ColorTransformationSelector =', v_ColorTransformationSelector)
except Exception as e:
    v_ColorTransformationSelector = None
    print('  ColorTransformationSelector: get failed:', e)
try:
    prop_map.set_value('ColorTransformationSelector', v_ColorTransformationSelector)
except Exception as e:
    print('  ColorTransformationSelector: set failed:', e)

# - ColorTransformationEnable : Color Transformation Enable
#   ColorTransformationEnable:色変換を有効にするかどうか
try:
    v_ColorTransformationEnable = prop_map.get_value_bool('ColorTransformationEnable')
    print('ColorTransformationEnable =', v_ColorTransformationEnable)
except Exception as e:
    v_ColorTransformationEnable = None
    print('  ColorTransformationEnable: get failed:', e)
try:
    prop_map.set_value('ColorTransformationEnable', v_ColorTransformationEnable)
except Exception as e:
    print('  ColorTransformationEnable: set failed:', e)

# - ColorTransformationValueSelector : Color Transformation Value Selector
#   RGB変換マトリクスの各要素やオフセット
try:
    v_ColorTransformationValueSelector = prop_map.get_value_str('ColorTransformationValueSelector')
    print('ColorTransformationValueSelector =', v_ColorTransformationValueSelector)
except Exception as e:
    v_ColorTransformationValueSelector = None
    print('  ColorTransformationValueSelector: get failed:', e)
try:
    prop_map.set_value('ColorTransformationValueSelector', v_ColorTransformationValueSelector)
except Exception as e:
    print('  ColorTransformationValueSelector: set failed:', e)

# - ColorTransformationValue : Color Transformation Value
#   ColorTransformationValue:選択された係数の数値を設定または取得
try:
    v_ColorTransformationValue = prop_map.get_value_float('ColorTransformationValue')
    print('ColorTransformationValue =', v_ColorTransformationValue)
except Exception as e:
    v_ColorTransformationValue = None
    print('  ColorTransformationValue: get failed:', e)
try:
    prop_map.set_value('ColorTransformationValue', v_ColorTransformationValue)
except Exception as e:
    print('  ColorTransformationValue: set failed:', e)

# - Saturation : Saturation
#   Saturation:彩度(色の鮮やかさ)を調整
try:
    v_Saturation = prop_map.get_value_float('Saturation')
    print('Saturation =', v_Saturation)
except Exception as e:
    v_Saturation = None
    print('  Saturation: get failed:', e)
try:
    prop_map.set_value('Saturation', v_Saturation)
except Exception as e:
    print('  Saturation: set failed:', e)

# - Hue : Hue
#   Hue:色相(色の回転)を調整
try:
    v_Hue = prop_map.get_value_float('Hue')
    print('Hue =', v_Hue)
except Exception as e:
    v_Hue = None
    print('  Hue: get failed:', e)
try:
    prop_map.set_value('Hue', v_Hue)
except Exception as e:
    print('  Hue: set failed:', e)
[Color Transformation Control]の詳細を閉じる▲ -
IC4詳細・解説
MultiFrameSetOutputModeは各フレームごとに露光時間やゲインの撮影パラメータを個別に割り当てることができます。例えば、1フレーム目は短い露光時間で高速動作を記録し、2フレーム目は長い露光時間で暗部の詳細を取得する、といった設定が可能です。その結果、同じシーンを異なる条件で撮影した複数の画像を一度に得られるため、HDR合成などに活用できます。
# - MultiFrameSetOutputModeEnable : Enable Multi Frame Set Output Mode
# - MultiFrameSetOutputMode の有効/無効を設定(false = 無効, true = 有効)
# - 有効にすると、1回のトリガーで複数のフレームを順番に出力可能
try:
    v_MultiFrameSetOutputModeEnable = prop_map.get_value_bool('MultiFrameSetOutputModeEnable')
    print('MultiFrameSetOutputModeEnable =', v_MultiFrameSetOutputModeEnable)
except Exception as e:
    v_MultiFrameSetOutputModeEnable = None
    print('  MultiFrameSetOutputModeEnable: get failed:', e)
try:
    prop_map.set_value('MultiFrameSetOutputModeEnable', v_MultiFrameSetOutputModeEnable)
except Exception as e:
    print('  MultiFrameSetOutputModeEnable: set failed:', e)

# - MultiFrameSetOutputModeFrameCount : Frame Count
# - 出力するフレーム数を指定(例: 2フレーム)
# - "MultiFrameSetOutputModeFrameCount_2Frames" は2枚の異なる設定で連続撮影
try:
    v_MultiFrameSetOutputModeFrameCount = prop_map.get_value_str('MultiFrameSetOutputModeFrameCount')
    print('MultiFrameSetOutputModeFrameCount =', v_MultiFrameSetOutputModeFrameCount)
except Exception as e:
    v_MultiFrameSetOutputModeFrameCount = None
    print('  MultiFrameSetOutputModeFrameCount: get failed:', e)
try:
    prop_map.set_value('MultiFrameSetOutputModeFrameCount', v_MultiFrameSetOutputModeFrameCount)
except Exception as e:
    print('  MultiFrameSetOutputModeFrameCount: set failed:', e)

# - MultiFrameSetOutputModeExposureTime0 : Exposure Time Frame 0
# - 各フレームごとの露光時間を設定(単位: μs または ms。カメラ仕様による)
# - Frame 0 の露光時間
try:
    v_MultiFrameSetOutputModeExposureTime0 = prop_map.get_value_float('MultiFrameSetOutputModeExposureTime0')
    print('MultiFrameSetOutputModeExposureTime0 =', v_MultiFrameSetOutputModeExposureTime0)
except Exception as e:
    v_MultiFrameSetOutputModeExposureTime0 = None
    print('  MultiFrameSetOutputModeExposureTime0: get failed:', e)
try:
    prop_map.set_value('MultiFrameSetOutputModeExposureTime0', v_MultiFrameSetOutputModeExposureTime0)
except Exception as e:
    print('  MultiFrameSetOutputModeExposureTime0: set failed:', e)

# - Frame 1 の露光時間
try:
    v_MultiFrameSetOutputModeExposureTime1 = prop_map.get_value_float('MultiFrameSetOutputModeExposureTime1')
    print('MultiFrameSetOutputModeExposureTime1 =', v_MultiFrameSetOutputModeExposureTime1)
except Exception as e:
    v_MultiFrameSetOutputModeExposureTime1 = None
    print('  MultiFrameSetOutputModeExposureTime1: get failed:', e)
try:
    prop_map.set_value('MultiFrameSetOutputModeExposureTime1', v_MultiFrameSetOutputModeExposureTime1)
except Exception as e:
    print('  MultiFrameSetOutputModeExposureTime1: set failed:', e)

# - Frame 2 の露光時間
try:
    v_MultiFrameSetOutputModeExposureTime2 = prop_map.get_value_float('MultiFrameSetOutputModeExposureTime2')
    print('MultiFrameSetOutputModeExposureTime2 =', v_MultiFrameSetOutputModeExposureTime2)
except Exception as e:
    v_MultiFrameSetOutputModeExposureTime2 = None
    print('  MultiFrameSetOutputModeExposureTime2: get failed:', e)
try:
    prop_map.set_value('MultiFrameSetOutputModeExposureTime2', v_MultiFrameSetOutputModeExposureTime2)
except Exception as e:
    print('  MultiFrameSetOutputModeExposureTime2: set failed:', e)

# - Frame 3 の露光時間
try:
    v_MultiFrameSetOutputModeExposureTime3 = prop_map.get_value_float('MultiFrameSetOutputModeExposureTime3')
    print('MultiFrameSetOutputModeExposureTime3 =', v_MultiFrameSetOutputModeExposureTime3)
except Exception as e:
    v_MultiFrameSetOutputModeExposureTime3 = None
    print('  MultiFrameSetOutputModeExposureTime3: get failed:', e)
try:
    prop_map.set_value('MultiFrameSetOutputModeExposureTime3', v_MultiFrameSetOutputModeExposureTime3)
except Exception as e:
    print('  MultiFrameSetOutputModeExposureTime3: set failed:', e)

# - MultiFrameSetOutputModeCustomGain : Customize Gain Values
#   カスタムゲインを使うかどうか(false = 露光ごとに共通ゲイン, true = フレームごとに別ゲイン)
try:
    v_MultiFrameSetOutputModeCustomGain = prop_map.get_value_bool('MultiFrameSetOutputModeCustomGain')
    print('MultiFrameSetOutputModeCustomGain =', v_MultiFrameSetOutputModeCustomGain)
except Exception as e:
    v_MultiFrameSetOutputModeCustomGain = None
    print('  MultiFrameSetOutputModeCustomGain: get failed:', e)
try:
    prop_map.set_value('MultiFrameSetOutputModeCustomGain', v_MultiFrameSetOutputModeCustomGain)
except Exception as e:
    print('  MultiFrameSetOutputModeCustomGain: set failed:', e)

# - MultiFrameSetOutputModeGain0 : Gain Frame 0
#   各フレームごとのゲイン設定(単位: dB またはカメラ固有スケール)
#   Frame 0 のゲイン
try:
    v_MultiFrameSetOutputModeGain0 = prop_map.get_value_float('MultiFrameSetOutputModeGain0')
    print('MultiFrameSetOutputModeGain0 =', v_MultiFrameSetOutputModeGain0)
except Exception as e:
    v_MultiFrameSetOutputModeGain0 = None
    print('  MultiFrameSetOutputModeGain0: get failed:', e)
try:
    prop_map.set_value('MultiFrameSetOutputModeGain0', v_MultiFrameSetOutputModeGain0)
except Exception as e:
    print('  MultiFrameSetOutputModeGain0: set failed:', e)

#   Frame 1 のゲイン
try:
    v_MultiFrameSetOutputModeGain1 = prop_map.get_value_float('MultiFrameSetOutputModeGain1')
    print('MultiFrameSetOutputModeGain1 =', v_MultiFrameSetOutputModeGain1)
except Exception as e:
    v_MultiFrameSetOutputModeGain1 = None
    print('  MultiFrameSetOutputModeGain1: get failed:', e)
try:
    prop_map.set_value('MultiFrameSetOutputModeGain1', v_MultiFrameSetOutputModeGain1)
except Exception as e:
    print('  MultiFrameSetOutputModeGain1: set failed:', e)

#   Frame 2 のゲイン
try:
    v_MultiFrameSetOutputModeGain2 = prop_map.get_value_float('MultiFrameSetOutputModeGain2')
    print('MultiFrameSetOutputModeGain2 =', v_MultiFrameSetOutputModeGain2)
except Exception as e:
    v_MultiFrameSetOutputModeGain2 = None
    print('  MultiFrameSetOutputModeGain2: get failed:', e)
try:
    prop_map.set_value('MultiFrameSetOutputModeGain2', v_MultiFrameSetOutputModeGain2)
except Exception as e:
    print('  MultiFrameSetOutputModeGain2: set failed:', e)

#   Frame 3 のゲイン
try:
    v_MultiFrameSetOutputModeGain3 = prop_map.get_value_float('MultiFrameSetOutputModeGain3')
    print('MultiFrameSetOutputModeGain3 =', v_MultiFrameSetOutputModeGain3)
except Exception as e:
    v_MultiFrameSetOutputModeGain3 = None
    print('  MultiFrameSetOutputModeGain3: get failed:', e)
try:
    prop_map.set_value('MultiFrameSetOutputModeGain3', v_MultiFrameSetOutputModeGain3)
except Exception as e:
    print('  MultiFrameSetOutputModeGain3: set failed:', e)
[Multi Frame Set Output Mode]の詳細を閉じる▲ -
IC4詳細・解説
AutoFunctionsROI を設定すると、カメラは画面全体ではなく、指定した領域だけを見て自動調整を行います。つまり、その範囲の明るさや色を基準にして、露光時間やゲイン、ホワイトバランスを決めることができます。これにより、背景が明るすぎたり暗すぎたりしても影響を受けにくく、撮りたい対象物に合わせた設定が自動で選ばれるようになります。
# - AutoFunctionsROIEnable : Auto Functions ROI Enable
#    AutoFunctionsROIEnable:ROIを有効にする(falseだと全体画像が対象)
try:
    v_AutoFunctionsROIEnable = prop_map.get_value_bool('AutoFunctionsROIEnable')
    print('AutoFunctionsROIEnable =', v_AutoFunctionsROIEnable)
except Exception as e:
    v_AutoFunctionsROIEnable = None
    print('  AutoFunctionsROIEnable: get failed:', e)
try:
    prop_map.set_value('AutoFunctionsROIEnable', True)
except Exception as e:
    print('  AutoFunctionsROIEnable: set failed:', e)

# - AutoFunctionsROIPreset : Auto Functions ROI Preset
#   AutoFunctionsROIPreset:ROI設定のプリセット(例:AutoFunctionsROIPreset_Full, AutoFunctionsROIPreset_Custom, AutoFunctionsROIPreset_Center50Pct, AutoFunctionsROIPreset_Center25Pct, AutoFunctionsROIPreset_BottomHalf, AutoFunctionsROIPreset_TopHalf
try:
    v_AutoFunctionsROIPreset = prop_map.get_value_str('AutoFunctionsROIPreset')
    print('AutoFunctionsROIPreset =', v_AutoFunctionsROIPreset)
except Exception as e:
    v_AutoFunctionsROIPreset = None
    print('  AutoFunctionsROIPreset: get failed:', e)
try:
    prop_map.set_value('AutoFunctionsROIPreset', v_AutoFunctionsROIPreset)
except Exception as e:
    print('  AutoFunctionsROIPreset: set failed:', e)

# - AutoFunctionsROILeft : Auto Functions ROI Left
#   AutoFunctionsROILeft:ROIの左上X座標(画素単位)
try:
    v_AutoFunctionsROILeft = prop_map.get_value_int('AutoFunctionsROILeft')
    print('AutoFunctionsROILeft =', v_AutoFunctionsROILeft)
except Exception as e:
    v_AutoFunctionsROILeft = None
    print('  AutoFunctionsROILeft: get failed:', e)
try:
    prop_map.set_value('AutoFunctionsROILeft', v_AutoFunctionsROILeft)
except Exception as e:
    print('  AutoFunctionsROILeft: set failed:', e)

# - AutoFunctionsROITop : Auto Functions ROI Top
#   AutoFunctionsROITop:ROIの左上Y座標(画素単位)
try:
    v_AutoFunctionsROITop = prop_map.get_value_int('AutoFunctionsROITop')
    print('AutoFunctionsROITop =', v_AutoFunctionsROITop)
except Exception as e:
    v_AutoFunctionsROITop = None
    print('  AutoFunctionsROITop: get failed:', e)
try:
    prop_map.set_value('AutoFunctionsROITop', v_AutoFunctionsROITop)
except Exception as e:
    print('  AutoFunctionsROITop: set failed:', e)

# - AutoFunctionsROIWidth : Auto Functions ROI Width
#   AutoFunctionsROIWidth:ROIの幅(画素単位)
try:
    v_AutoFunctionsROIWidth = prop_map.get_value_int('AutoFunctionsROIWidth')
    print('AutoFunctionsROIWidth =', v_AutoFunctionsROIWidth)
except Exception as e:
    v_AutoFunctionsROIWidth = None
    print('  AutoFunctionsROIWidth: get failed:', e)
try:
    prop_map.set_value('AutoFunctionsROIWidth', v_AutoFunctionsROIWidth)
except Exception as e:
    print('  AutoFunctionsROIWidth: set failed:', e)

# - AutoFunctionsROIHeight : Auto Functions ROI Height
#    AutoFunctionsROIHeight:ROIの高さ(画素単位)
try:
    v_AutoFunctionsROIHeight = prop_map.get_value_int('AutoFunctionsROIHeight')
    print('AutoFunctionsROIHeight =', v_AutoFunctionsROIHeight)
except Exception as e:
    v_AutoFunctionsROIHeight = None
    print('  AutoFunctionsROIHeight: get failed:', e)
try:
    prop_map.set_value('AutoFunctionsROIHeight', v_AutoFunctionsROIHeight)
except Exception as e:
    print('  AutoFunctionsROIHeight: set failed:', e)
[AutoFunctionsROI]の詳細を閉じる▲ -
IC4詳細・解説
LUT Control は「ルックアップテーブル(LUT)」を使って、カメラが出力する画像の明るさや色を変える機能です。LUT は「変換表」を使って画素の値を置き換える仕組みで、例えば暗い部分を持ち上げて見やすくしたり、色を反転させたり、コントラストを強くするといったことをカメラの内部で行えます。このLUTは0~256 までの「インデックス」と、それに対応する16bitの出力値で構成されています。カメラは各画素の明るさを読み取り、上位8ビットをインデックスとして使い、下位ビットで隣同士の値を滑らかに補間して変換を行います。これにより段階的ではなく滑らかな補正が可能になります。カラー画像の場合、YUVモードでは輝度成分(Y)のみ処理されますが、BGRやBayer Rawでは全ての色チャンネルに対して同じ変換が適用されます。LUTを使うときは「LUT Enable」で有効化し、必要に応じて「LUT Index」「LUT Value」で1つずつ書き換えたり、「LUT Value All」で一括設定ができます。注意点として、LUT はガンマ補正と同じ回路を使っているため、LUT を有効にするとガンマ補正は自動的にオフになります。
# - LUTSelector : LUT Selector
#   LUTSelector:対象となるLUTを選択(例:Luminance, Red, Green, Blue)
try:
    v_LUTSelector = prop_map.get_value_str('LUTSelector')
    print('LUTSelector =', v_LUTSelector)
except Exception as e:
    v_LUTSelector = None
    print('  LUTSelector: get failed:', e)
try:
    prop_map.set_value('LUTSelector', v_LUTSelector)
except Exception as e:
    print('  LUTSelector: set failed:', e)

# - LUTEnable : LUT Enable
#   LUTEnable:選択したLUTを有効化(true:有効, false:無効)
try:
    v_LUTEnable = prop_map.get_value_bool('LUTEnable')
    print('LUTEnable =', v_LUTEnable)
except Exception as e:
    v_LUTEnable = None
    print('  LUTEnable: get failed:', e)
try:
    prop_map.set_value('LUTEnable', v_LUTEnable)
except Exception as e:
    print('  LUTEnable: set failed:', e)

# - LUTIndex : LUT Index
#   LUTIndex:読み書き対象のLUTインデックス(0~256 など)
try:
    v_LUTIndex = prop_map.get_value_int('LUTIndex')
    print('LUTIndex =', v_LUTIndex)
except Exception as e:
    v_LUTIndex = None
    print('  LUTIndex: get failed:', e)
try:
    prop_map.set_value('LUTIndex', v_LUTIndex)
except Exception as e:
    print('  LUTIndex: set failed:', e)

# - LUTValue : LUT Value
#   LUTValue:現在の LUTIndex に対応する出力値(1~65535)
try:
    v_LUTValue = prop_map.get_value_int('LUTValue')
    print('LUTValue =', v_LUTValue)
except Exception as e:
    v_LUTValue = None
    print('  LUTValue: get failed:', e)
try:
    prop_map.set_value('LUTValue', v_LUTValue)
except Exception as e:
    print('  LUTValue: set failed:', e)
[LUT Control]の詳細を閉じる▲ -
IC4詳細・解説
Digital I/O Controlは、カメラに搭載されているGPIOポート(デジタル入出力端子)を制御するための機能です。カメラにはGPIOという入出力端子があり、そこから外部から信号を受け取ることも外部へ信号を出すこともできます。たとえば GPInはカメラが外部から来る信号を読む機能でスイッチやセンサーから信号が来ると「LOW(0)」や「HIGH(1)」として検出できるので、スイッチが押された瞬間に撮影を開始する、といった動作ができます。一方、GPOutはカメラから外部へ信号を送る機能で、ソフトから「1」を出すと外部機器に撮影したことを知らせたり、PLCや照明などを制御することが可能です。また、StrobeEnableを有効にすると露光に合わせてカメラがストロボ用の信号を出し、撮影と照明を同期することができます。さらに StrobeOperationを設定すれば「露光中だけストロボを点灯」といった動作が簡単にできます。
# - GPIn : GP In
# - GPIn:GPIOの入力状態(ReadOnly)
# - 0: LOW, 1: HIGH
try:
    v_GPIn = prop_map.get_value_int('GPIn')
    print('GPIn =', v_GPIn)
except Exception as e:
    v_GPIn = None
    print('  GPIn: get failed:', e)


# - GPOut : GP Out
#   GPOut:GPIOの出力状態(Write可能)
#   例:1 を設定すると HIGH、0 で LOW
try:
    v_GPOut = prop_map.get_value_int('GPOut')
    print('GPOut =', v_GPOut)
except Exception as e:
    v_GPOut = None
    print('  GPOut: get failed:', e)
try:
    prop_map.set_value('GPOut', v_GPOut)
except Exception as e:
    print('  GPOut: set failed:', e)


# - StrobeEnable : Strobe Enable
#   StrobeEnable:ストロボ出力の有効化(On, Off)
try:
    v_StrobeEnable = prop_map.get_value_str('StrobeEnable')
    print('StrobeEnable =', v_StrobeEnable)
except Exception as e:
    v_StrobeEnable = None
    print('  StrobeEnable: get failed:', e)
try:
    prop_map.set_value('StrobeEnable', v_StrobeEnable)
except Exception as e:
    print('  StrobeEnable: set failed:', e)


# - StrobePolarity : Strobe Polarity
#   StrobePolarity:ストロボ出力の極性(ActiveHigh, ActiveLow)
try:
    v_StrobePolarity = prop_map.get_value_str('StrobePolarity')
    print('StrobePolarity =', v_StrobePolarity)
except Exception as e:
    v_StrobePolarity = None
    print('  StrobePolarity: get failed:', e)
try:
    prop_map.set_value('StrobePolarity', v_StrobePolarity)
except Exception as e:
    print('  StrobePolarity: set failed:', e)

# - StrobeOperation : Strobe Operation
#   StrobeOperation:ストロボ動作モードの選択(例:"Exposure")
try:
    v_StrobeOperation= prop_map.get_value_str('StrobeOperation')
    print('StrobeOperation =', v_StrobeOperation)
except Exception as e:
    v_StrobeOperation = None
    print('  StrobeOperation: get failed:', e)
try:
    prop_map.set_value('StrobeOperation', v_StrobeOperation)
except Exception as e:
    print('  StrobeOperation: set failed:', e)
[Digital I/O Control]の詳細を閉じる▲ -
IC4詳細・解説
カメラに搭載されたレンズのズーム、フォーカス、アイリス(絞り)を制御する機能です。ズームでは画角を広くしたり狭くしたりして被写体の見え方を変え、フォーカスは被写体にピントを合わせて画像を鮮明にします。アイリスはレンズを通る光の量を調整し、明るさや被写界深度をコントロールします。
# フォーカス値を手動で1に設定(最小位置や初期位置などの調整に使用される)
try:
    v = prop_map.get_value_int("Focus")
    print("Focus =", v)
except Exception as e:
    print("Focus get failed:", e)

try:
    prop_map.set_value("Focus", v)
except Exception as e:
    print("Focus set failed:", e)

# オートフォーカス機能を実行(自動でピント調整を開始)
try:
    prop_map.execute_command("FocusAuto")

except Exception as e:
    print("FocusAuto get failed:", e)

# ズーム値を手動で1に設定(最小倍率)
try:
    v = prop_map.get_value_int("Zoom")
    print("Zoom =", v)
except Exception as e:
    print("Zoom get failed:", e)
try:
    prop_map.set_value("Zoom",1)
except Exception as e:
    print("Zoom set failed:", e)

# アイリス(絞り)を手動で1に設定(開放側または初期値)
try:
    v = prop_map.get_value_int("Iris")
    print("Iris =", v)
except Exception as e:
    print("Iris get failed:", e)
try:
    prop_map.set_value("Iris",1)
except Exception as e:
    print("Iris set failed:", e)

# アイリスのオート設定を無効化(手動制御に切り替え)
try:
    v = prop_map.get_value_bool("IrisAuto")
    print("IrisAuto =", v)
except Exception as e:
    print("IrisAuto get failed:", e)
try:
    prop_map.set_value("IrisAuto",v)
except Exception as e:
    print("IrisAuto set failed:", e)


# IRカットフィルターを有効化(赤外線を遮断する機能をON)
try:
    v = prop_map.get_value_bool("IRCutFilterEnable")
    print("IRCutFilterEnable =", v)
except Exception as e:
    print("IRCutFilterEnable get failed:", e)
try:
    prop_map.set_value("IRCutFilterEnable",v)
except Exception as e:
    print("IRCutFilterEnable set failed:", e)
[Lens Control]の詳細を閉じる▲ -
IC4詳細・解説
AutoFocusROI は、カメラのオートフォーカスを画面全体ではなく特定の領域に限定して動作させるための機能です。まず AutoFocusROIEnable をtrueに設定することで、この機能を有効にできます。その後、画像座標系に基づいて ROI の位置と大きさを指定します。
# オートフォーカス用のROI(Region of Interest, フォーカス対象領域)機能を有効化
try:
    v = prop_map.get_value_bool("AutoFocusROIEnable")
    print("AutoFocusROIEnable =", v)
except Exception as e:
    print("AutoFocusROIEnable get failed:", e)
try:
    prop_map.set_value("AutoFocusROIEnable", v)
except Exception as e:
    print("AutoFocusROIEnable set failed:", e)

# ROIの左端位置を設定(画像座標系におけるX座標, ピクセル単位)
try:
    v = prop_map.get_value_int("AutoFocusROILeft")
    print("AutoFocusROILeft =", v)
except Exception as e:
    print("AutoFocusROILeft get failed:", e)
try:
    prop_map.set_value("AutoFocusROILeft", v)
except Exception as e:
    print("AutoFocusROILeft set failed:", e)


# ROIの上端位置を設定(画像座標系におけるY座標, ピクセル単位)
try:
    v = prop_map.get_value_int("AutoFocusROITop")
    print("AutoFocusROITop =", v)
except Exception as e:
    print("AutoFocusROITop get failed:", e)
try:
    prop_map.set_value("AutoFocusROITop", v)
except Exception as e:
    print("AutoFocusROITop set failed:", e)

# ROIの幅を設定(ピクセル単位)
# ここでは640ピクセル幅の領域をフォーカス対象に指定
try:
    v = prop_map.get_value_int("AutoFocusROIWidth")
    print("AutoFocusROIWidth =", v)
except Exception as e:
    print("AutoFocusROIWidth get failed:", e)
try:
    prop_map.set_value("AutoFocusROIWidth", v)
except Exception as e:
    print("AutoFocusROIWidth set failed:", e)

# ROIの高さを設定(ピクセル単位)
# ここでは480ピクセル高さの領域をフォーカス対象に指定
try:
    v = prop_map.get_value_int("AutoFocusROIHeight")
    print("AutoFocusROIHeight =", v)
except Exception as e:
    print("AutoFocusROIHeight get failed:", e)
try:
    prop_map.set_value("AutoFocusROIHeight", v)
except Exception as e:
    print("AutoFocusROIHeight set failed:", e)
[AutoFocusROI]の詳細を閉じる▲ -
IC4詳細・解説
Chunk Data Control は、カメラが出力する画像フレームに追加の「メタデータ」を埋め込む仕組みを制御する機能です。通常、Chunk Dataを有効化すると、各フレームに撮影条件や内部状態といった補足情報を一緒に付与できます。例えば、露光時間(ChunkExposureTime)、ゲイン(ChunkGain)があります。これらは後処理や解析の際に画像と紐づけて利用できます。
使用するには、まずChunkModeActiveを有効化してチャンク出力を許可することで、選択した情報が各フレームに記録されるようになります。埋め込まれたデータは画像バッファの一部として受け取れるため、IC4 SDKのFrameQueueSinkやバッファ操作のAPI(connect_chunkdata)を使って取り出すことが可能です。# - ChunkModeActive : Chunk Mode Active # Chunkモードを有効化(画像ごとにメタデータを埋め込む機能をONにする) try: v_ChunkModeActive = prop_map.get_value_bool('ChunkModeActive') print('ChunkModeActive =', v_ChunkModeActive) except Exception as e: v_ChunkModeActive = None print(' ChunkModeActive: get failed:', e) try: prop_map.set_value('ChunkModeActive', v_ChunkModeActive) except Exception as e: print(' ChunkModeActive: set failed:', e) # - ChunkSelector : Chunk Selector # どの種類のChunk情報を埋め込むか選択(この例では"Image":画像関連のチャンクを指定) try: v_ChunkSelector = prop_map.get_value_str('ChunkSelector') print('ChunkSelector =', v_ChunkSelector) except Exception as e: v_ChunkSelector = None print(' ChunkSelector: get failed:', e) try: prop_map.set_value('ChunkSelector', v_ChunkSelector) except Exception as e: print(' ChunkSelector: set failed:', e) # - ChunkEnable : Chunk Enable # 選択されたChunk項目("Image")の埋め込み有無を確認(trueで有効) try: v_ChunkEnable = prop_map.get_value_bool('ChunkEnable') print('ChunkEnable =', v_ChunkEnable) except Exception as e: v_ChunkEnable = None print(' ChunkEnable: get failed:', e) try: prop_map.set_value('ChunkEnable', v_ChunkEnable) except Exception as e: print(' ChunkEnable: set failed:', e) # - ChunkExposureTime : Chunk Exposure Time # チャンクに含まれる露光時間(撮影ごとの実際のExposureTime)を取得 try: v_ChunkExposureTime = prop_map.get_value_float('ChunkExposureTime') print('ChunkExposureTime =', v_ChunkExposureTime) except Exception as e: v_ChunkExposureTime = None print(' ChunkExposureTime: get failed:', e) # - ChunkGain : Chunk Gain # チャンクに含まれるゲイン(撮影時のGain設定)を取得 try: v_ChunkGain = prop_map.get_value_float('ChunkGain') print('ChunkGain =', v_ChunkGain) except Exception as e: v_ChunkGain = None print(' ChunkGain: get failed:', e) # - ChunkMultiFrameSetId : Chunk Multi Frame Set Id # チャンクに含まれるMultiFrameSetのIDを取得(同期撮影やマルチカメラ時のセット識別用) try: v_ChunkMultiFrameSetId = prop_map.get_value_int('ChunkMultiFrameSetId') print('ChunkMultiFrameSetId =', v_ChunkMultiFrameSetId) except Exception as e: v_ChunkMultiFrameSetId = None print(' ChunkMultiFrameSetId: get failed:', e) # - ChunkMultiFrameSetFrameId : Chunk Multi Frame Set Frame Id # チャンクに含まれる各フレームのIDを取得(セット内でのフレームの通し番号) try: v_ChunkMultiFrameSetFrameId = prop_map.get_value_int('ChunkMultiFrameSetFrameId') print('ChunkMultiFrameSetFrameId =', v_ChunkMultiFrameSetFrameId) except Exception as e: v_ChunkMultiFrameSetFrameId = None print(' ChunkMultiFrameSetFrameId: get failed:', e)[Chunk Data Control]の詳細を閉じる▲ -
IC4詳細・解説
カメラ内部で発生する特定の出来事(露光終了、トリガーミス、外部信号の立上り/立下りなど)を選択して監視し、通知を有効化する機能です。EventSelectorで監視対象を選び、EventNotificationで通知のON/OFFを設定します。発生時刻(Timestamp)やフレームIDを取得することで、画像との紐づけや同期処理が可能です。
イベントの通知を有効にするには、EventNotificationを"On"に設定します。これにより、選択したイベントが実際に発生したとき、ソフトウェア側でその情報を受け取り処理を行うことができるようになります。# - EventSelector : Event Selector # EventSelector:監視するイベントの種類を選択 # 例: ExposureEnd, FrameTriggerMissed, Line1RisingEdge, Line1FallingEdge, Test try: v_EventSelector = prop_map.get_value_str('EventSelector') print('EventSelector =', v_EventSelector) except Exception as e: v_EventSelector = None print(' EventSelector: get failed:', e) try: prop_map.set_value('EventSelector', v_EventSelector) except Exception as e: print(' EventSelector: set failed:', e) # - EventNotification : Event Notification # [EventNotification:選択したイベント通知を有効化または無効化("Off", "On") try: v_EventNotification = prop_map.get_value_str('EventNotification') print('EventNotification =', v_EventNotification) except Exception as e: v_EventNotification = None print(' EventNotification: get failed:', e) try: prop_map.set_value('EventNotification', v_EventNotification) except Exception as e: print(' EventNotification: set failed:', e)[Event Control]の詳細を閉じる▲ -
IC4詳細・解説
EventExposureEndData は、カメラ内部で「露光が終了した瞬間」に発火するイベントです。これにより、フレームが物理的に取得された正確なタイミングを把握できます。EventExposureEnd はこの通知の有効/無効を切り替える設定で、EventExposureEndTimestamp はカメラ内部クロックに基づく露光終了時刻を示します。複数カメラ間で露光終了タイミングを比較・評価したい場合に利用してください。
一方、画像の保存・表示・画像処理といった画素データの扱いは、IC Imaging Control 4 の QueueSink(コールバック)側で行います。すなわち、タイミングの基準は EventExposureEndData、実データの処理は QueueSink、と役割を分けて使用してください。# - EventExposureEnd : Event Exposure End # EventExposureEnd:露光終了イベントの通知有効化(true:有効, false:無効)(ReadOnly) try: v_EventExposureEnd = prop_map.get_value_int('EventExposureEnd') print('EventExposureEnd =', v_EventExposureEnd) except Exception as e: v_EventExposureEnd = None print(' EventExposureEnd: get failed:', e) # - EventExposureEndTimestamp : Event Exposure End Timestamp # 単位:通常ナノ秒。カメラ内部クロック基準での露光終了時刻 try: v_EventExposureEndTimestamp = prop_map.get_value_int('EventExposureEndTimestamp') print('EventExposureEndTimestamp =', v_EventExposureEndTimestamp) except Exception as e: v_EventExposureEndTimestamp = None print(' EventExposureEndTimestamp: get failed:', e) # - EventExposureEndFrameID : Event Exposure End Frame ID # EventExposureEndFrameID:露光終了が発生したフレームのID(ReadOnly) # フレームとイベントの対応づけを行うために使用 try: v_EventExposureEndFrameID = prop_map.get_value_int('EventExposureEndFrameID') print('EventExposureEndFrameID =', v_EventExposureEndFrameID) except Exception as e: v_EventExposureEndFrameID = None print(' EventExposureEndFrameID: get failed:', e)[EventExposureEndData]の詳細を閉じる▲ -
IC4詳細・解説
外部トリガーがカメラに送信されたにもかかわらず、何らかの理由で露光が開始できなかった「トリガーミス(FrameTriggerMissed)」のイベントです。EventFrameTriggerMissedはその通知の有効/無効を制御するプロパティで、trueに設定することでイベント監視を有効化します。また、EventFrameTriggerMissedTimestampは、そのトリガーミスが発生した時刻を、カメラ内部のクロックに基づいて計測されます。付随するメタデータには、トリガ信号の識別子や発生時刻が含まれるため、ホスト側ではどのフレームで失敗が起きたのかを特定でき、同期精度の検証やシステムのパフォーマンス改善に活用できます。
# - EventFrameTriggerMissed : Event Frame Trigger Missed
#   EventFrameTriggerMissed:トリガーミスのイベント通知を有効化(true:有効, false:無効)
#   外部トリガーが来たが、露光が始まらなかった、またはカメラが対応できなかった場合に通知
try:
    v_EventFrameTriggerMissed = prop_map.get_value_int('EventFrameTriggerMissed')
    print('EventFrameTriggerMissed =', v_EventFrameTriggerMissed)
except Exception as e:
    v_EventFrameTriggerMissed = None
    print('  EventFrameTriggerMissed: get failed:', e)


# - EventFrameTriggerMissedTimestamp : Event Frame Trigger Missed Timestamp
#   EventFrameTriggerMissedTimestamp:トリガーミスが発生した時刻(ReadOnly)
#   単位はナノ秒やマイクロ秒など(カメラ依存)、カメラ内クロック基準
try:
    v_EventFrameTriggerMissedTimestamp = prop_map.get_value_int('EventFrameTriggerMissedTimestamp')
    print('EventFrameTriggerMissedTimestamp =', v_EventFrameTriggerMissedTimestamp)
except Exception as e:
    v_EventFrameTriggerMissedTimestamp = None
    print('  EventFrameTriggerMissedTimestamp: get failed:', e)
[EventFrameTriggerMissedData]の詳細を閉じる▲ -
IC4詳細・解説
カメラのGPIOに入力される外部信号の「立ち上がりエッジ(LOW→HIGHの変化)」を検出するイベントです。EventLine1RisingEdgeはそのイベント通知の有効・無効を制御するプロパティで、これを有効にすることで、外部トリガー信号がカメラに入力された瞬間を検出し、アプリケーション側に通知させることができます。また、EventLine1RisingEdgeTimestamp は、外部トリガーの立ち上がりが発生した時刻を示すプロパティで、タイムスタンプを取得できます。ただし、この機能は外部 I/O 信号を直接監視しているため、ノイズによるチャタリングがあると、1回の入力にもかかわらず複数回のイベントが発生してしまう場合があります。そのため、安定した検出を行うには、トリガー機能の「デバウンス設定」といった機能を併用してください。
 # - EventLine1RisingEdge : Event Line1 Rising Edge
#   EventLine1RisingEdge:Line1(外部信号)の立ち上がりエッジ検出イベントを有効化(true:有効, false:無効)
#   トリガー入力やGPIO入力の立ち上がりを検出するために使用
try:
    v_EventLine1RisingEdge = prop_map.get_value_int('EventLine1RisingEdge')
    print('EventLine1RisingEdge =', v_EventLine1RisingEdge)
except Exception as e:
    v_EventLine1RisingEdge = None
    print('  EventLine1RisingEdge: get failed:', e)
try:
    prop_map.set_value('EventLine1RisingEdge', v_EventLine1RisingEdge)
except Exception as e:
    print('  EventLine1RisingEdge: set failed:', e)

# - EventLine1RisingEdgeTimestamp : Event Line1 Rising Edge Timestamp
#   EventLine1RisingEdgeTimestamp:Line1立ち上がりエッジが検出された時のタイムスタンプ(ReadOnly)
#   単位:ナノ秒やマイクロ秒(カメラ内部クロックに基づく)
try:
    v_EventLine1RisingEdgeTimestamp = prop_map.get_value_int('EventLine1RisingEdgeTimestamp')
    print('EventLine1RisingEdgeTimestamp =', v_EventLine1RisingEdgeTimestamp)
except Exception as e:
    v_EventLine1RisingEdgeTimestamp = None
    print('  EventLine1RisingEdgeTimestamp: get failed:', e)
try:
    prop_map.set_value('EventLine1RisingEdgeTimestamp', v_EventLine1RisingEdgeTimestamp)
except Exception as e:
    print('  EventLine1RisingEdgeTimestamp: set failed:', e)
[Event Line1 Rising Edge Data]の詳細を閉じる▲ -
IC4詳細・解説
EventLine1FallingEdgeDataは、カメラの GPIO に入力される外部信号が「立ち下がりエッジ(HIGH→LOW)」に変化した瞬間を検出して通知するイベントです。これを有効化すると、外部トリガー信号がOFFになった正確なタイミングをカメラ側から知らせることができます。付随するタイムスタンプ情報により、その変化が起こった時刻を正確に把握できるため、外部機器の動作との同期の検証等に有効です。立ち下がりエッジは、例えば「信号がHIGHの間だけ処理を行い、LOWになったら終了する」といった制御に利用されます。ただし、外部信号にノイズやチャタリングが含まれると不要なイベントが発生する可能性があるため、ソフトウェアでのデバウンス処理を組み合わせるようにしてください。
# - EventLine1FallingEdge : Event Line1 Falling Edge
#   EventLine1FallingEdge:Line1 の立ち下がりエッジ(HIGH → LOW)を検出するイベント通知を有効化
#   GPIO入力の負エッジ検出に使用(外部機器との同期に便利)
try:
    v_EventLine1FallingEdge = prop_map.get_value_int('EventLine1FallingEdge')
    print('EventLine1FallingEdge =', v_EventLine1FallingEdge)
except Exception as e:
    v_EventLine1FallingEdge = None
    print('  EventLine1FallingEdge: get failed:', e)

# - EventLine1FallingEdgeTimestamp : Event Line1 Falling Edge Timestamp
#   EventLine1FallingEdgeTimestamp:Line1 の立ち下がりエッジが発生した時刻(ReadOnly)
#   単位:ナノ秒またはマイクロ秒(カメラ内部クロック基準)
try:
    v_EventLine1FallingEdgeTimestamp = prop_map.get_value_int('EventLine1FallingEdgeTimestamp')
    print('EventLine1FallingEdgeTimestamp =', v_EventLine1FallingEdgeTimestamp)
except Exception as e:
    v_EventLine1FallingEdgeTimestamp = None
    print('  EventLine1FallingEdgeTimestamp: get failed:', e)
[EventLine1FallingEdgeData]の詳細を閉じる▲ -
IC4詳細・解説
カメラのフォーカス動作が完了したことを通知するイベントです。オートフォーカスやフォーカス制御コマンドによってレンズが移動した際、その処理が終了したタイミングでイベントが発生します。このデータには、イベント自体を識別する ID、発生時刻を示すタイムスタンプ、そして完了後のフォーカス位置が含まれます。
# フォーカス移動完了イベントのフラグ値(イベントが発生したかどうかを示す)
# ReadOnlyデータ取得
try:
    v = prop_map.get_value_int("EventFocusMoveCompleted")
    print("EventFocusMoveCompleted =", v)
except Exception as e:
    print("EventFocusMoveCompleted get failed:", e)
# フォーカス移動完了が検出されたタイムスタンプ(時刻同期や遅延解析に使用)
try:
    v = prop_map.get_value_int("EventFocusMoveCompletedTimestamp")
    print("EventFocusMoveCompletedTimestamp =", v)
except Exception as e:
    print("EventFocusMoveCompletedTimestamp get failed:", e)
# フォーカス移動完了時点でのフォーカス位置(レンズのステップ値や焦点位置を表す)
try:
    v = prop_map.get_value_int("EventFocusMoveCompletedFocus")
    print("EventFocusMoveCompletedFocus =", v)
except Exception as e:
    print("EventFocusMoveCompletedFocus get failed:", e)
[EventFocusMoveCompletedData]の詳細を閉じる▲ -
IC4詳細・解説
カメラのズーム動作が完了したことを通知するイベントです。ズーム制御コマンドによってレンズが移動した際、その処理が終了したタイミングでイベントが発生します。このデータには、イベント自体を識別する ID、発生時刻を示すタイムスタンプ、そして完了後のズーム位置が含まれます。
# ズーム移動完了イベントのフラグ値(イベントが発生したかどうかを示す)
# ReadOnlyデータ取得
try:
    v = prop_map.get_value_int("EventZoomMoveCompleted")
    print("EventZoomMoveCompleted =", v)
except Exception as e:
    print("EventZoomMoveCompleted get failed:", e)

# ズーム移動完了が検出されたタイムスタンプ(時刻同期や遅延解析に使用)
try:
    v = prop_map.get_value_int("EventZoomMoveCompletedTimestamp")
    print("EventZoomMoveCompletedTimestamp =", v)
except Exception as e:
    print("EventZoomMoveCompletedTimestamp get failed:", e)

# ズーム移動完了時点でのズーム位置(レンズのステップ値や焦点位置を表す)
try:
    v = prop_map.get_value_int("EventZoomMoveCompletedZoom")
    print("EventZoomMoveCompletedZoom =", v)
except Exception as e:
    print("EventZoomMoveCompletedZoom get failed:", e)
[EventZoomMoveCompletedData]の詳細を閉じる▲ -
IC4詳細・解説
カメラに搭載された「テストイベント」機能の確認および制御をしています。EventTest は、カメラ内部で擬似的に生成されるイベントで、実際の撮像イベントではなく、イベント通知の機能が正しく機能しているかを確認するために使用されます。TestEventGenerateを実行すると、テストイベントが発生し、タイムスタンプEventTestTimestampなどの情報を取得することができます。
# - EventTest : Event Test
#   EventTest:カメラのテストイベント通知
#   ※これはイベント通知機構のテスト用途で、実運用では使用しないことが一般的です
try:
    v_EventTest = prop_map.get_value_int('EventTest')
    print('EventTest =', v_EventTest)
except Exception as e:
    v_EventTest = None
    print('  EventTest: get failed:', e)

# - EventTestTimestamp : Event Test Timestamp
#   EventTestTimestamp:直近のテストイベントが発生した時刻(ReadOnly)
#   単位:ナノ秒またはマイクロ秒(カメラ内部のクロック基準)
try:
    v_EventTestTimestamp = prop_map.get_value_int('EventTestTimestamp')
    print('EventTestTimestamp =', v_EventTestTimestamp)
except Exception as e:
    v_EventTestTimestamp = None
    print('  EventTestTimestamp: get failed:', e)
[EventTestData]の詳細を閉じる▲ -
IC4詳細・解説
Test Control は、カメラやアプリケーションの機能が正しく動作しているかを検証するための仕組みで、主に開発やデバッグ時に使用されます。例えば TestEventGenerate を実行すると、カメラは擬似的なイベントを生成し、アプリケーション側に通知が届くかどうかを確認できます。これにより、イベント処理の実装が正しく行われているかを簡単に検証できます。
# - TestEventGenerate : Test Event Generate
#   TestEventGenerate:テストイベント(EventTest)をソフトウェアから強制的に発生させるためのコマンド
try:
    print('TestEventGenerate (Command)')
    prop_map.execute_command('TestEventGenerate')
except Exception as e:
    print('  TestEventGenerate: command failed:', e)
[Test Control]の詳細を閉じる▲ -
IC4詳細・解説
User Set Controlは、カメラの撮影条件を「プリセット」として保存・呼び出しできる機能で、よく使う設定を素早く再現するのに役立ちます。まず UserSetSelectorで対象プリセットを選択します(例:工場出荷時の "Default"、ユーザー保存用の "UserSet1"、"UserSet2" など)。UserSetLoadに"Execute"を指定すると、そのプリセットが即時に読み込まれ、以後はその条件で動作します。現在の設定を保存したい場合はUserSetSaveに"Execute"を渡すと、選択中のプリセットへ上書き保存され、同じ条件を再利用できます。これにより、シーンごとに細かな再調整を行う手間が減り、安定した撮影条件の再現性が向上します。
一方、アプリケーション開発では、カメラ内のユーザーセットではなく、PC 側で状態をXMLファイルとして管理する方法が一般的です。# - UserSetSelector : User Set Selector # UserSetSelector:操作対象のユーザー設定プリセットを選択 # 例:"Default", "UserSet1", "UserSet2"(カメラによって異なる) try: v_UserSetSelector = prop_map.get_value_str('UserSetSelector') print('UserSetSelector =', v_UserSetSelector) except Exception as e: v_UserSetSelector = None print(' UserSetSelector: get failed:', e) try: prop_map.set_value('UserSetSelector', 'UserSet1') except Exception as e: print(' UserSetSelector: set failed:', e) # - UserSetSave : User Set Save # UserSetSave:現在の設定を選択中のプリセットに保存(次回以降の電源ONでも保持されることあり) # こちらも "Execute" を指定する try: print('UserSetSave') prop_map.set_value('UserSetSave', "Execute") except Exception as e: print(' UserSetSave: command failed:', e) # - UserSetLoad : User Set Load # UserSetLoad:選択したユーザー設定をカメラに読み込む(=その設定で即時動作開始) try: print('UserSetLoad') prop_map.set_value('UserSetLoad', "Execute") except Exception as e: print(' UserSetLoad: command failed:', e) # - UserSetDefault : User Set Default # UserSetDefault:カメラの起動時に自動読み込みされるプリセットを指定 # 例:"Default", "UserSet1" など、UserSetSelectorと同じ値 try: v_UserSetDefault = prop_map.get_value_str('UserSetDefault') print('UserSetDefault =', v_UserSetDefault) except Exception as e: v_UserSetDefault = None print(' UserSetDefault: get failed:', e) try: prop_map.set_value('UserSetDefault', v_UserSetDefault) except Exception as e: print(' UserSetDefault: set failed:', e)[User Set Control]の詳細を閉じる▲ -
IC4詳細・解説
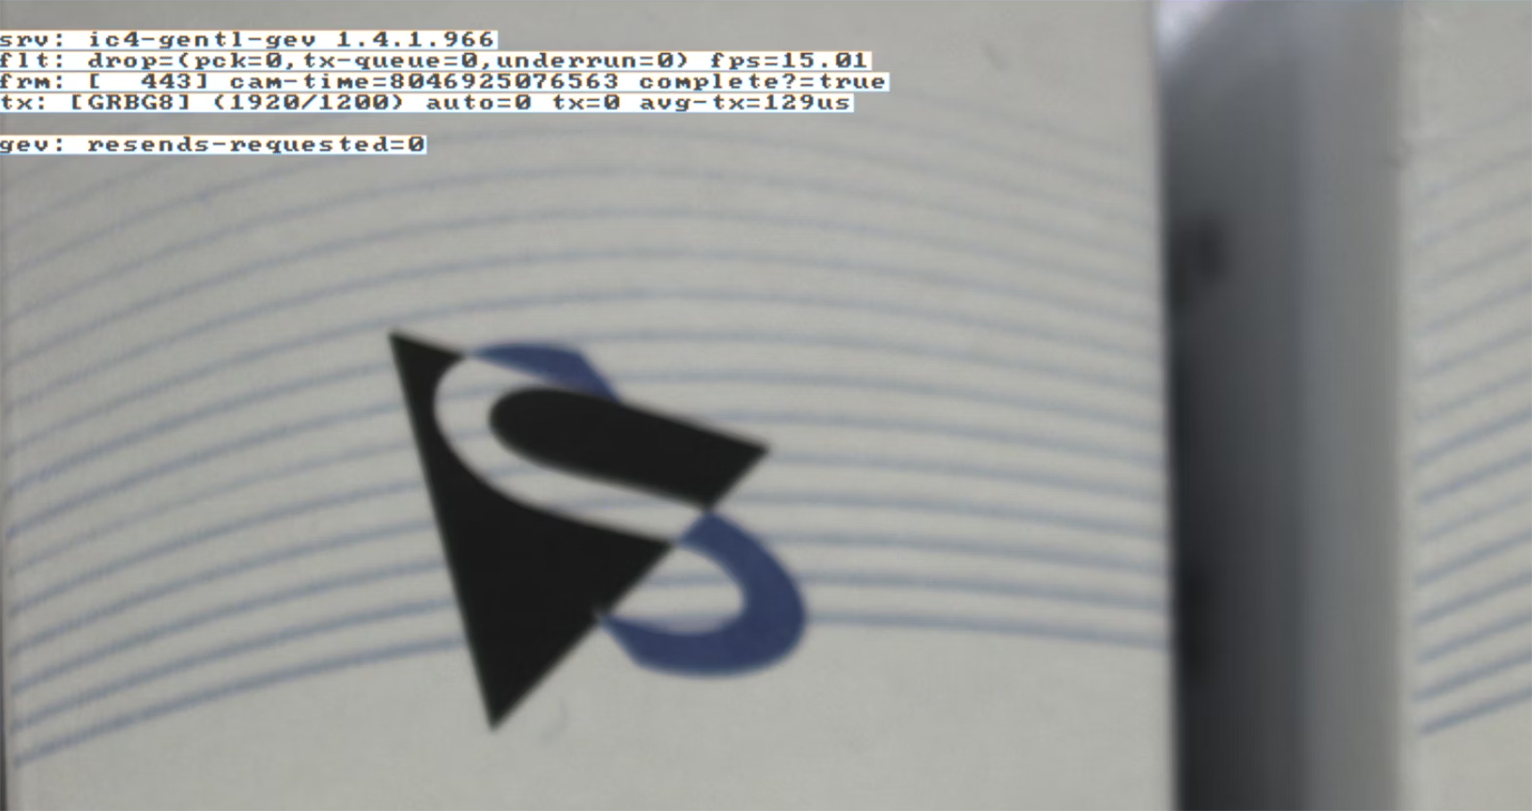
Software Transform Controlは、カメラの画像処理機能をオンにするとコントラスト調整やシャープネス強調、ノイズ除去、WDR(ワイドダイナミックレンジ)補正といった画像処理が有効になります。これらはハードウェア内部で処理されるため、PC側で追加の画像処理を行う必要がなく、リアルタイムで効果を確認できます。さらに、ShowOverlayをtrue に設定すれば、ライブビュー画面上にカメラのドライバー情報や解像度、フレームレート、フレーム数といった情報を重ねて表示することができ、撮影状況を確認しながら調整できます。
# - SoftwareTransformEnable : Software Transform Enable
#   SoftwareTransformEnable:有効にすると、シャープネスやコントラストなどのプロパティが有効になります
try:
    v_SoftwareTransformEnable = prop_map.get_value_bool('SoftwareTransformEnable')
    print('SoftwareTransformEnable =', v_SoftwareTransformEnable)
except Exception as e:
    v_SoftwareTransformEnable = None
    print('  SoftwareTransformEnable: get failed:', e)
try:
    prop_map.set_value('SoftwareTransformEnable', v_SoftwareTransformEnable)
except Exception as e:
    print('  SoftwareTransformEnable: set failed:', e)

# - Contrast : Contrast
#   Contrast:画像全体のコントラストを調整
#   値を大きくすると明暗の差が強調される
try:
    v_Contrast = prop_map.get_value_int('Contrast')
    print('Contrast =', v_Contrast)
except Exception as e:
    v_Contrast = None
    print('  Contrast: get failed:', e)
try:
    prop_map.set_value('Contrast', v_Contrast)
except Exception as e:
    print('  Contrast: set failed:', e)

# - Sharpness : Sharpness
#   Sharpness:輪郭の強調度
try:
    v_Sharpness = prop_map.get_value_int('Sharpness')
    print('Sharpness =', v_Sharpness)
except Exception as e:
    v_Sharpness = None
    print('  Sharpness: get failed:', e)
try:
    prop_map.set_value('Sharpness', v_Sharpness)
except Exception as e:
    print('  Sharpness: set failed:', e)

# - Denoise : Denoise
#   Denoise:ノイズ低減処理の強さ
try:
    v_Denoise = prop_map.get_value_int('Denoise')
    print('Denoise =', v_Denoise)
except Exception as e:
    v_Denoise = None
    print('  Denoise: get failed:', e)
try:
    prop_map.set_value('Denoise', v_Denoise)
except Exception as e:
    print('  Denoise: set failed:', e)

# - ShowOverlay : Show Overlay
#   ShowOverlay:画像にオーバーレイを表示する(true: 表示, false: 非表示)
#   主に表示確認用
try:
    v_ShowOverlay = prop_map.get_value_bool('ShowOverlay')
    print('ShowOverlay =', v_ShowOverlay)
except Exception as e:
    v_ShowOverlay = None
    print('  ShowOverlay: get failed:', e)
try:
    prop_map.set_value('ShowOverlay', v_ShowOverlay)
except Exception as e:
    print('  ShowOverlay: set failed:', e)
ShowOverlayしたときの画像
 [Software Transform Control]の詳細を閉じる▲
 -
IC4詳細・解説
Tone Mapping は、センサーが捉えた広い明暗の情報を人の目で見やすい範囲に圧縮し、逆光や白飛び・黒つぶれを抑えて階調を整える処理です。Tone Mappingを有効にすると自動で補正が行われ、Tone Mapping AutoをONにすればカメラがシーンに応じて補正量を自動調整します。補正のかかり具合は Tone_Mapping_Intensity(0.0〜1.0)で調整でき、値を大きくすると明るい部分と暗い部分の差が小さくなり、全体がなだらかに見える仕上がりになります。さらに、Tone_Mapping_Global_Brightness_Factor を使うことで画像全体の明るさを細かく調整できます。
# - ToneMappingEnable : Tone Mapping Enable
#   ToneMappingEnable:トーンマッピング(HDR補正)の有効化(true: 有効, false: 無効)
#   明暗差の大きい映像を視認性よく補正する処理。
try:
    v_ToneMappingEnable = prop_map.get_value_bool('ToneMappingEnable')
    print('ToneMappingEnable =', v_ToneMappingEnable)
except Exception as e:
    v_ToneMappingEnable = None
    print('  ToneMappingEnable: get failed:', e)
try:
    prop_map.set_value('ToneMappingEnable', v_ToneMappingEnable)
except Exception as e:
    print('  ToneMappingEnable: set failed:', e)

# - ToneMappingAuto : Tone Mapping Auto
#   ToneMappingAuto : トーンマッピングの明るさを自動調整
try:
    v_ToneMappingAuto = prop_map.get_value_bool('ToneMappingAuto')
    print('ToneMappingAuto =', v_ToneMappingAuto)
except Exception as e:
    v_ToneMappingAuto = None
    print('  ToneMappingAuto: get failed:', e)
try:
    prop_map.set_value('ToneMappingAuto', v_ToneMappingAuto)
except Exception as e:
    print('  ToneMappingAuto: set failed:', e)

# - ToneMappingIntensity : Tone Mapping Intensity
#   ToneMappingIntensity:トーンマッピングの強度(0.0 ~ 1.0)
#   値が大きいほど明るい部分と暗い部分の差が少なくなる
try:
    v_ToneMappingIntensity = prop_map.get_value_float('ToneMappingIntensity')
    print('ToneMappingIntensity =', v_ToneMappingIntensity)
except Exception as e:
    v_ToneMappingIntensity = None
    print('  ToneMappingIntensity: get failed:', e)
try:
    prop_map.set_value('ToneMappingIntensity', v_ToneMappingIntensity)
except Exception as e:
    print('  ToneMappingIntensity: set failed:', e)

# - ToneMappingGlobalBrightness : Tone Mapping Global Brightness
#   ToneMappingGlobalBrightness:トーンマッピング処理後の全体的な明るさ
#   画像全体の明るさを調整したい場合に使用
try:
    v_ToneMappingGlobalBrightness = prop_map.get_value_float('ToneMappingGlobalBrightness')
    print('ToneMappingGlobalBrightness =', v_ToneMappingGlobalBrightness)
except Exception as e:
    v_ToneMappingGlobalBrightness = None
    print('  ToneMappingGlobalBrightness: get failed:', e)
try:
    prop_map.set_value('ToneMappingGlobalBrightness', v_ToneMappingGlobalBrightness)
except Exception as e:
    print('  ToneMappingGlobalBrightness: set failed:', e)
[Tone Mapping]の詳細を閉じる▲

