
オーバーレイの作成
ここではライブ画像上にテキストや図を描く方法について説明します。
今回のサンプルプログラムのVB.NET 、C#用のソースコードはMy Documents/IC Imaging Control 3.4内の以下のディレクトリに格納されています。
samples\VB *\Creating an Overlay
samples\C# *\Creating an Overlay
プロジェクトの新規作成
まず最初に、 Visual Studioでスタートプログラマーズガイド>Visual Studioでスタートで説明してある通りにプロジェクトを新規作成して IC Imaging Control をフォームに追加します。
フォームに3つのボタンを追加し、 CaptionプロパティをそれぞれDevice, Start, Settingsとします。またcmdSelectDevice,cmdLiveVideo,cmdImageSettingと名前を付けます。これらのボタンは画像取り込みデバイスの選択、ライブ表示の開始と停止、そして画像設定ダイアログを表示するのに使用されます。

では3つのボタン用にハンドラを実装しましょう。
Private Sub cmdDevice_Click(ByVal sender As System.Object, ByVal e As System.EventArgs)
  Handles cmdDevice.Click
     cmdStartStop.Text = "Start"

     Dim wasLive As Boolean = IcImagingControl1.LiveVideoRunning
     If wasLive Then IcImagingControl1.LiveStop()

       IcImagingControl1.ShowDeviceSettingsDialog()

       If IcImagingControl1.DeviceValid Then
           If wasLive Then
             IcImagingControl1.LiveStart()
             cmdStartStop.Text = "Stop"
         End If

         cmdStartStop.Enabled = True
         cmdSettings.Enabled = True
     End If
End Subprivate void cmdDevice_Click(object sender, EventArgs e)
{
cmdStartStop.Text = "Start";
bool wasLive = icImagingControl1.LiveVideoRunning;
if (wasLive)
icImagingControl1.LiveStop();
icImagingControl1.ShowDeviceSettingsDialog();
if (icImagingControl1.DeviceValid)
{
if (wasLive)
{
icImagingControl1.LiveStart();
cmdStartStop.Text = "Stop";
}
cmdStartStop.Enabled = true ;
cmdSettings.Enabled = true ;
}
}Private Sub cmdStartStop_Click(ByVal sender As System.Object,
ByVal e As System.EventArgs) Handles cmdStartStop.Click
With IcImagingControl1
If .LiveVideoRunning Then
.LiveStop()
cmdStartStop.Text = "Start"
Else
.LiveStart()
cmdStartStop.Text = "Stop"
End If
End With
End Subprivate void cmdStartStop_Click(object sender, EventArgs e)
{
if (icImagingControl1.LiveVideoRunning)
{
icImagingControl1.LiveStop();
cmdStartStop.Text = "Start";
}
else
{
icImagingControl1.LiveStart();
cmdStartStop.Text = "Stop";
}
}Private Sub cmdSettings_Click(ByVal sender As System.Object, ByVal e As System.EventArgs)
Handles cmdSettings.Click
If IcImagingControl1.DeviceValid Then
IcImagingControl1.ShowPropertyDialog()
End If
End Subprivate void cmdSettings_Click(object sender, EventArgs e)
{
if (icImagingControl1.DeviceValid)
{
icImagingControl1.ShowPropertyDialog();
}
}プログラムを実行してください。これで画像取り込みデバイスを選択し、ライブ画像が見られるようになったかと思います。
オーバーレイオブジェクトを使用する
IC Imaging Control はライブ画像に図や文字を書き込める特殊なオブジェクトを提供しています。それはOverlayBitmapクラスライブラリリファレンス>クラス>OverlayBitmapと呼ばれるものです。
OverlayBitmapクラスライブラリリファレンス>クラス>OverlayBitmapオブジェクトはbitmapを含んでおり、そのbitmapはビデオフォーマット、もしくはフレームフィルタのサイズと同になります。アプリケーションはテキストや図をこのoverlay bitmap上に描くことができ、それがビデオのの各フレームへコピーされます。ドロップアウトカラーを指定することでoverlay bitmapの特定のピクセルを透明にし、ライブ画像上で表示されないようにすることもできます。
overlay bitmapはICImagingControl.LiveStartクラスライブラリリファレンス>クラス>ICImagingControl>ICImagingControl.LiveStart Methodが呼び出されてから少なくとも一度ビデオフォーマットが変更された時のみ使用することが可能です。ライブ表示中のみ見えるようになっています。
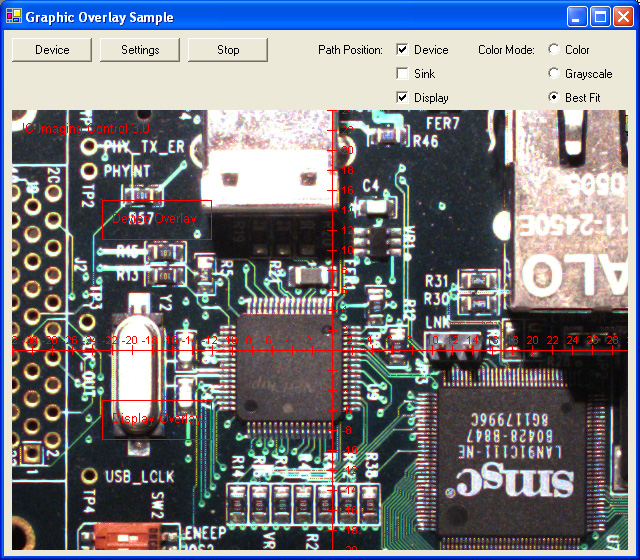
オーバレイの有効、無効化(デバイス、シンク、ディスプレイパス)
IC Imaging Control version 3.0より、オーバーレイを描画する場所として、ライブ画像上、取り込み・録画された画像上、もしくはその両方というように選択可能となっています。
ICImagingControl.OverlayBitmapPositionクラスライブラリリファレンス>クラス>ICImagingControl>ICImagingControl.OverlayBitmapPosition Property を使って PathPositionsクラスライブラリリファレンス>エニュメレーション(列挙)>refenum.PathPositions 値の論理和を設定し、overlay bitmapオブジェクトをどこのパスに挿入するかを指定することができます。
2つの処理を行います: ライブ表示を開始する前にOverlayBitmapPositionクラスライブラリリファレンス>クラス>ICImagingControl>ICImagingControl.OverlayBitmapPosition Property を設定し、どこのパスでoverlayを使用するかを決定します。OverlayBitmap.Enableクラスライブラリリファレンス>クラス>OverlayBitmap>OverlayBitmap.Enable Property はライブ表示中に特定のoverlay bitmapアプリケーションを有効化、無効化します。
OverlayBitmap オブジェクトにアクセスする
3つある OverlayBitmapクラスライブラリリファレンス>クラス>OverlayBitmap オブジェクトのうちの1つにアクセスするには ICImagingControl.OverlayBitmapAtPathクラスライブラリリファレンス>クラス>ICImagingControl>ICImagingControl.OverlayBitmapAtPath Propertyを使います。プロパティのパラメータがアクセスされるOverlayBitmapクラスライブラリリファレンス>クラス>OverlayBitmapの位置を選択します。
ICImagingControl.OverlayBitmapクラスライブラリリファレンス>クラス>ICImagingControl>ICImagingControl.OverlayBitmap Property プロパティがデバイスパス用の OverlayBitmapクラスライブラリリファレンス>クラス>OverlayBitmap を返します。
オーバーレイのセットアップ
プログラムはライブ表示の準備が完了、もしくは開始した状態であればどのoverlay bitmapにも描画することが可能です。先にライブ表示の準備が必要な理由はoverlay bitmapのサイズやカラーフォーマットがフレームフィルタに依存することがあるからです。つまり前もってフォーマットを事前に決めるのは不可能ということです。
ICImagingControl.LivePreparedクラスライブラリリファレンス>クラス>ICImagingControl>ICImagingControl.LivePrepared Method イベントはライブモードの準備が完了した時に起こります。3つのoverlay bitmapに複数の図を描画するイベントハンドラを実装します。
Private Sub IcImagingControl1_LivePrepared(ByVal sender As System.Object,
  ByVal e As System.EventArgs)  Handles IcImagingControl1.LivePrepared

       If IcImagingControl1.DeviceValid Then

       SetupOverlay(IcImagingControl1.OverlayBitmapAtPath(PathPositions.Device))
       SetupOverlay(IcImagingControl1.OverlayBitmapAtPath(PathPositions.Sink))
       SetupOverlay(IcImagingControl1.OverlayBitmapAtPath(PathPositions.Display))

        ' デバイスオーバーレイの座標システムを表示
         DrawCoordinatesystem(IcImagingControl1.OverlayBitmapAtPath(PathPositions.Device))

         ' bitmapファイルをロードしディスプレイオーバーレイに表示
         ShowBitmap(IcImagingControl1.OverlayBitmapAtPath(PathPositions.Display))

         ' オーバーレイ情報ボックスに描画
         DrawOverlayInfo(IcImagingControl1.OverlayBitmapAtPath(PathPositions.Device))
         DrawOverlayInfo(IcImagingControl1.OverlayBitmapAtPath(PathPositions.Sink))
         DrawOverlayInfo(IcImagingControl1.OverlayBitmapAtPath(PathPositions.Display))
     End If
End Subprivate void icImagingControl1_LivePrepared(object sender, EventArgs e)
{
if (icImagingControl1.DeviceValid)
{
if ( (icImagingControl1.OverlayBitmapPosition & PathPositions.Device) != 0 )
{
SetupOverlay(icImagingControl1.OverlayBitmapAtPath[PathPositions.Device]);
// デバイスオーバーレイの座標システムを表示
DrawCoordinatesystem(icImagingControl1.OverlayBitmapAtPath[PathPositions.Device]);
// オーバーレイ情報ボックスに描画
DrawOverlayInfo(icImagingControl1.OverlayBitmapAtPath[PathPositions.Device]);
}
if ((icImagingControl1.OverlayBitmapPosition & PathPositions.Sink) != 0)
{
SetupOverlay(icImagingControl1.OverlayBitmapAtPath[PathPositions.Sink]);
// オーバーレイ情報ボックスに描画
DrawOverlayInfo(icImagingControl1.OverlayBitmapAtPath[PathPositions.Sink]);
}
if ((icImagingControl1.OverlayBitmapPosition & PathPositions.Display) != 0)
{
SetupOverlay(icImagingControl1.OverlayBitmapAtPath[PathPositions.Display]);
// ビットマップファイルをロードしディスプレイオーバーレイに表示
ShowBitmap(icImagingControl1.OverlayBitmapAtPath[PathPositions.Display]);
// オーバーレイ情報ボックスに描画
DrawOverlayInfo(icImagingControl1.OverlayBitmapAtPath[PathPositions.Display]);
}
}SetupOverlayサブ関数はライブモードが開始された後に呼び出され、3つのオーバーレイを初期化します。
Private Sub SetupOverlay(ByVal ob As TIS.Imaging.OverlayBitmap)

     ' overlay bitmap を有効化し描画可能にする
     ob.Enable = True

     ' Magenta(マゼンタ)をドロップアウトカラーとする
     ob.DropOutColor = Color.Magenta

     ' overlay bitmap をドロップアウトカラーで塗りつぶす
     ob.Fill(ob.DropOutColor)

     Dim OldFont As Font = ob.Font
     ob.Font = New Font("Arial", 10)

     ' テキストを赤色で描く
     ob.FontTransparent = True
     ob.DrawText(Color.Red, 10, 10, "IC Imaging Control 3.3")

     ob.Font = OldFont
End Subprivate void SetupOverlay( TIS.Imaging.OverlayBitmap ob )
{
// overlay bitmap を有効化し描画可能にする
ob.Enable = true ;
// Magenta(マゼンタ)をドロップアウトカラーとする
ob.DropOutColor = Color.Magenta;
// overlay bitmap をドロップアウトカラーで塗りつぶす
ob.Fill( ob.DropOutColor );
// テキストを赤色で描く
ob.FontTransparent = true ;
ob.DrawText( Color.Red, 10, 10, "IC Imaging Control 3.3" );
}オーバーレイはOverlayBitmap.Enableクラスライブラリリファレンス>クラス>OverlayBitmap>OverlayBitmap.Enable Propertyを呼び出すことで有効になります。そしてテキストがbitmapの左上の隅に表示されます。サブ関数はドロップアウトカラーも設定します。
ドロップアウトカラー
OverlayBitmap オブジェクトのOverlayBitmap.DropOutColorクラスライブラリリファレンス>クラス>OverlayBitmap>OverlayBitmap.DropOutColor Property プロパティはライブ画像上のどの色を透明にするかを決めます。 ドロップアウトカラーを持つピクセルは全てライブ画像にはコピーされなくなります。ドロップアウトカラーは Visual Basic のRGB 関数で設定できます。デフォルトでは黒に設定されているため、上にあるようにテキストの背景は透明になっています。OverlayBitmapオブジェクトのFontBackColorクラスライブラリリファレンス>クラス>OverlayBitmap>OverlayBitmap.FontBackColor Property プロパティもデフォルトでは黒に設定されています。
オーバーレイで黒を使えるようにするには OverlayBitmap.DropOutColorクラスライブラリリファレンス>クラス>OverlayBitmap>OverlayBitmap.DropOutColor Property を別の色に設定します。例としてマゼンタにするとしますRGB(255,0,255) 。アプリケーションを開始すると黒い画面とテキストのみが表示されるようになります。画面が黒くなるのはoverlay bitmapの色が黒でドロップアウトカラーはマゼンタに変更されたからです。よって背景を透明にするためにはoverlay bitmapの色をマゼンタで塗りつぶさなければなりません。OverlayBitmap.Fillクラスライブラリリファレンス>クラス>OverlayBitmap>OverlayBitmap.Fill Method メソッドがこの機能を果たします。ドロップアウトカラーが変更されると、テキストの背景は黒い長方形として見えるようになります。これを見えないようにするためには、プロパティOverlayBitmap.FontTransparentクラスライブラリリファレンス>クラス>OverlayBitmap>OverlayBitmap.FontTransparent Property をTrueに設定します。
座標面を描く
次のステップでは線とラベルで構成される座標面を描きます。これにはOverlayBitmapオブジェクトにあるDrawLineクラスライブラリリファレンス>クラス>OverlayBitmap>OverlayBitmap.DrawLine Method と DrawTextクラスライブラリリファレンス>クラス>OverlayBitmap>OverlayBitmap.DrawText Method メソッドを使用します。また、ラベルに使用する文字のフォントの変更も行いたいと思います。
では新しいサブ関数、DrawCoordinatesystemを実装します。ラベルのフォントには8 dpi のArialを使用したいので、新しいStdFontオブジェクトであるFontを作成しなければなりません。このオブジェクトは名前、サイズ、他の属性を決定するフォントプロパティを持っています。フォントを変更する前には現在のフォント設定を保存しておき、座標面が完成した後に復元できるようにしておきましょう。
OverlayBitmapオブジェクトのFontクラスライブラリリファレンス>クラス>OverlayBitmap>OverlayBitmap.Font PropertyプロパティはStdFont オブジェクトを受け取ります。これで新しいフォントが以下のOverlayBitmap.DrawTextクラスライブラリリファレンス>クラス>OverlayBitmap>OverlayBitmap.DrawText Methodの呼び出し の際に使えます。
完成した座標面を描くサブ関数は以下の通り実装されます。
Private Sub DrawCoordinatesystem(ByVal ob As TIS.Imaging.OverlayBitmap)

     ' 画像の中心を算出する
     Dim Col As Integer = IcImagingControl1.ImageWidth / 2
     Dim Row As Integer = IcImagingControl1.ImageHeight / 2

     Dim OldFont As Font = ob.Font
     ob.Font = New Font("Arial", 8)

     ob.DrawLine(Color.Red, Col, 0, Col, IcImagingControl1.ImageHeight)
     ob.DrawLine(Color.Red, 0, Row, IcImagingControl1.ImageWidth, Row)

     Dim i As Integer
     For i = 0 To Row Step 20
         ob.DrawLine(Color.Red, Col - 5, Row - i, Col + 5, Row - i)
         ob.DrawLine(Color.Red, Col - 5, Row + i, Col + 5, Row + i)
         If i > 0 Then
             ob.DrawText(Color.Red, Col + 10, Row - i - 7, i / 10)
             ob.DrawText(Color.Red, Col + 10, Row + i - 7, -i / 10)
         End If
     Next

     For i = 0 To Col Step 20
         ob.DrawLine(Color.Red, Col - i, Row - 5, Col - i, Row + 5)
         ob.DrawLine(Color.Red, Col + i, Row - 5, Col + i, Row + 5)
         If i > 0 Then
             ob.DrawText(Color.Red, Col + i - 5, Row - 17, i / 10)
             ob.DrawText(Color.Red, Col - i - 10, Row - 17, -i / 10)
         End If
     Next
     ob.Font = OldFont
End Subprivate void DrawCoordinatesystem(TIS.Imaging.OverlayBitmap ob)
{
// 画像の中心を算出する
int Col = icImagingControl1.ImageWidth / 2;
int Row = icImagingControl1.ImageHeight / 2;
Font OldFont = ob.Font;
ob.Font = new Font("Arial", 8);
ob.DrawLine(Color.Red, Col, 0, Col, icImagingControl1.ImageHeight);
ob.DrawLine(Color.Red, 0, Row, icImagingControl1.ImageWidth, Row);
for (int i = 0; i < Row; i += 20)
{
ob.DrawLine(Color.Red, Col - 5, Row - i, Col + 5, Row - i);
ob.DrawLine(Color.Red, Col - 5, Row + i, Col + 5, Row + i);
if (i > 0)
{
ob.DrawText(Color.Red, Col + 10, Row - i - 7, string.Format("{0}", i / 10));
ob.DrawText(Color.Red, Col + 10, Row + i - 7, string.Format("{0}", -i / 10));
}
}
for (int i = 0; i < Col; i += 20)
{
ob.DrawLine(Color.Red, Col - i, Row - 5, Col - i, Row + 5);
ob.DrawLine(Color.Red, Col + i, Row - 5, Col + i, Row + 5);
if (i > 0)
{
ob.DrawText(Color.Red, Col + i - 5, Row - 17, string.Format("{0}", i / 10));
ob.DrawText(Color.Red, Col - i - 10, Row - 17, string.Format("{0}", -i / 10));
}
}
ob.Font = OldFont;
}現在の時刻を表示させる
ライブ画像上で現在の時刻を表示させるには、フォームにタイマーを挿入します。デフォルトではtimer1 となっているもので、プロパティウィンドウでその間隔は1000ミリ秒まで設定されています。タイマーイベントハンドラはTimer1_timerというサブ関数です。 時刻は画面の右下に黒の背景に白のフォントで表示されます。それも独自でフォントを持っているので、上記の通りStdFont オブジェクトを作成して使用しなければなりません。プロパティ OverlayBitmap.FontTransparentクラスライブラリリファレンス>クラス>OverlayBitmap>OverlayBitmap.FontTransparent PropertyはFalseに設定されており、 OverlayBitmap.FontBackColorクラスライブラリリファレンス>クラス>OverlayBitmap>OverlayBitmap.FontBackColor Property は黒(RGB 0 0 0)となっております。
Private Sub Timer1_Tick(ByVal sender As System.Object, ByVal e As System.EventArgs) Handles Timer1.Tick
     Dim ob = IcImagingControl1.OverlayBitmap

      If IcImagingControl1.LiveVideoRunning Then
         Dim OldFont As Font = ob.Font
         ob.Font = New Font("Arial", 14, FontStyle.Bold)

         ' 画像の左下に時間を表示させる
         Dim Col As Integer = IcImagingControl1.ImageWidth - 81
         Dim Row As Integer = IcImagingControl1.ImageHeight - 20

         ' 背景の色と描画モードのセットアップ
         ob.FontTransparent = False
         ob.FontBackColor = Color.Black

         ' テキストを白色で描く
         ob.DrawText(Color.White, Col, Row, DateTime.Now.ToString("T"))

         ' フォントと描画モードのリセット
         ob.FontTransparent = True
         ob.Font = OldFont
     End If
End Subprivate void timer1_Tick(object sender, EventArgs e)
{
TIS.Imaging.OverlayBitmap ob = icImagingControl1.OverlayBitmapAtPath[TIS.Imaging.PathPositions.Device];
if (icImagingControl1.LiveVideoRunning)
{
// 現在のフォントを保存
Font OldFont = ob.Font;
ob.Font = new Font("Arial", 14, FontStyle.Bold);
// 画像の左下に時間を表示させる
int Col = icImagingControl1.ImageWidth - 81;
int Row = icImagingControl1.ImageHeight - 20;
// 背景の色と描画モードをセットアップ
ob.FontTransparent = false;
ob.FontBackColor = Color.Black;
// 現在の時刻を白色で表示させる
ob.DrawText(Color.White, Col, Row, DateTime.Now.ToString("T"));
// 前に使用していたフォントの呼び出し
ob.Font = OldFont;
}
}OverlayUpdate イベント
IC Imaging ControlはOverlayUpdateクラスライブラリリファレンス>クラス>ICImagingControl>ICImagingControl.OverlayUpdate Event イベントを提供しています。このイベントは画像取り込みデバイスより新しいフレームが転送された後に呼び出されます。 よってフレームカウンターのようにフレームごとに違う情報を挿入することが可能となります。例にあるOverlayUpdateクラスライブラリリファレンス>クラス>ICImagingControl>ICImagingControl.OverlayUpdate Event サブ関数は変数FrameCountでフレーム数をカウントします。これは三角形 のゲージを描くのに使用されます。 もしカウンターが25を超えた場合、0にリセットされ三角形が消去されます。よって同じサイズで単一色の長方形をその三角形の上から描画するのであれば、その長方形の色はDropOutColorクラスライブラリリファレンス>クラス>OverlayBitmap>OverlayBitmap.DropOutColor Propertyとして設定し、透過させなければなりません。DrawSolidRectクラスライブラリリファレンス>クラス>OverlayBitmap>OverlayBitmap.DrawSolidRect Method メソッドがこの機能を提供します。
OverlayUpdateクラスライブラリリファレンス>クラス>ICImagingControl>ICImagingControl.OverlayUpdate Event イベントハンドラは次の通り実装されます。
Private Sub IcImagingControl1_OverlayUpdate(ByVal sender As System.Object,
  ByVal e As TIS.Imaging.ICImagingControl.OverlayUpdateEventArgs) Handles IcImagingControl1.OverlayUpdate
    Dim ob As TIS.Imaging.OverlayBitmap = e.overlay

    Dim lineIndex As Integer = Sink.FrameCount Mod 25

     If lineIndex = 0 Then
         ' 三角形を消去する
         ob.DrawSolidRect(ob.DropOutColor, 10, _
                                       IcImagingControl1.ImageHeight - 70, _
                                       62, _
                                       IcImagingControl1.ImageHeight - 9)
     End If

     ' 新しい三角形の線を引く
     ob.DrawLine(Color.Yellow, lineIndex * 2 + 10, _
                                 IcImagingControl1.ImageHeight - 10, _
                                 lineIndex * 2 + 10, _
                                 IcImagingControl1.ImageHeight - 10 - lineIndex)

     ' 現在のフレームナンバーを表示

     ' 背景色をドロップアウトカラーに設定し、
     ' フォントは非透明にする
     ob.FontBackColor = ob.DropOutColor
     ob.FontTransparent = False

     ' 現在のフォント設定を保存する
     Dim OldFont As Font = ob.Font

     ' 新しく作成したフォントを設定する
     ob.Font = New Font("Arial", 8)

     ' テキストを描く
     ob.DrawText(Color.Yellow, 70, IcImagingControl1.ImageHeight - 19, Str(FrameCount) + "  ")

     ' 前に使用したフォントを呼び出す
     ob.Font = OldFont
End Subprivate void icImagingControl1_OverlayUpdate(object sender,
TIS.Imaging.ICImagingControl.OverlayUpdateEventArgs e)
{
TIS.Imaging.OverlayBitmap ob = e.overlay;
int lineIndex = m_sink.FrameCount % 25;
if (lineIndex == 0) {
m_frameCount = 0;
ob.DrawSolidRect(ob.DropOutColor, 10, icImagingControl1.ImageHeight - 70, 62,
icImagingControl1.ImageHeight - 9);
}
ob.DrawLine(Color.Yellow, lineIndex * 2 + 10,
icImagingControl1.ImageHeight - 10,
lineIndex * 2 + 10,
icImagingControl1.ImageHeight - 10 - lineIndex);
// 現在のフレームナンバーを表示
// 背景色をドロップアウトカラーに設定し、
// フォントは非透明にする
ob.FontBackColor = ob.DropOutColor;
ob.FontTransparent = false;
// 現在のフォント設定を保存する
Font OldFont = ob.Font;
// テキストを描く
ob.Font = new Font("Arial", 8);
ob.DrawText(Color.Yellow, 70, icImagingControl1.ImageHeight - 19,
m_frameCount.ToString());
// 前に使用したフォントを呼び出す
ob.Font = OldFont;
}Visual Basic .NET と C#のGraphics関数
overlay bitmapにどのようにビットマップ画像を描画するかを実演するために新しいサブ関数 ShowBitmap を実装します。OverlayBitmap.GetGraphicsrクラスライブラリリファレンス>クラス>OverlayBitmap>OverlayBitmap.GetGraphics Method メソッドを使って.NET Graphics オブジェクトを呼び出し、overlay bitmap上に描画することを可能にします。
Private Sub ShowBitmap(ByVal ob As TIS.Imaging.OverlayBitmap)

      Try
        ' サンプルのビットマップをアプリケーションのディレクトリからロードする
        Dim TheBitmap As Image = Bitmap.FromFile(Application.StartupPath & "\..\..\hardware.bmp")

         ' 縦の列を計算してビットマップを
         ' Imaging Controlウィンドウの右上のコーナーに表示する
        Dim Col As Integer = IcImagingControl1.ImageWidth - 5 - TheBitmap.Width

         'OverlayBitmapのGraphicsオブジェクトを呼び出す
         Dim g As Graphics = ob.GetGraphics()

         g.DrawImage(TheBitmap, Col, 5)

          ' 描画が完了次第、Graphicsオブジェクトを開放する
         ob.ReleaseGraphics(g)

     Catch Ex As System.Exception
         MsgBox("File not found: " + Ex.Message, MsgBoxStyle.Information, "ShowBitmap")
     End Try
End Subprivate void ShowBitmap(TIS.Imaging.OverlayBitmap ob)
{
try
{
//サンプルのビットマップをプロジェクトファイルのディレクトリからロードする
Image bmp = Bitmap.FromFile(Application.StartupPath + @"\..\..\hardware.bmp");
// 縦の列を計算してビットマップを
// Imaging Controlウィンドウの右上のコーナーに表示する
int col = icImagingControl1.ImageWidth - 5 - bmp.Width;
// OverlayBitmapのGraphicsオブジェクトを呼び出す
Graphics g = ob.GetGraphics();
// 画像を描画する
g.DrawImage(bmp, col, 5);
// 描画が完了次第、Graphicsオブジェクトを開放する
ob.ReleaseGraphics(g);
}
catch (Exception Ex)
{
MessageBox.Show("File not found: " + Ex.Message);
}
}オーバーレイのパスの位置を設定する
サンプルプログラムを使えば3つのoverlay bitmapのうちどれをライブ画像上に描画するかをコントロールすることができます。パスの位置クラスライブラリリファレンス>エニュメレーション(列挙)>refenum.PathPositionsを変更をするために、以下のヘルパーサブ関数が使用されます。
Private Sub ShowBitmap(ByVal ob As TIS.Imaging.OverlayBitmap)

     Try
         ' サンプルのビットマップをプロジェクトファイルのディレクトリからロードする
        Dim TheBitmap As Image = Bitmap.FromFile(Application.StartupPath & "\..\..\hardware.bmp")

         ' 縦の列を計算してビットマップを
         ' Imaging Controlウィンドウの右上のコーナーに表示する
         Dim Col As Integer = IcImagingControl1.ImageWidth - 5 - TheBitmap.Width

         'OverlayBitmapのGraphicsオブジェクトを呼び出す
         Dim g As Graphics = ob.GetGraphics()

          g.DrawImage(TheBitmap, Col, 5)

         ' 描画が完了次第、Graphicsオブジェクトを開放する
         ob.ReleaseGraphics(g)

     Catch Ex As System.Exception
         MsgBox("File not found: " + Ex.Message, MsgBoxStyle.Information, "ShowBitmap")
     End Try
End Subprivate void EnableOverlayBitmapAtPath(PathPositions pos, bool enabled)
{
bool wasLive = icImagingControl1.LiveVideoRunning;
if (wasLive)
icImagingControl1.LiveStop();
PathPositions oldPos = icImagingControl1.OverlayBitmapPosition;
if (enabled)
icImagingControl1.OverlayBitmapPosition = oldPos | pos;
else
icImagingControl1.OverlayBitmapPosition = oldPos & ~pos;
if (wasLive)
icImagingControl1.LiveStart();
}オーバーレイのカラーモードを設定する
アプリケーションはオーバーレイをグレースケールかカラーのどちらで表示するかを選択できます。OverlayBitmap.ColorModeクラスライブラリリファレンス>クラス>OverlayBitmap>OverlayBitmap.ColorMode Property プロパティを使って下のいずれかのカラーモードを選択します。
- OverlayBitmap.OverlayColorModes.BestFit
overlay bitmapフォーマットは画像ストリームに合わせて最適なものが選択されます。 - OverlayBitmap.OverlayColorModes.Color
カラーのoverlay bitmap フォーマットです。オーバレイにカラーの線やテキストを描くことができます。 - OverlayBitmap.OverlayColorModes.Grayscale
グレースケールのoverlay bitmap フォーマットです。線やテキストはグレースケールでしか描けません。
画像データストリームがoverlay bitmap カラーモードに対応しない時には、その画像データは自動的に変換されます。